


How it works?
This is a quick guide to our products. Just the essentials—first steps, answers to FAQs, and practical tips to help you go from idea to results in minutes.
![]() Board Assistant
Board Assistant
 Cross-Boards Dashboards
- Activation Check
After installing the Power-Up, open the Power-Ups menu on your Trello board. Make sure that Board Assistant appears in the list of enabled Power-Ups and has a green toggle (enabled state).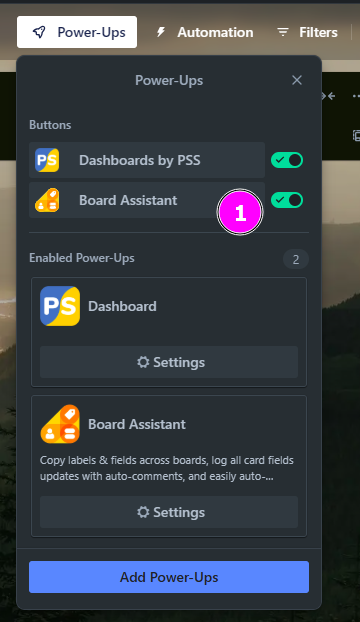
- Authorization
Locate the Board Assistant button in the top Trello panel and click it to launch the app. In the window that opens, review the Terms of Use and Privacy Policy, check the agreement box, and click Sign in to proceed with authorization.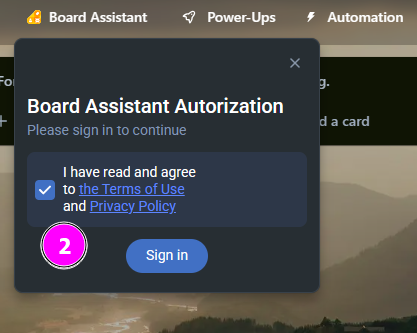
- Granting Access
In the Trello authorization window, click Allow to grant Board Assistant access to your boards and workspaces. This access is required for proper automation and functionality.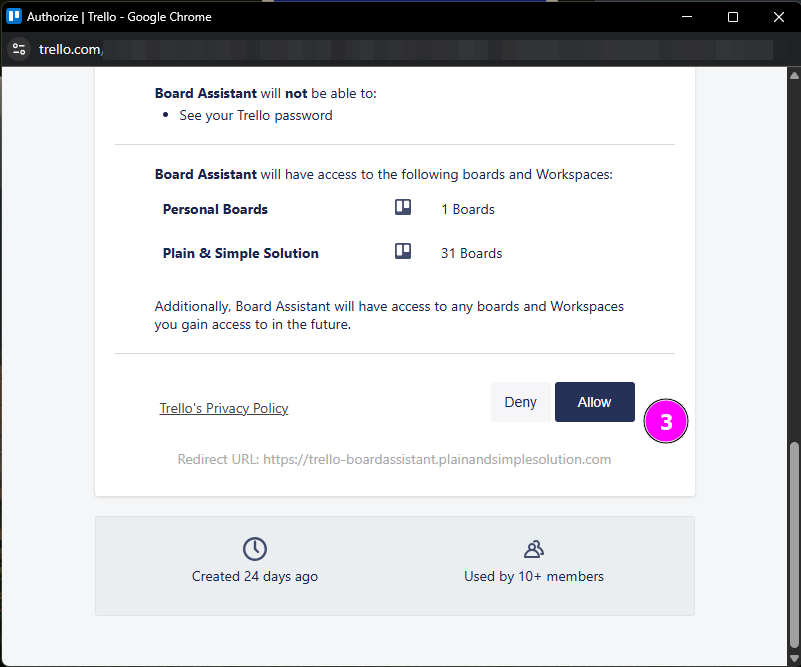
- Selecting a Subscription Plan
After authorization, the subscription plans page will appear.
Choose the Free plan (up to 2 boards) or another plan that best fits your needs.
Click Subscribe to activate the selected plan.
🔔 Note: The free plan will be unavailable if someone else in your workspace has already activated it or is using a paid plan.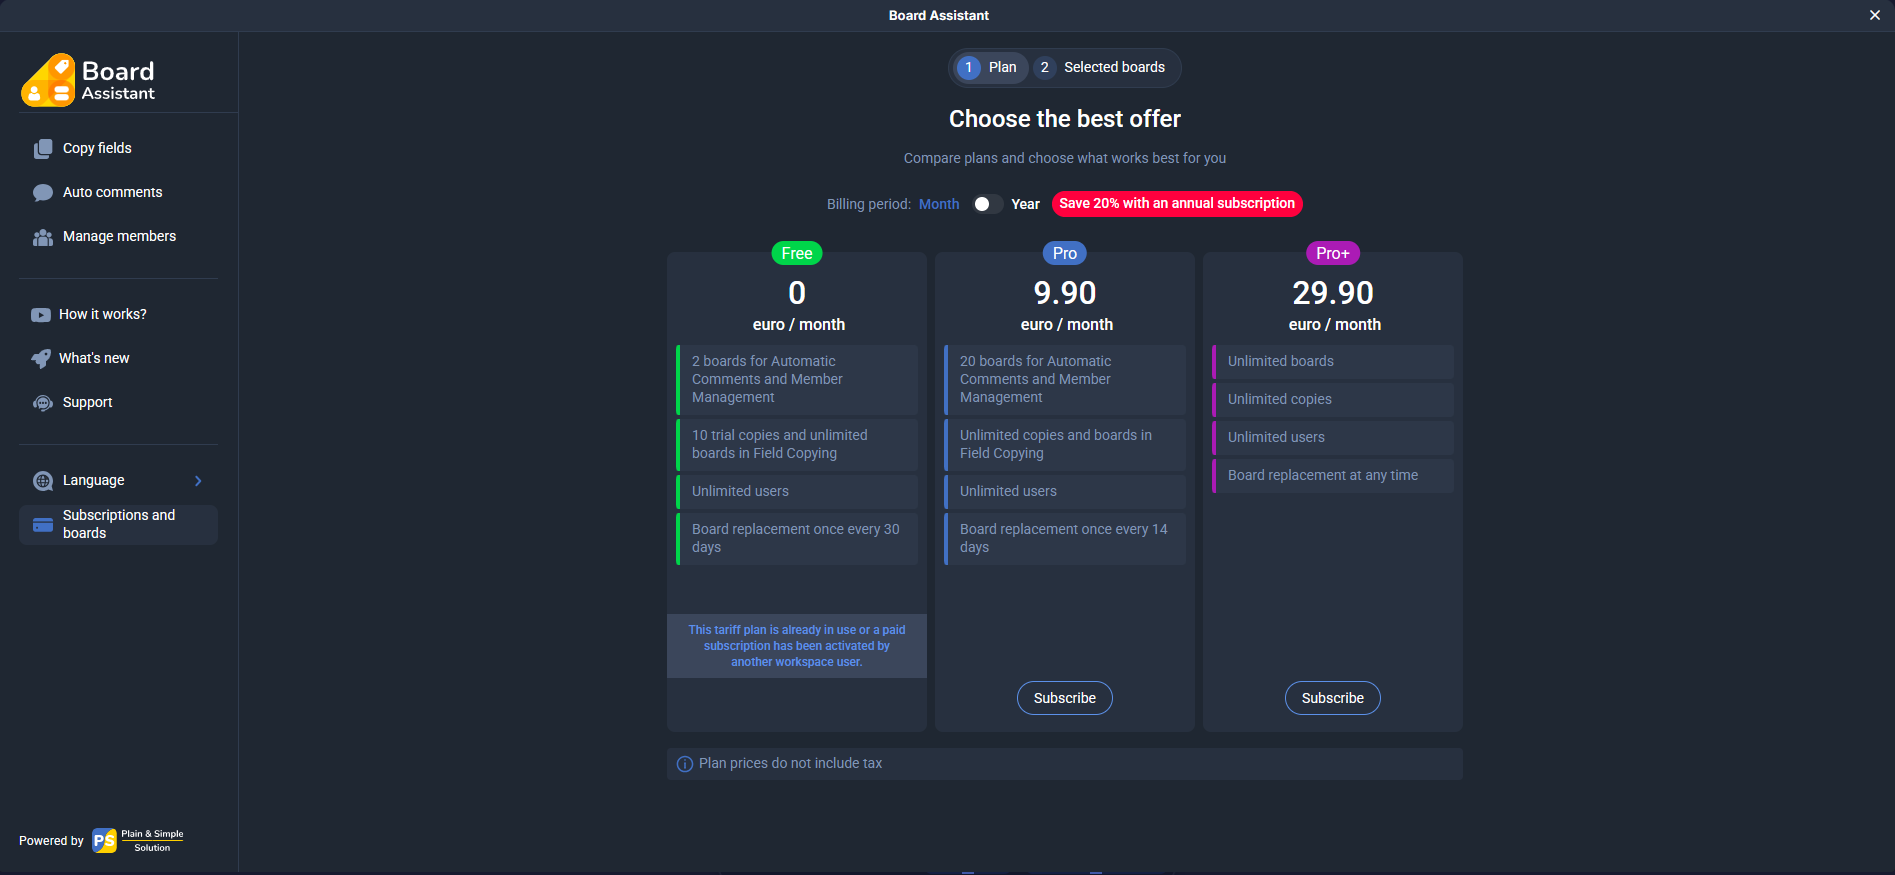
- Selecting Boards
Once your subscription is active, open the Selected boards tab, select the boards you want to use with Board Assistant, and click Save.
Board selection can be changed once every 30 days, starting from when you select the first board.You don’t have to select all available boards immediately — add them as needed at any time.Boards selected by other members of your workspace are marked with their profile icons. You can use these boards for free.If someone removes a board from their plan, you will lose access. You can add such boards to your own plan to keep using them.
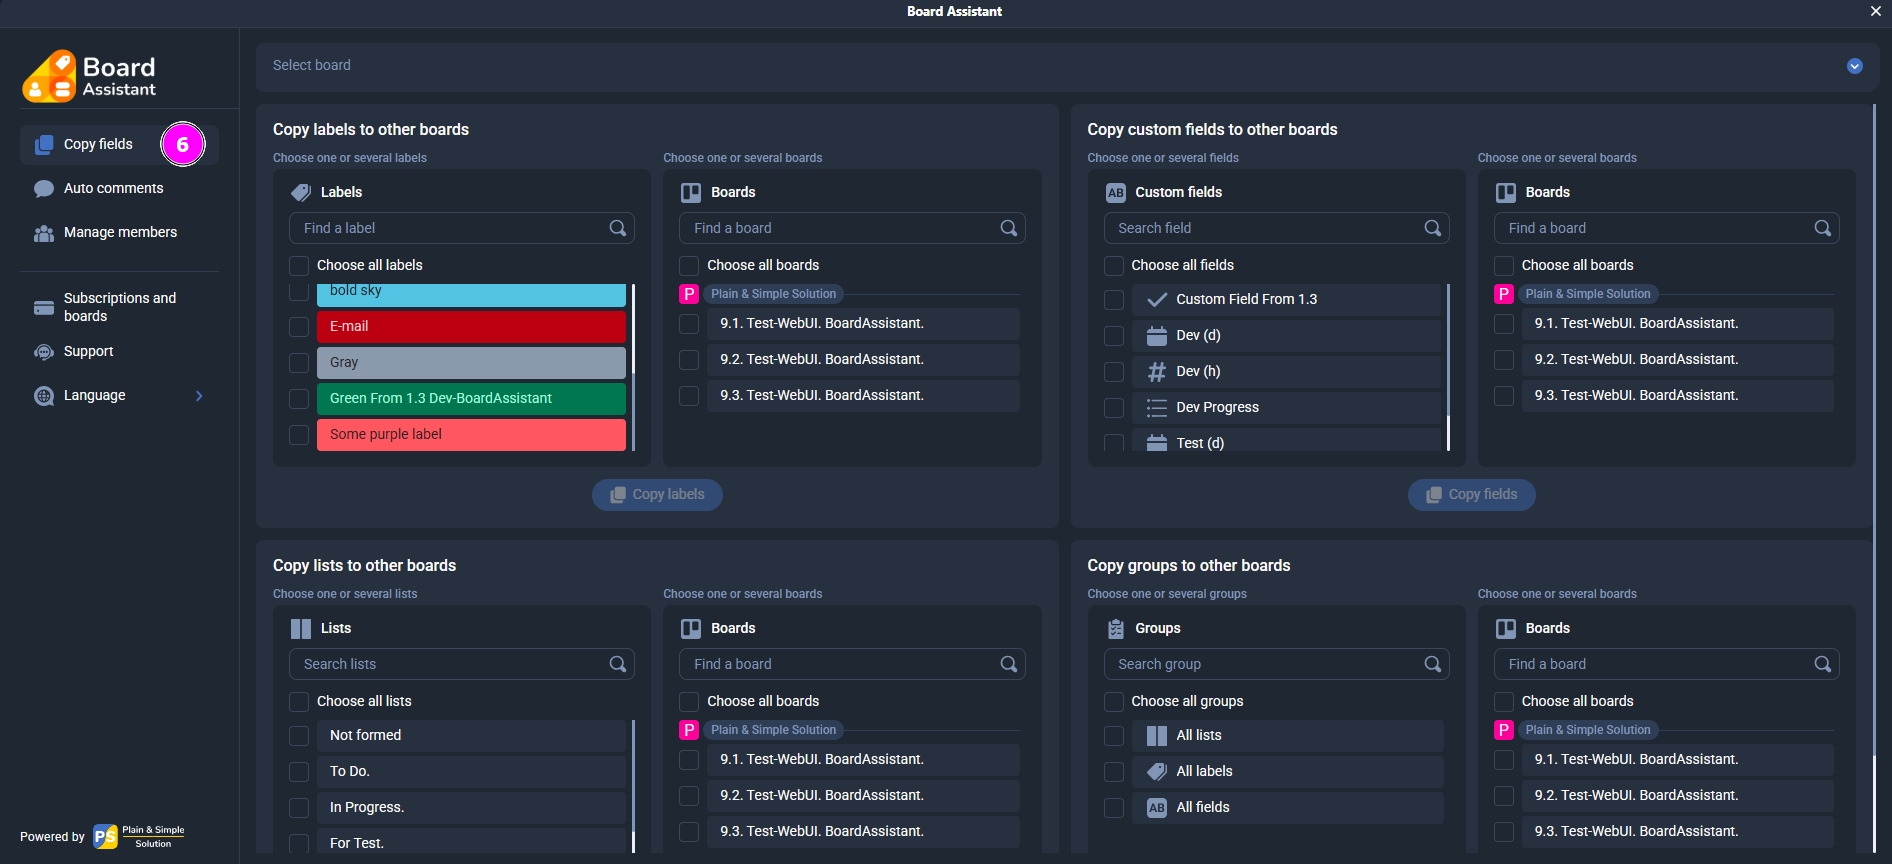
- Copying Fields
In the Copy fields section, you can quickly transfer structure between boards:- Labels
- Custom fields
- Lists
- Groups of elements (all labels, fields, and lists at once)
To copy data:
- Select the source board (from the dropdown list above).
- Mark the items you want to copy in the appropriate block.
- Select the destination boards.
- Click the Copy button.
⚠️ If the selected boards already contain the same items, duplicates will be skipped — only new items will be copied.
- Auto Comments
In the Auto comments section, you can enable automatic logging of changes on cards for the selected board. This is especially useful for teams that need to track who made changes and when.
Once enabled, Board Assistant will automatically post comments to cards when the following changes occur:- Label changes
- Checklist changes
- Date changes
- Custom field changes
Comments are created on behalf of the user who made the change.
The comment format is clear and shows the old and new value. For example:
The value of the custom field "Test (d)" was changed from 06/17/2025 09:00 to 06/18/2025 09:00
This allows you to view all changes without manually checking fields or activity logs.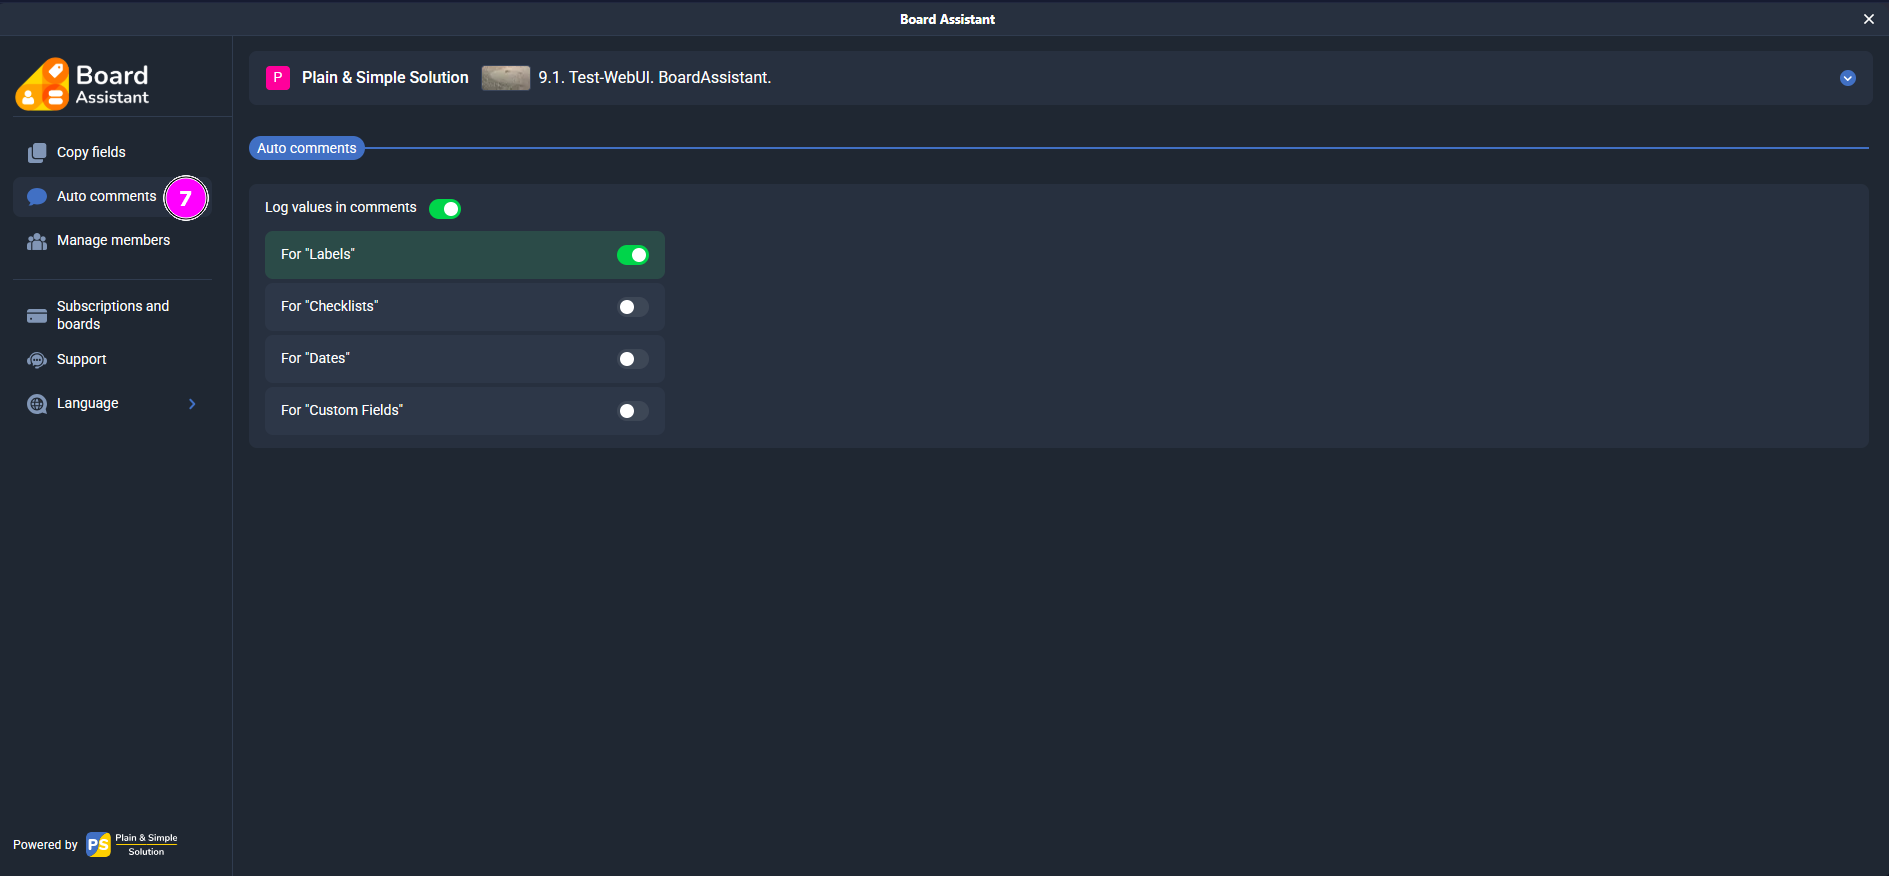
- Automatic Member Management
In the Manage members section, you can configure automatic assignment or adjustment of members when a card is moved into a specific list.
What you can configure:- Action type — select from a dropdown menu:
- Without Change — do not modify members
- Remove All Members — remove all members
- Replace Members — replace existing members with new ones
- Add Members — add new members to existing ones
- Remove Members — selectively remove specified members
- Members — select one or multiple users per list.
- Show in the card — allows editing these settings directly from the card. If disabled, the rule still works but can’t be modified from the card.
- Hide member from selection — hides a user from the in-card member list without deactivating the rule.
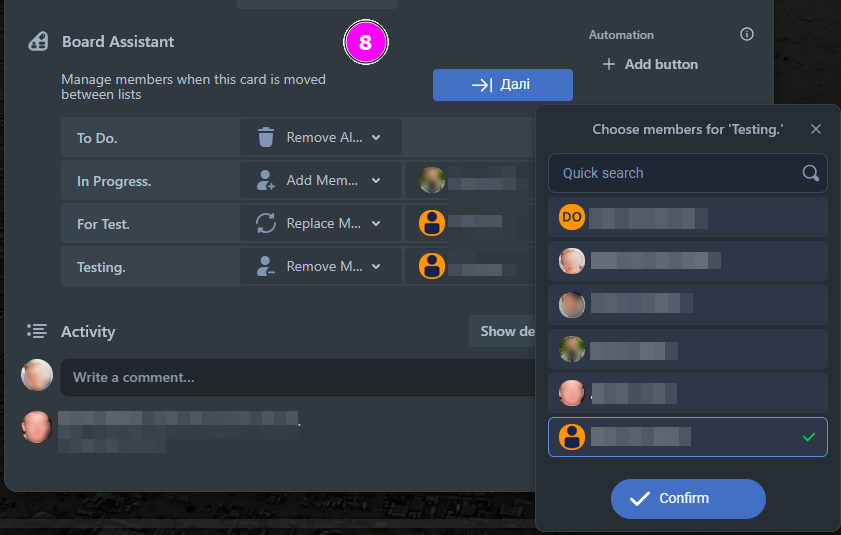
Card-level settings
In each card, you can override the automatic member management scenario defined at the list level. This is useful when a specific card requires a different action than the default for the entire list.How to do it:
- Open the card.
- Find the Board Assistant section (displayed below the description or above the activity feed).
- You will see the current settings — the selected action (type of member management) and the assigned members.
- Update these settings as needed for that specific card.
- Changes are saved automatically and apply only to that card — regardless of the list’s global rules.
⬆️ Priority: Card-level settings have higher priority than global list rules. This means that even if the card is moved to a list with an active rule, the local card rule will apply if it has been set.
Example 1: Override the default rule
The default rule in the “To Do” list is:
Action: Replace Members, Members: Mark, Mary
However, for the card “Urgent task”, you want only John to be assigned.
You open the card, go to the Board Assistant, and change the action to:
Replace Members, Member: John
➡️ As a result, when this card enters the “To Do” list, it will only assign John — not Mark and Mary.Example 2: Disable the list rule
The global rule for the “Pending” list is:
Remove All Members
But the card “Legal approval” should keep its current members.
In the Board Assistant section of the card, you change the action to:
Without Change
➡️ This way, when the card is moved to that list, it won’t lose its members.Thanks to card-level rules, you can build flexible exceptions that let you tailor workflows not only by list, but also per individual card.
Next list button
Add the “Next list” button to a card to move it to the next list in one click. You can use the default label or assign your own (up to 16 characters).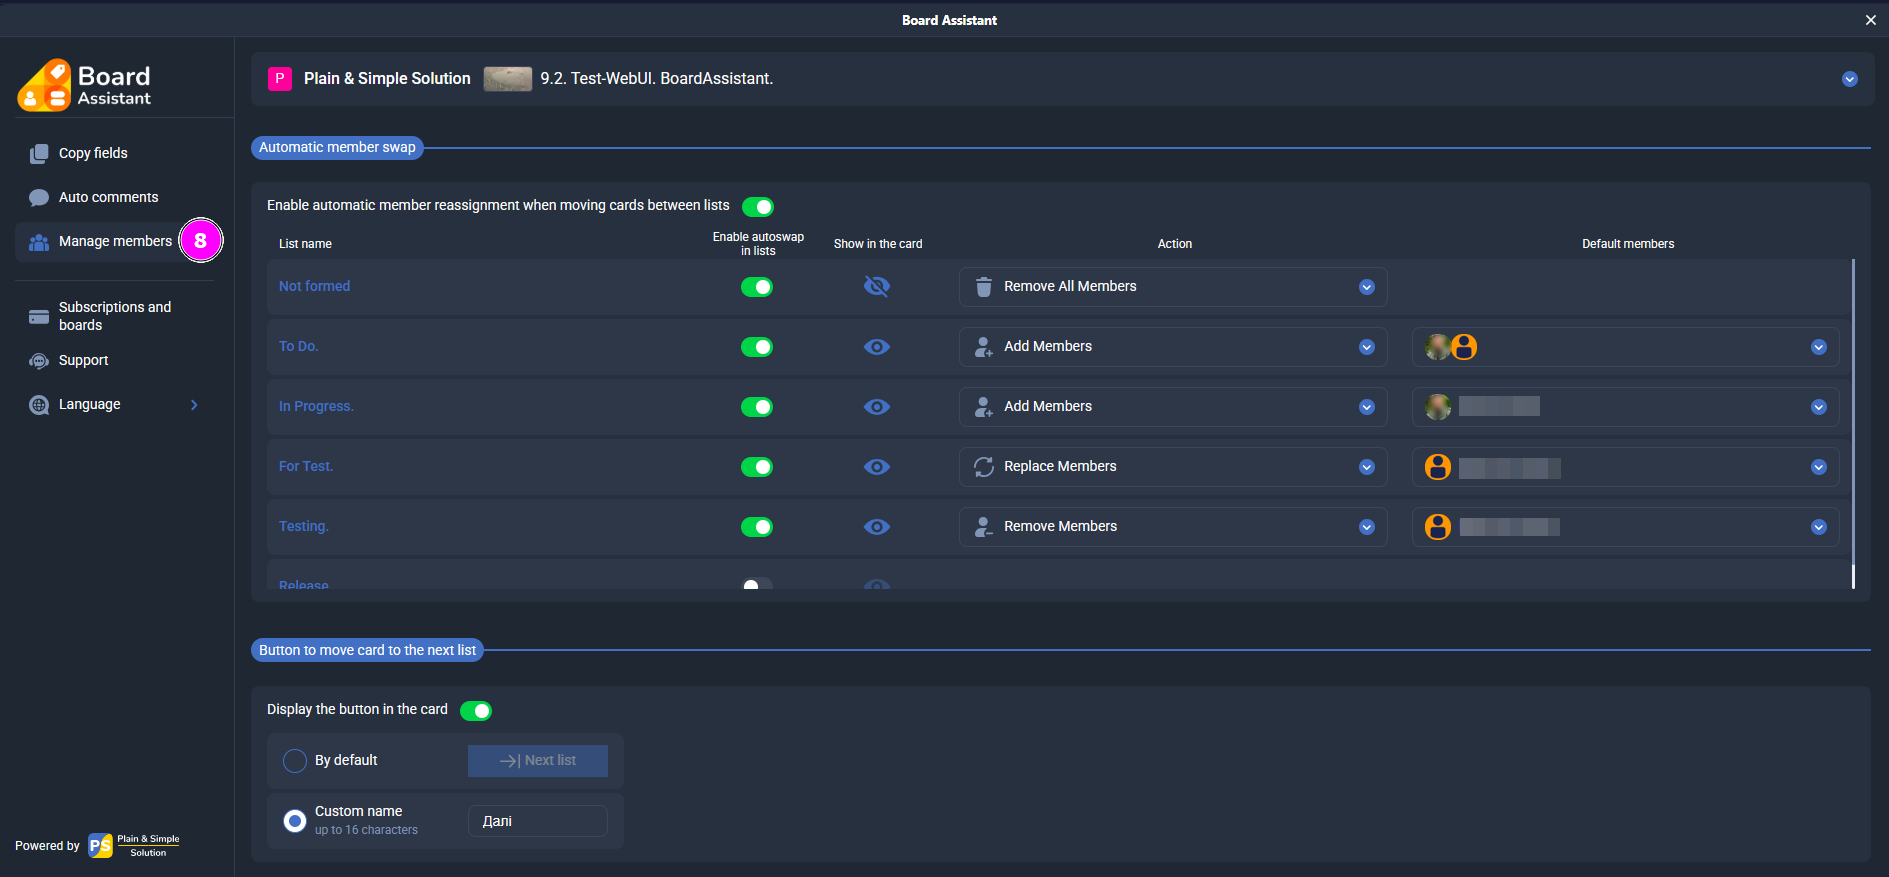
- Action type — select from a dropdown menu:
- Activation Check
After installing the Power-Up, open the Power-Ups menu on your Trello board. Make sure that Cross-Boards Dashboards appears in the list of enabled Power-Ups and has a green toggle (enabled state).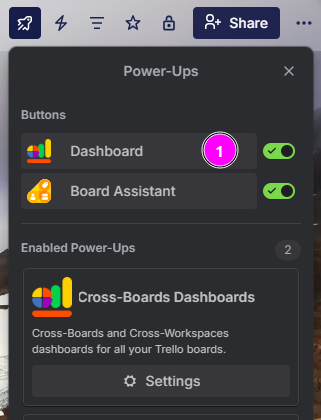
- Authorization
Locate the Cross-Boards Dashboards button in the top Trello panel and click it to launch the app. In the window that opens, review the Terms of Use and Privacy Policy, check the agreement box, and click Sign in to proceed with authorization.
- Granting Access
In the Trello authorization window, click Allow to grant Cross-Boards Dashboards access to your boards and workspaces. This access is required for proper functionality.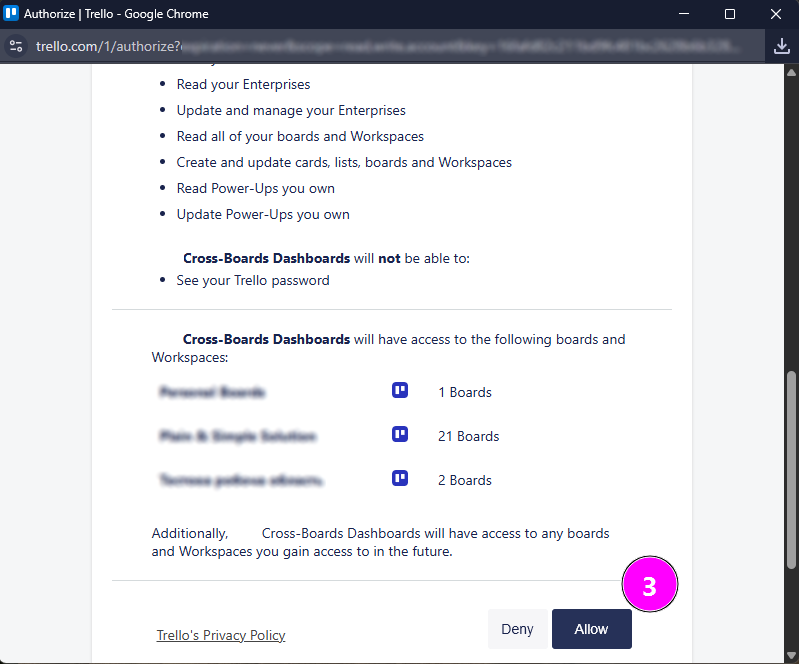
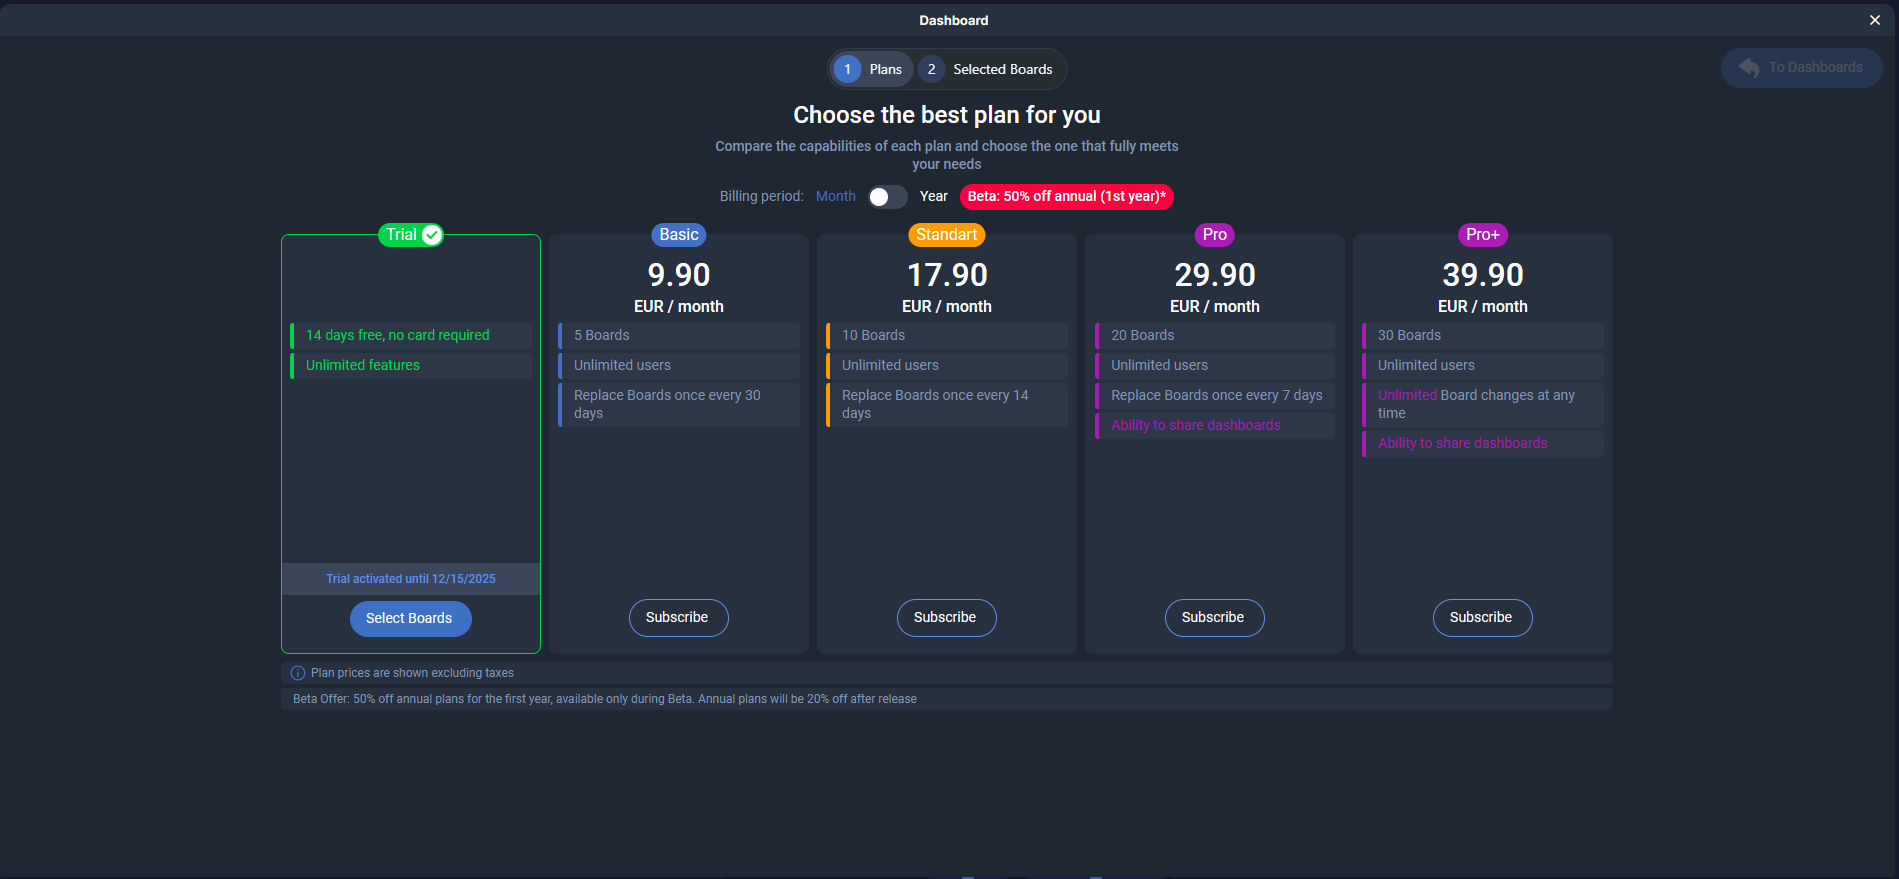
- Choose a subscription plan
After you authorize, the pricing plans page will open and a 14-day free trial will be activated for you automatically.
Click “Select boards” to go to the Trello boards selection, or activate the subscription plan you need right away.
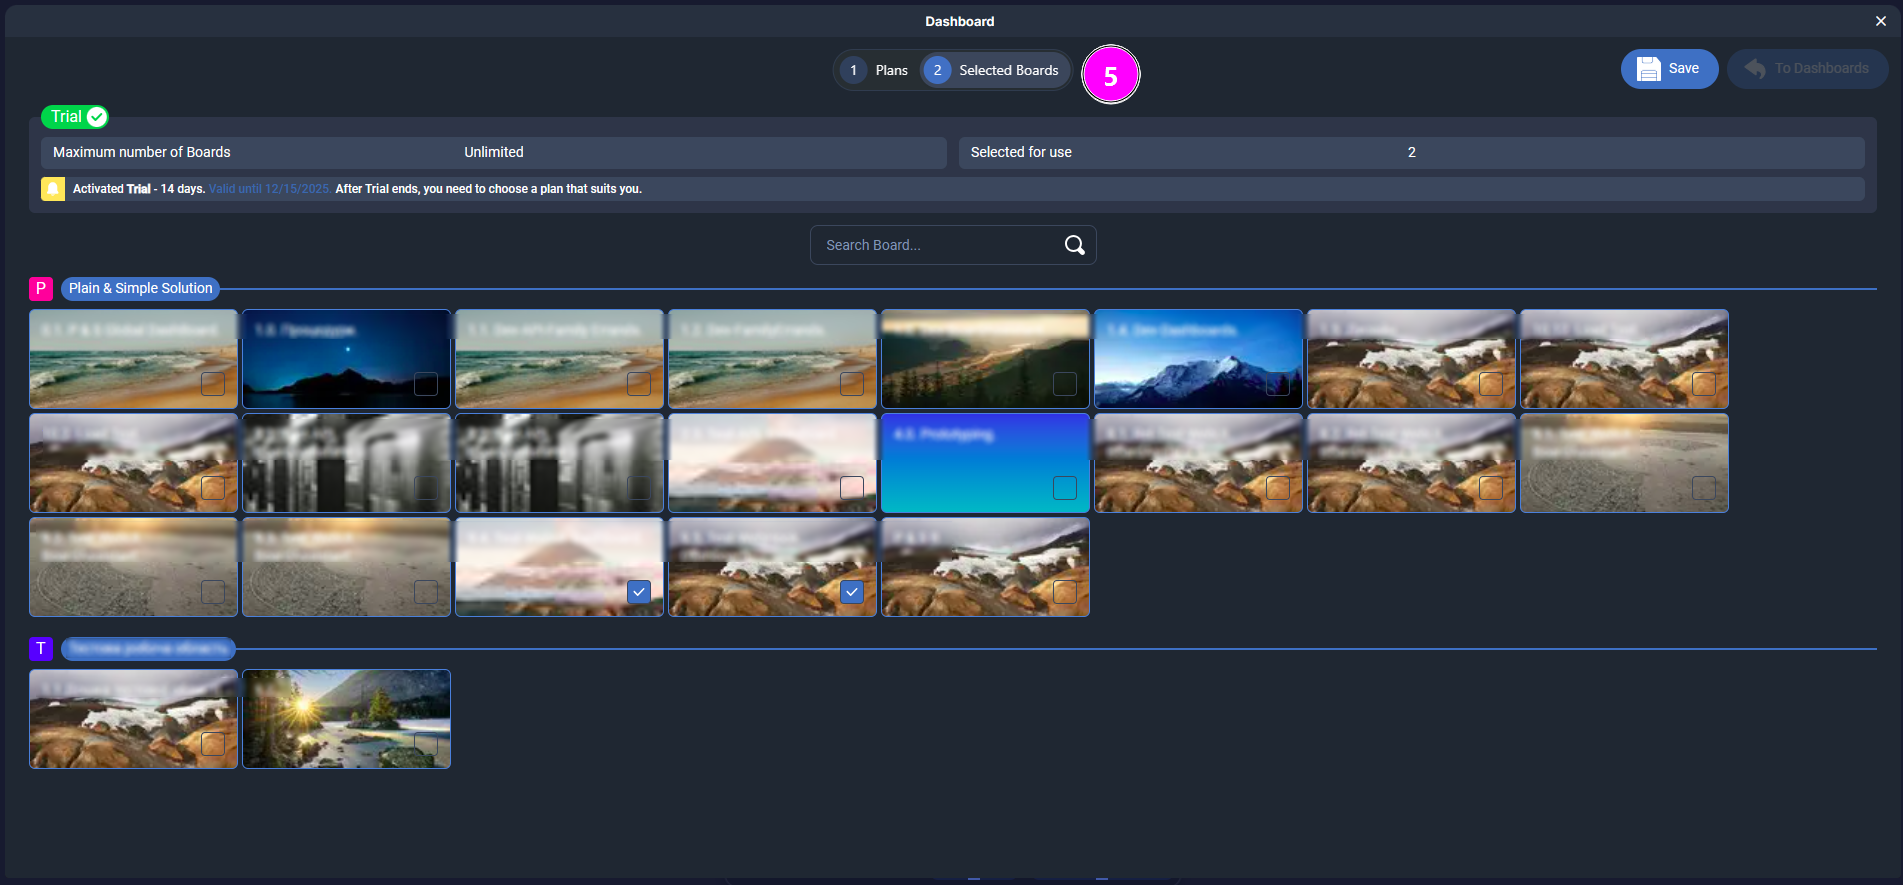
- Selecting Boards
Open the “Selected boards” tab, choose the boards you want to use with Cross-Boards Dashboards, and click “Save”.
You can change your board selection once every certain number of days, depending on your subscription, counted from the moment you select the first board. You don’t have to connect all available boards right away — add them later whenever you need.
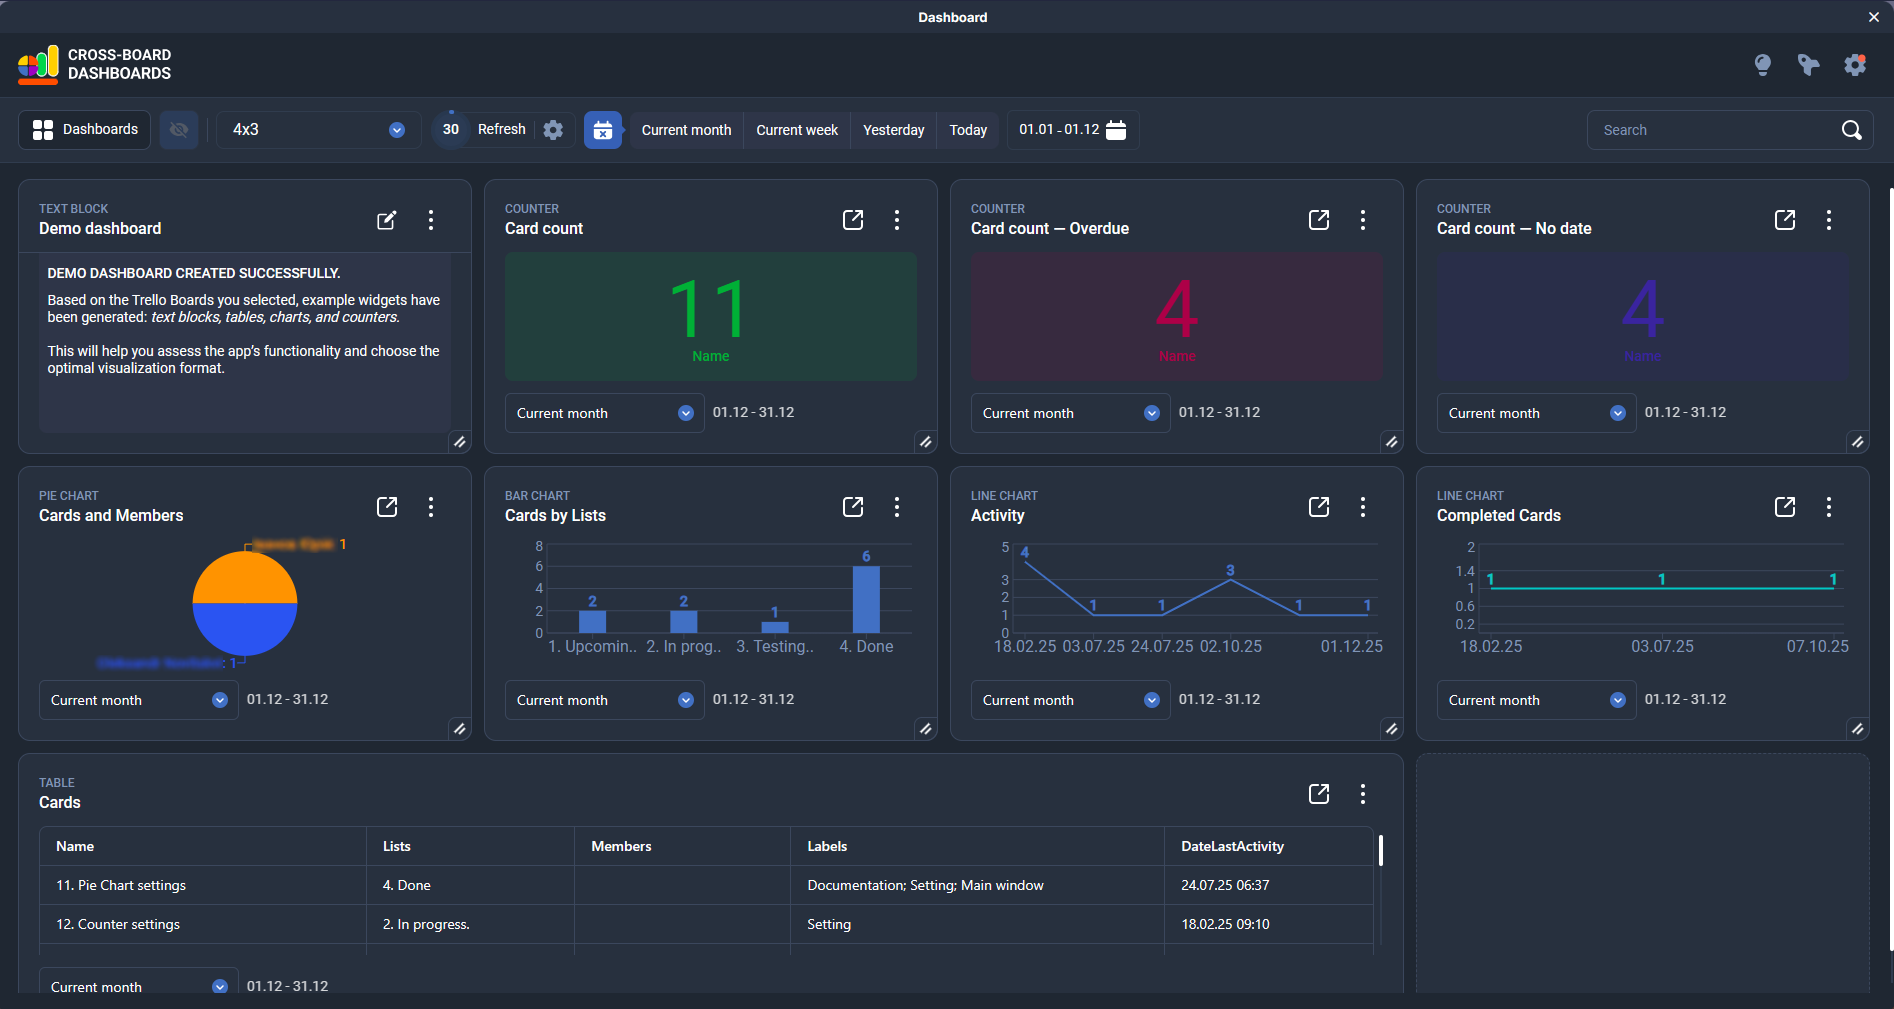
- Automatic demo dashboard
After you save your board selection and click “Go to dashboards”, the system will automatically create a demo dashboard. It will include data from the selected Trello boards for the current month and show the last activity date on cards.
The demo dashboard uses all widget types available in Cross-Boards Dashboards:
Text block — a short description of the dashboard and usage tips;
Counters — the total number of cards, overdue cards, cards without a date, etc.;
Pie chart — distribution of cards by members;
Bar chart — number of cards by lists;
Line chart — activity by dates of the last change on a card;
Table — a detailed list of cards with key fields (name, list, members, labels, dates).
This demo dashboard helps you quickly assess the app’s capabilities and choose the visualization format that works best for you.
- Creating your own dashboardI
To create a new dashboard, click the “+ Create” button on the top bar. Enter a name for the dashboard and click the green button to save it.
By default, the dashboard grid is set to 3×2, but you can change it at any time by clicking the corresponding button on the top bar.
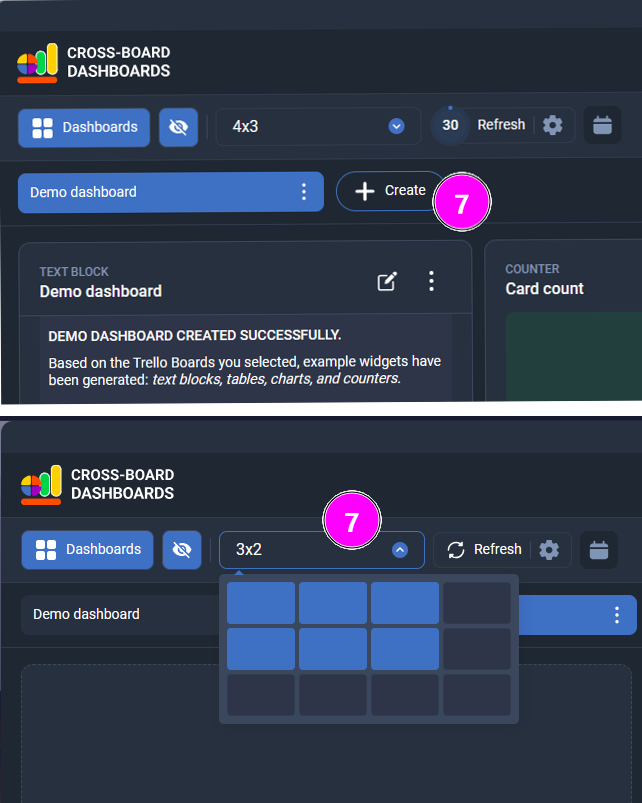
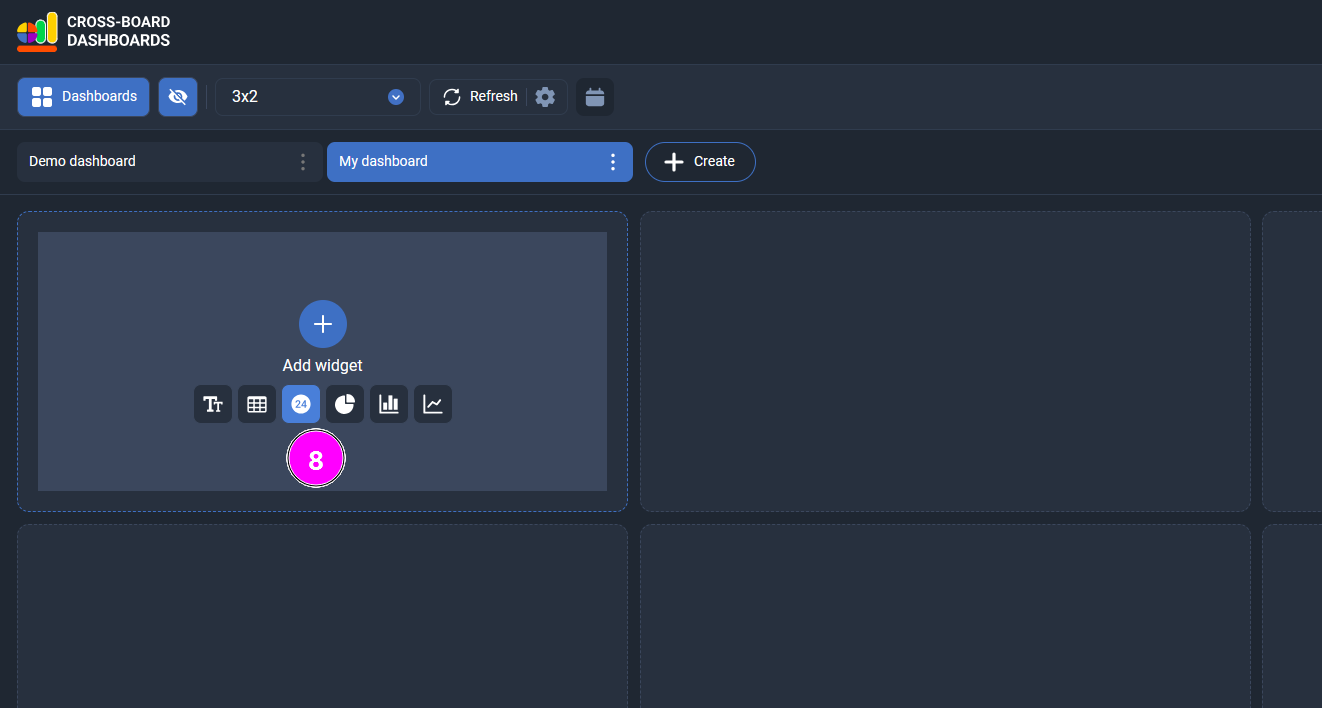
- Adding a widget
To add a new widget, hover over any empty tile on the dashboard. A panel with widget types will appear — click the icon of the widget you want to add (text block, counter, table, chart, etc.).
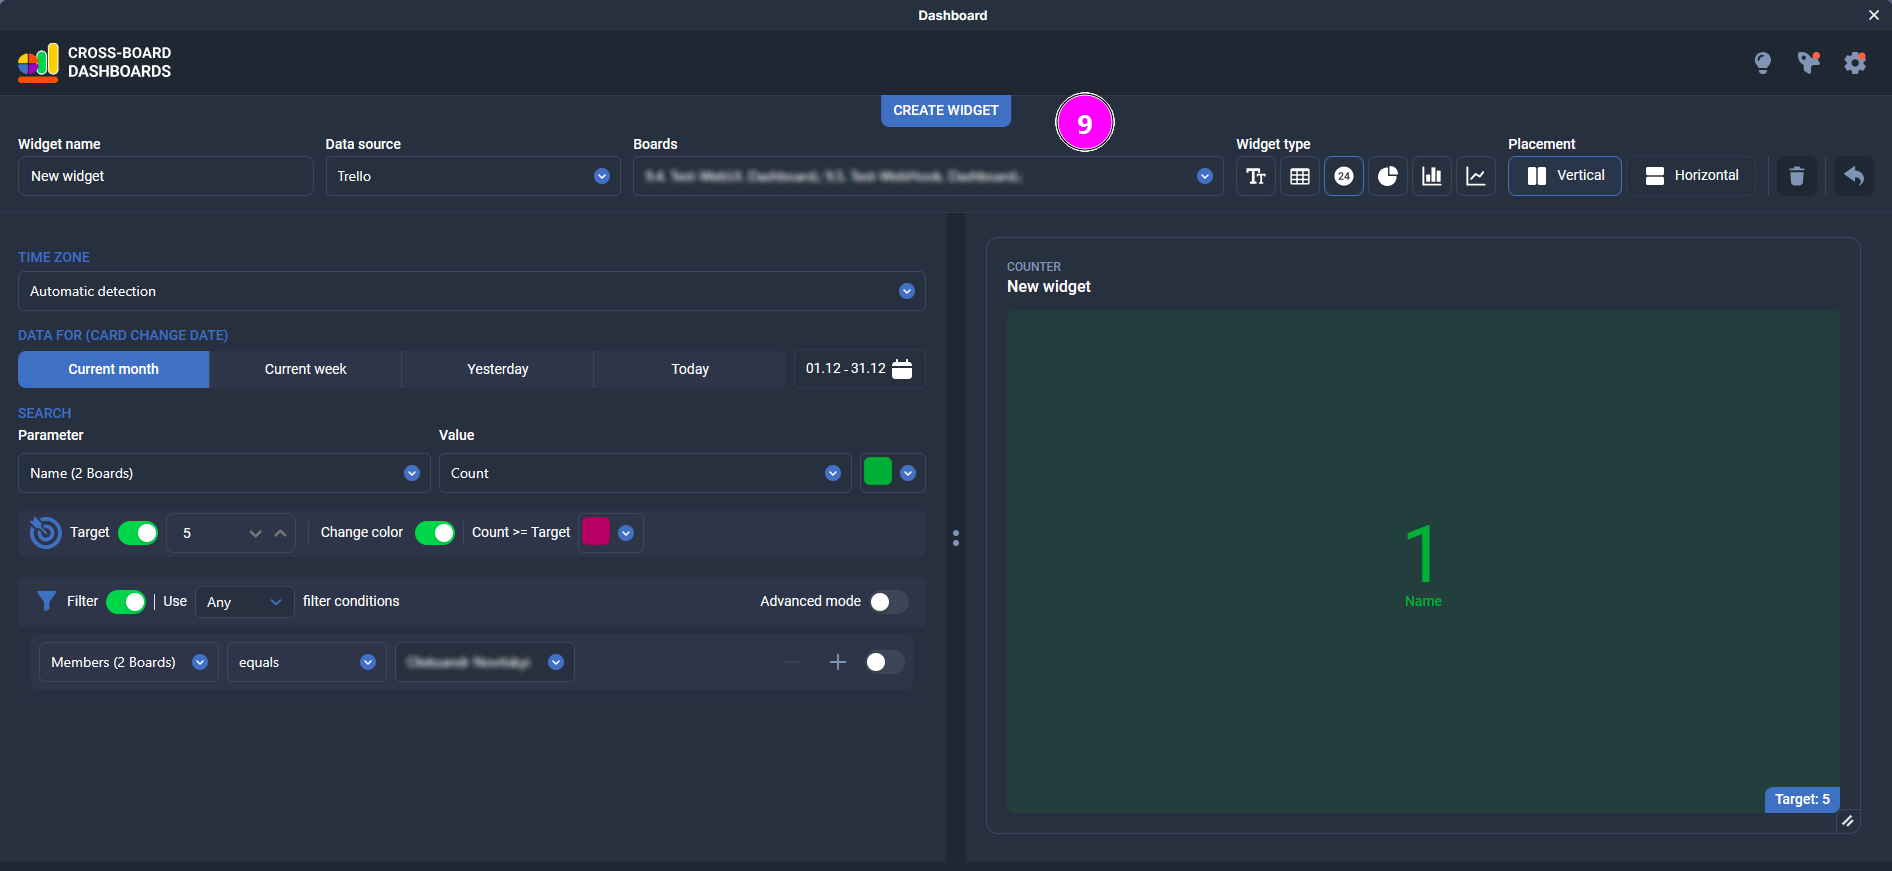
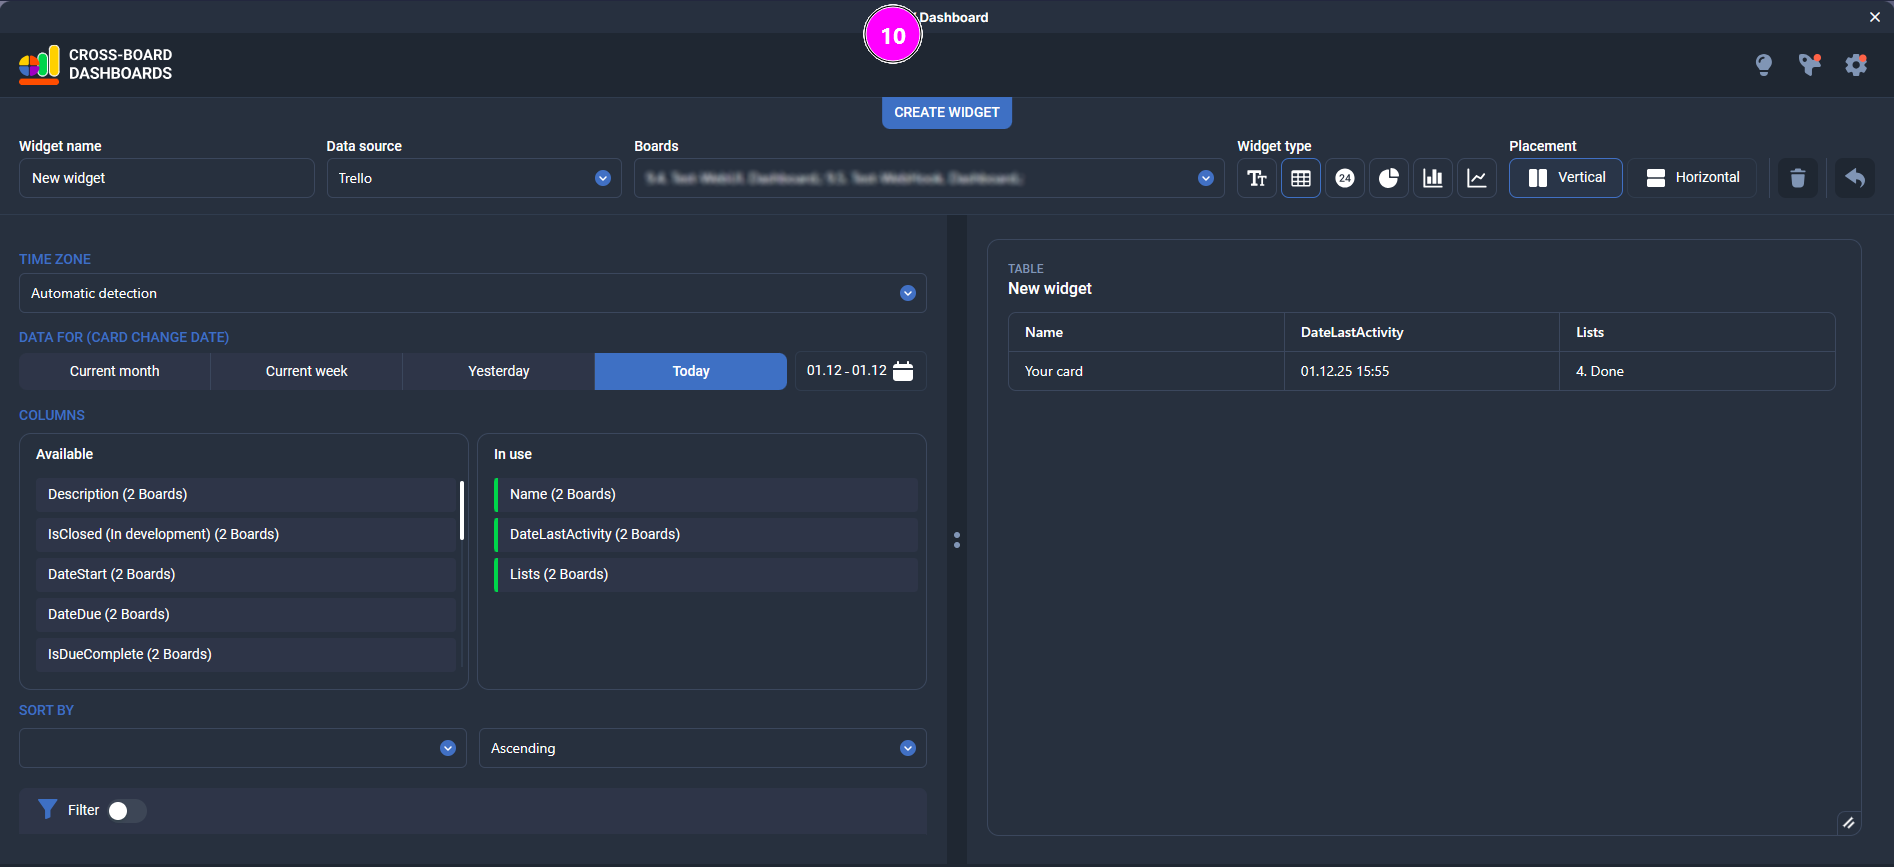
- Widget settings
In the widget settings window you define what data the widget shows and how it’s visualized. The left side contains all configuration options, the right side shows a live preview. The Placement toggle (Vertical / Horizontal) changes how these areas are arranged — one above the other or side by side, as on the screenshot.
Here you can:
set the widget name, data source and select the Trello boards to pull data from;
choose the widget type (text block, table, counter, charts) and the preview layout (Vertical / Horizontal);
configure the time zone and the period used for card changes (current month, current week, yesterday, today or a custom date range).
The Power-Up automatically detects your browser’s time zone and calculates “today/yesterday/week” and due dates accordingly. If your team spans multiple time zones, you can manually set a specific time zone for each widget so everyone sees correct local views;choose the metric (for example, number of cards) and set a Target value, with automatic color change when the target is reached;
add filters to decide which cards are included (by members, lists, labels, custom fields, etc.), in simple or advanced mode.
If the widget uses several boards, the app shows in brackets how many boards have a given field, for example: Members (2 boards). This is especially useful for custom fields with the same name on multiple boards.
There’s no separate Save button — changes are applied immediately as you adjust the settings. When you’re done, click the button in the top-right corner to return to the dashboards view.
- Table widget settings
In the table mode you choose which Trello card fields will be shown in the table and in what order.
The Available block on the left shows all standard and custom fields (Name, Lists, Labels, DateStart, DateDue, DateLastActivity, etc.).
The In use block on the right shows the columns that are already used in the table.
To add a column to the table, drag it from Available to In use.
To change the column order, simply drag the items within the In use list.At the top of the window you can also:
set the period for the card change date (today, yesterday, current week, current month or a custom date range);
choose a field to sort by in the Sort by section and set the sort direction (Ascending / Descending);
enable Filter if needed to limit which cards are included in the table.
- Managing a widget on the dashboard
To resize a widget, drag it using the handle in the bottom-right corner.
To move a widget, grab its top area and drag it to any free cells in the grid.
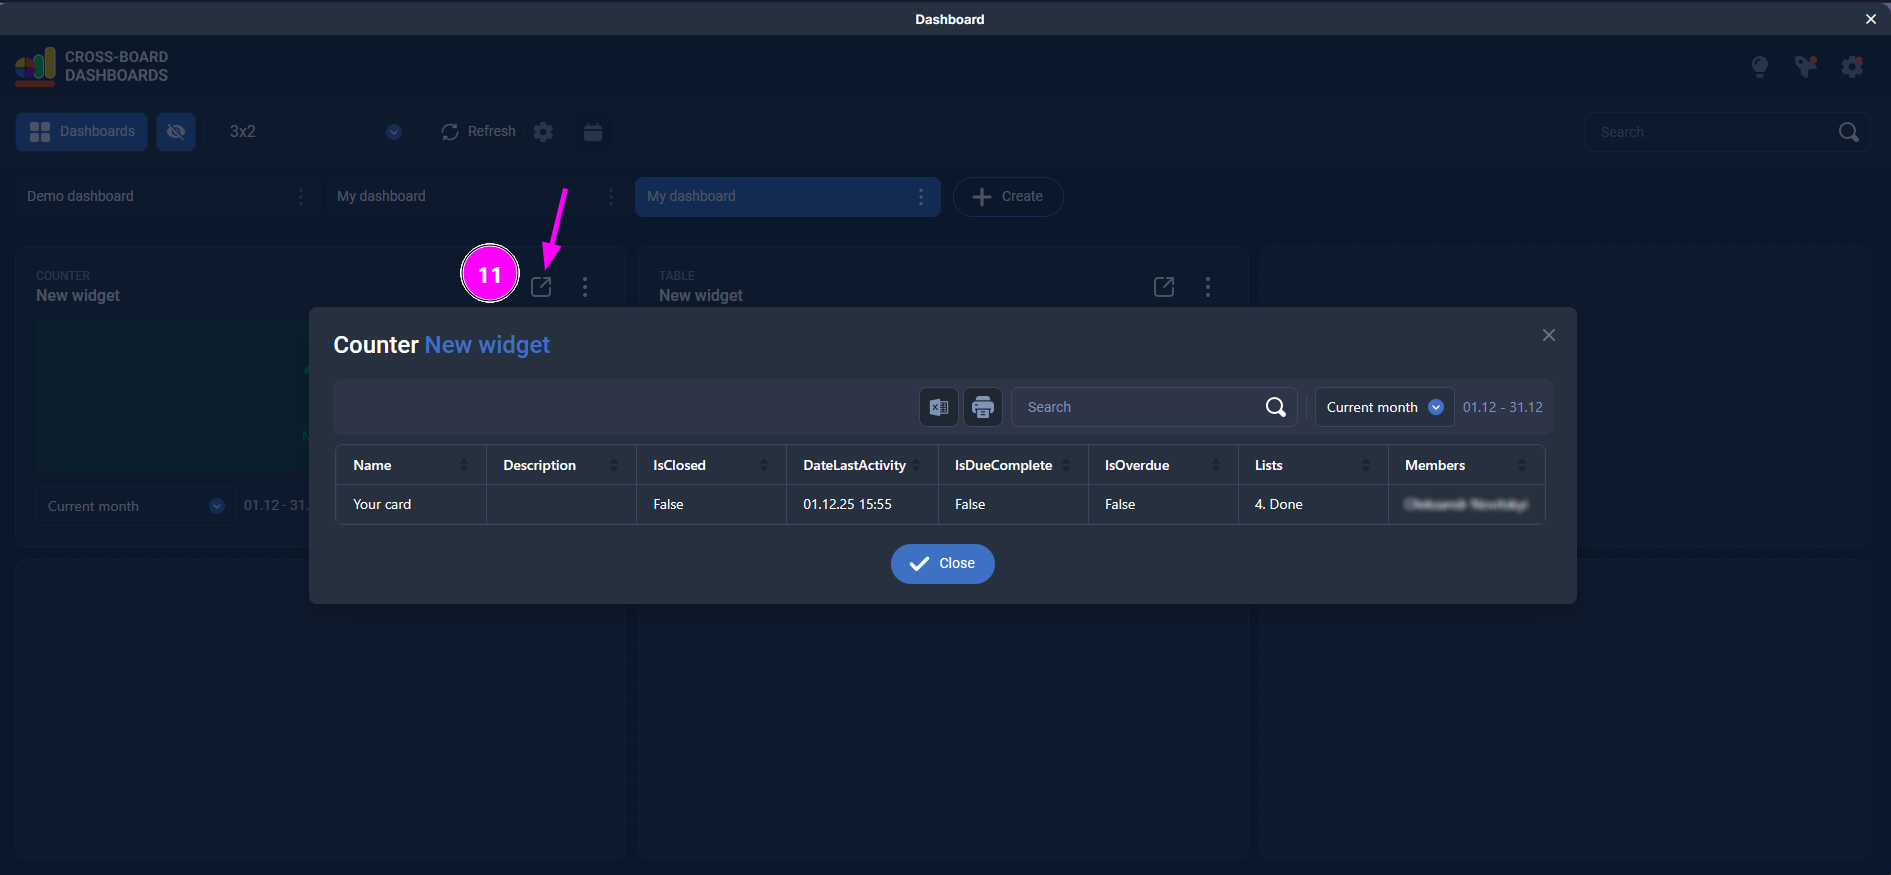
By clicking the expand icon, you open a table with all the cards used to build this widget. There you can review, sort, and filter the data in more detail.
By clicking the three-dot menu, you can perform additional actions: rename the widget, open its settings, create a copy, move it, or delete it.

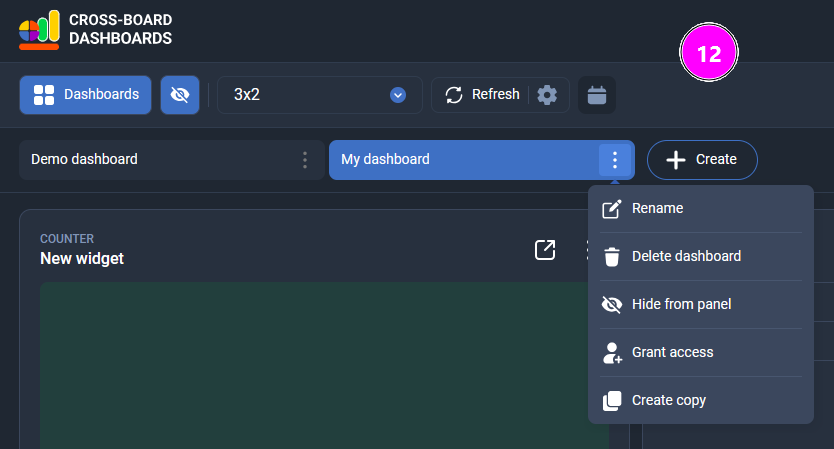
- Managing a dashboard
From the menu next to the dashboard name (three-dot icon) you can:
Rename – change the dashboard name.
Delete dashboard – permanently remove the dashboard.
Hide from panel – hide the dashboard from the top tab bar (the dashboard is not deleted and can be shown again later).
Grant access – share the dashboard with other users.
Create copy – duplicate the dashboard with all its widgets and settings.
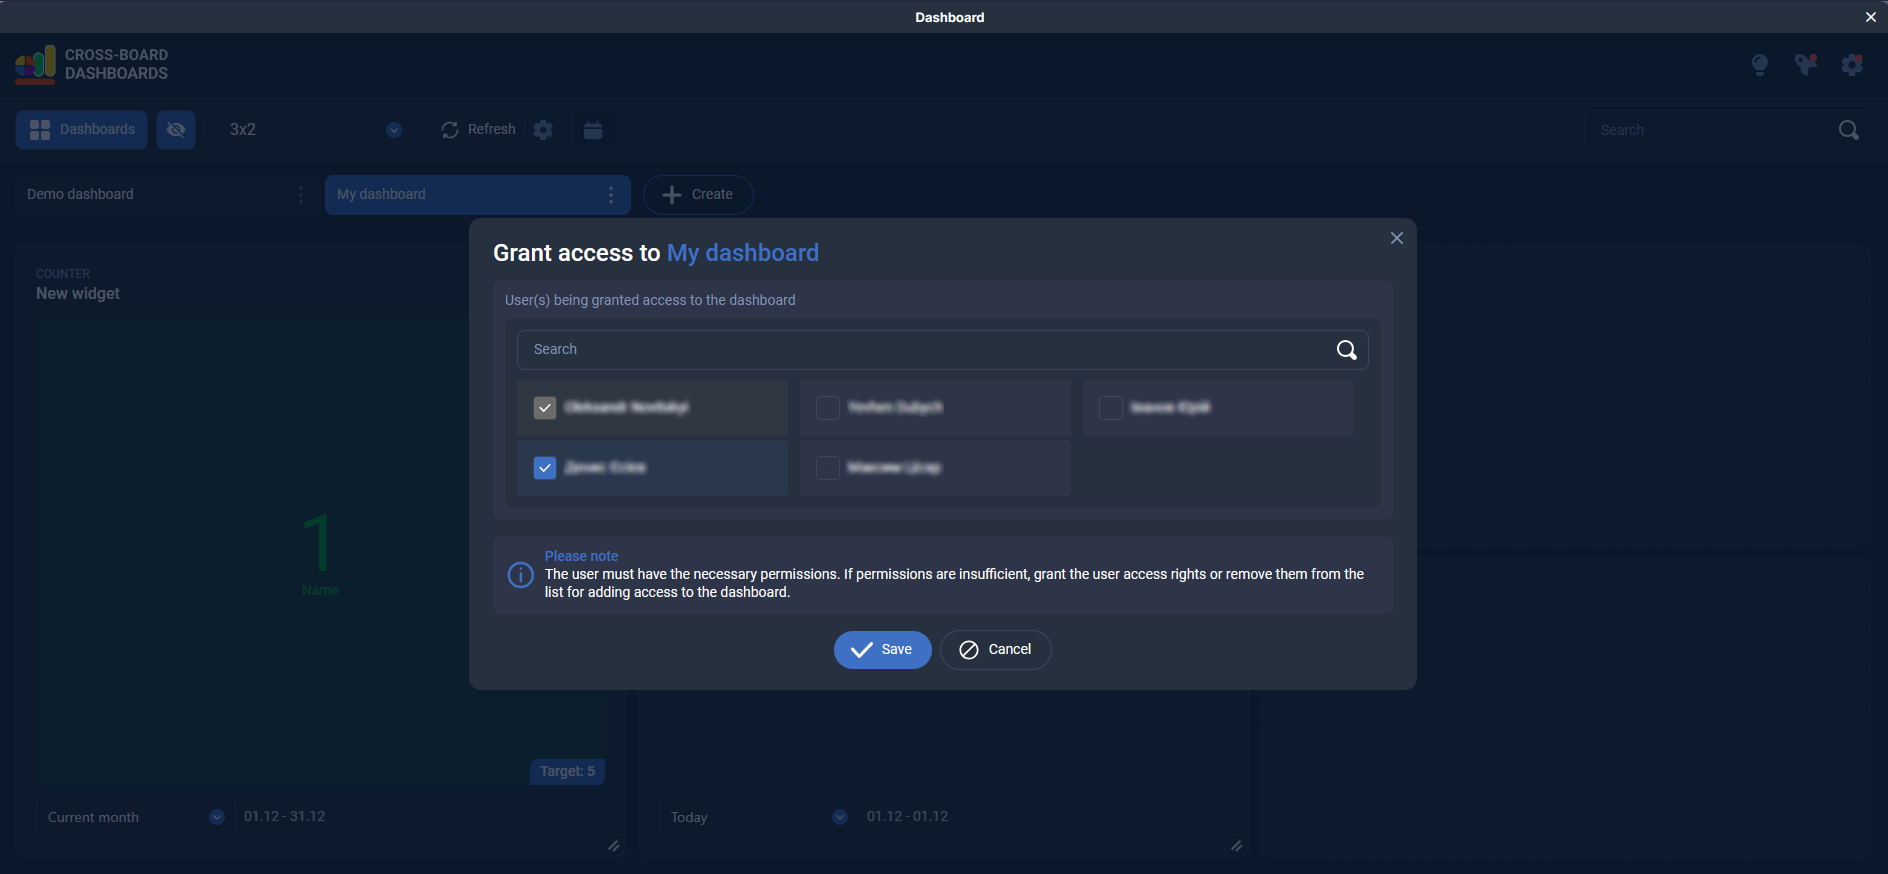
Sharing a dashboard
On some subscription plans you can share a dashboard with other members of your Trello boards.
To share a dashboard, open the three-dot menu for that dashboard and select Grant access.
In the dialog, search for and select the users you want to give access to.
A user must have the required permissions for the related Trello boards; otherwise they won’t appear in the list or won’t see all data.
The user you share the dashboard with does not need to buy a subscription. They can view the dashboards shared with them as long as the subscription of the owner who granted access remains active.
Got a question? Ask us
We’ll advise you on Plain&Simple Solution products