


Πώς λειτουργεί;
Αυτός είναι ένας σύντομος οδηγός για τα προϊόντα μας. Μόνο τα απαραίτητα — τα πρώτα βήματα, απαντήσεις σε συχνές ερωτήσεις και πρακτικές συμβουλές ώστε να περάσετε από την ιδέα στο αποτέλεσμα μέσα σε λίγα λεπτά.
![]() Board Assistant
Board Assistant
 Cross-Boards Dashboards
- Έλεγχος ενεργοποίησης
Αφού εγκαταστήσετε το Power-Up, ανοίξτε το μενού Power-Ups στον πίνακα σας στο Trello. Βεβαιωθείτε ότι το Board Assistant εμφανίζεται στη λίστα με τα ενεργά πρόσθετα και έχει πράσινο διακόπτη (ενεργοποιημένο).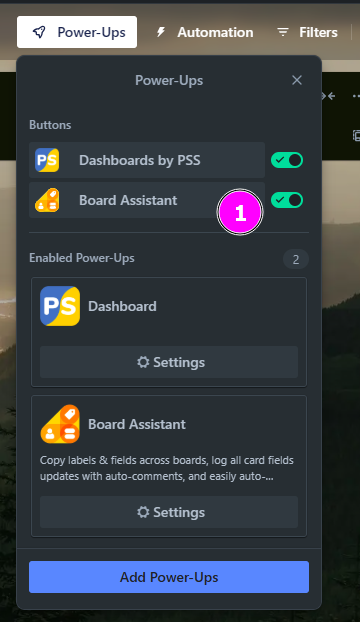
- Σύνδεση
Βρείτε το κουμπί Board Assistant στην επάνω μπάρα του Trello και κάντε κλικ για να ανοίξετε την εφαρμογή. Στο παράθυρο που εμφανίζεται, διαβάστε τους Όρους Χρήσης και την Πολιτική Απορρήτου, επιλέξτε το πλαίσιο και κάντε κλικ στο Sign in για να συνδεθείτε.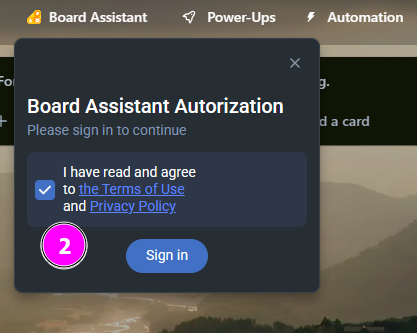
- Χορήγηση πρόσβασης
Στο παράθυρο εξουσιοδότησης του Trello, κάντε κλικ στο Allow για να παραχωρήσετε στο Board Assistant πρόσβαση στους πίνακες και στους χώρους εργασίας σας. Αυτό είναι απαραίτητο για τη σωστή λειτουργία των αυτοματισμών και των δυνατοτήτων της εφαρμογής.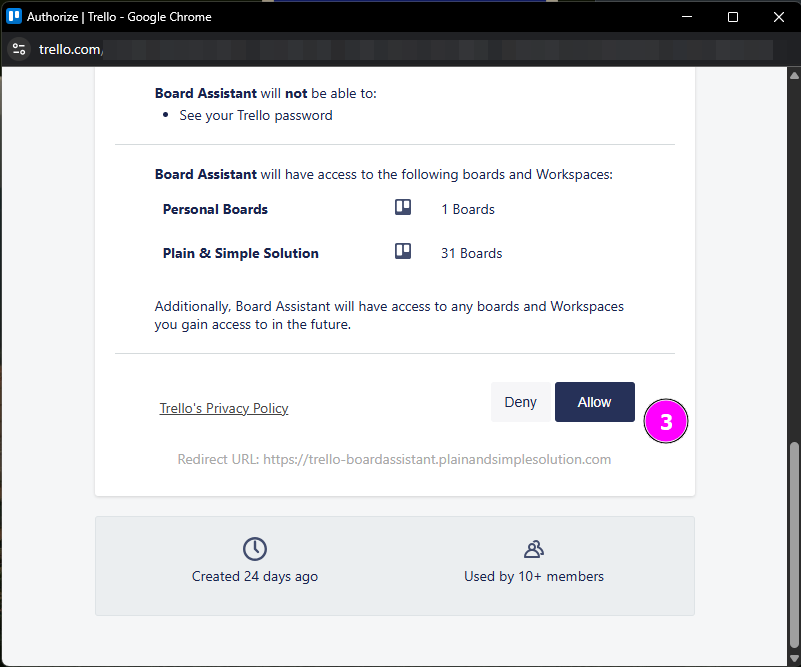
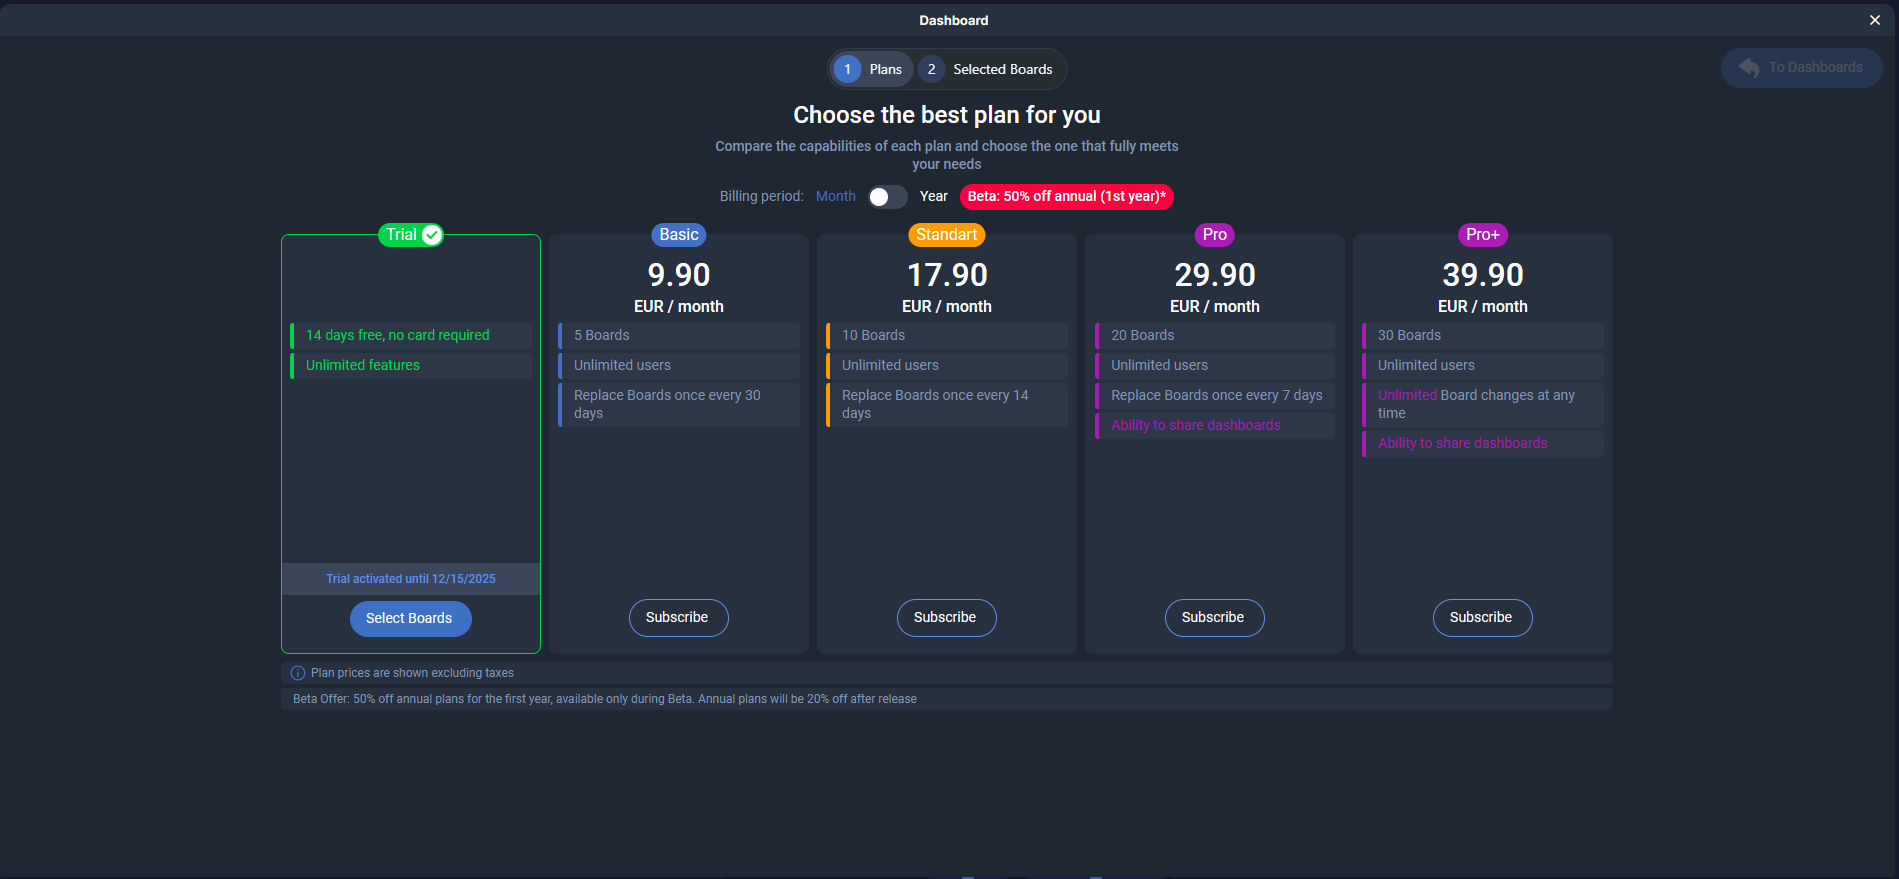
- Επιλογή συνδρομής
Μετά τη σύνδεση, θα εμφανιστεί η σελίδα των διαθέσιμων πακέτων.
Επιλέξτε τη δωρεάν συνδρομή (έως 2 πίνακες) ή κάποιο άλλο πλάνο που καλύπτει καλύτερα τις ανάγκες σας.
Κάντε κλικ στο Subscribe για να ενεργοποιήσετε το επιλεγμένο πακέτο.
🔔 Σημείωση: Η δωρεάν συνδρομή δεν θα είναι διαθέσιμη αν κάποιος άλλος στον χώρο εργασίας σας την έχει ήδη επιλέξει ή έχει ενεργή πληρωμένη συνδρομή.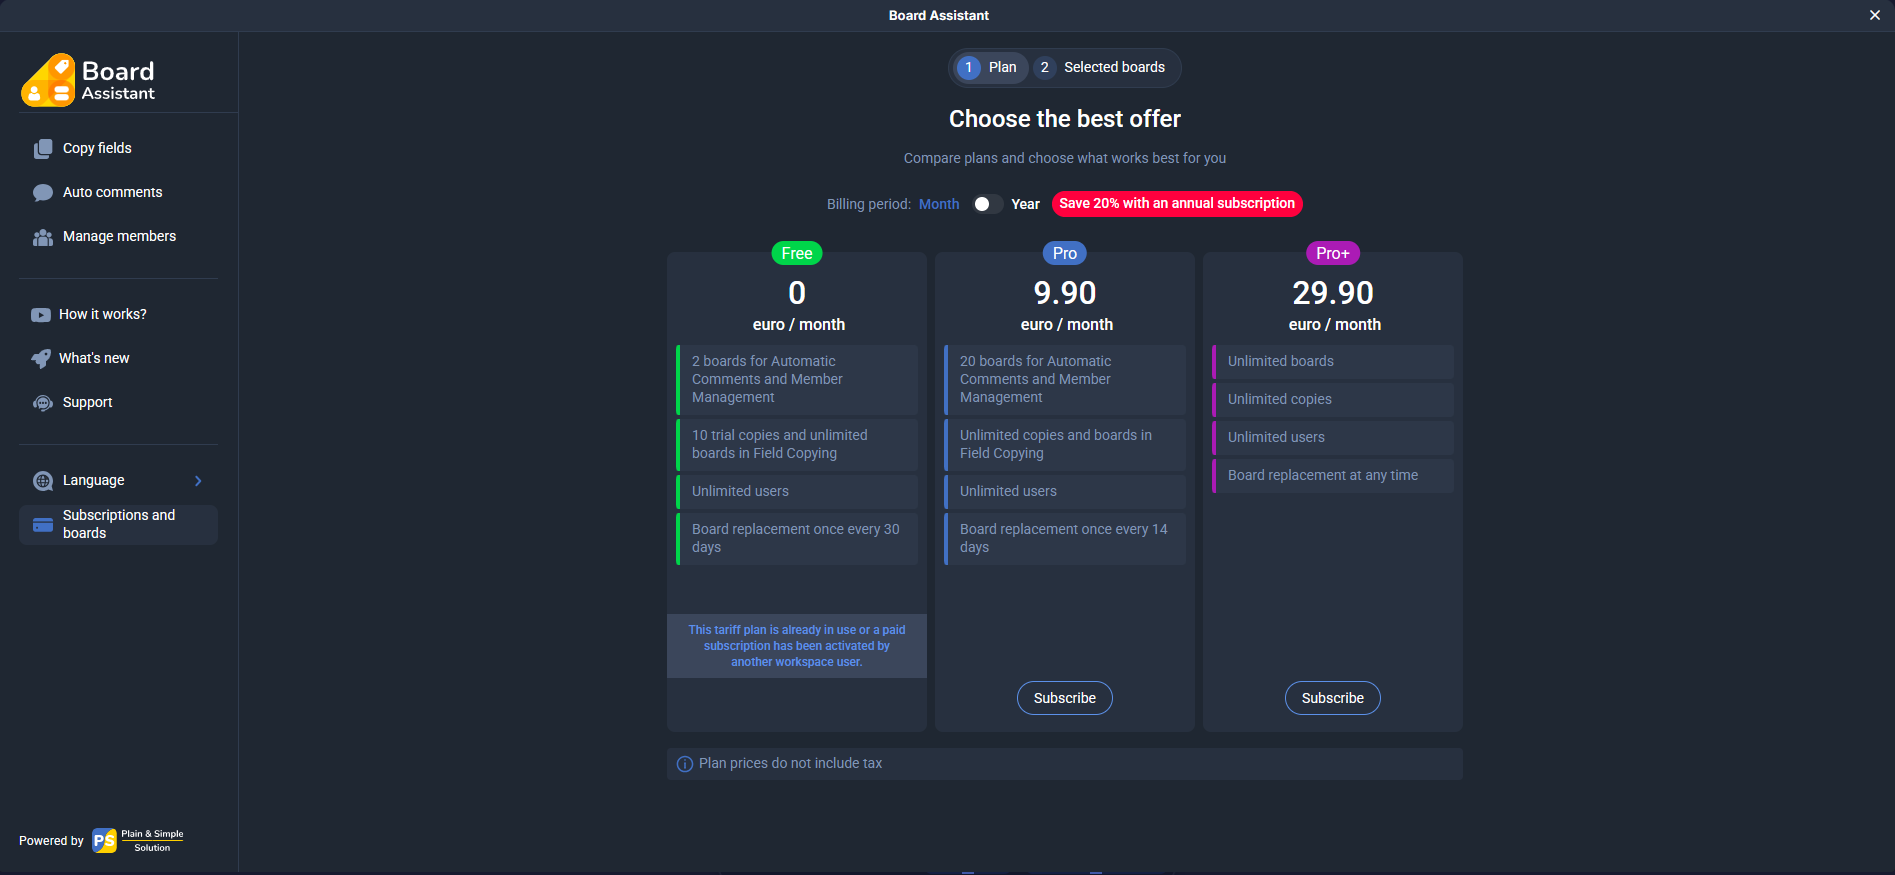
- Επιλογή πινάκων
Αφού ενεργοποιήσετε τη συνδρομή, μεταβείτε στην καρτέλα Selected boards, επιλέξτε τους πίνακες που θέλετε να χρησιμοποιήσετε με το Board Assistant και κάντε κλικ στο Save.
Η αλλαγή πινάκων είναι διαθέσιμη μία φορά κάθε 30 ημέρες, ξεκινώντας από την ημερομηνία επιλογής του πρώτου πίνακα.Δεν χρειάζεται να επιλέξετε αμέσως όλους τους διαθέσιμους πίνακες — μπορείτε να τους προσθέτετε όποτε χρειάζεται.Οι πίνακες που έχουν επιλεγεί από άλλα μέλη του χώρου εργασίας σας εμφανίζονται με τα εικονίδιά τους και είναι διαθέσιμοι για δωρεάν χρήση.Αν το μέλος αφαιρέσει τον πίνακα από τη συνδρομή του, θα χάσετε την πρόσβαση, γι’ αυτό συνιστάται να προσθέσετε αυτόν τον πίνακα και στη δική σας συνδρομή αν είναι σημαντικός.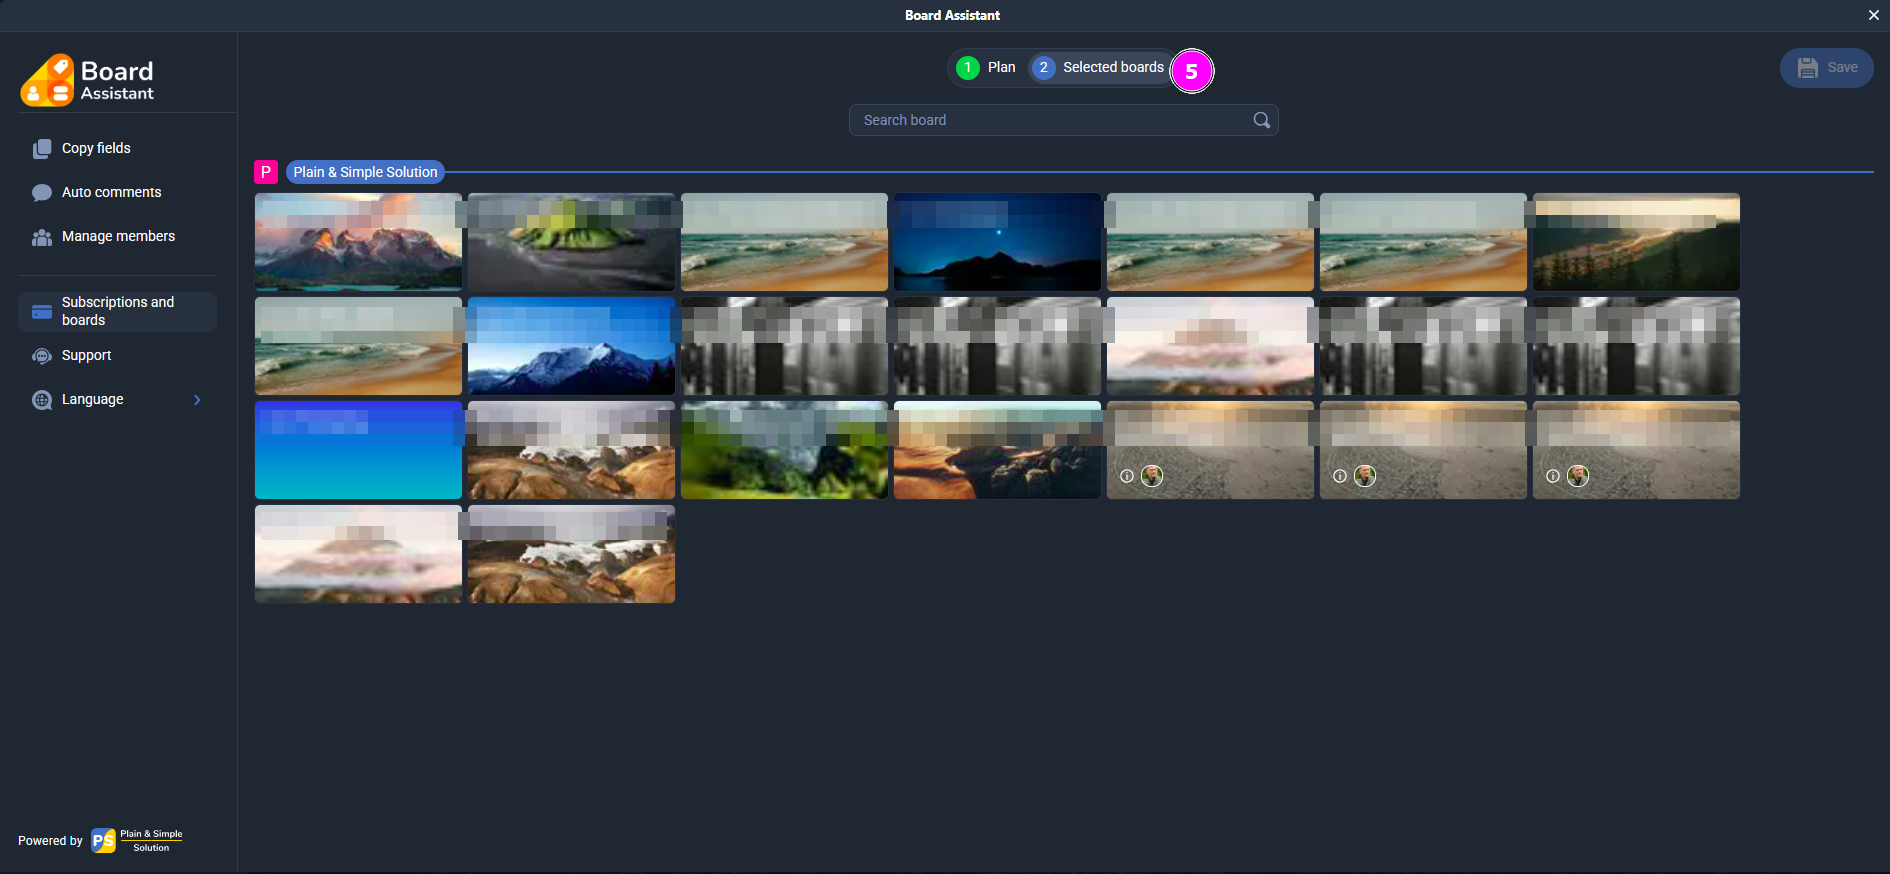
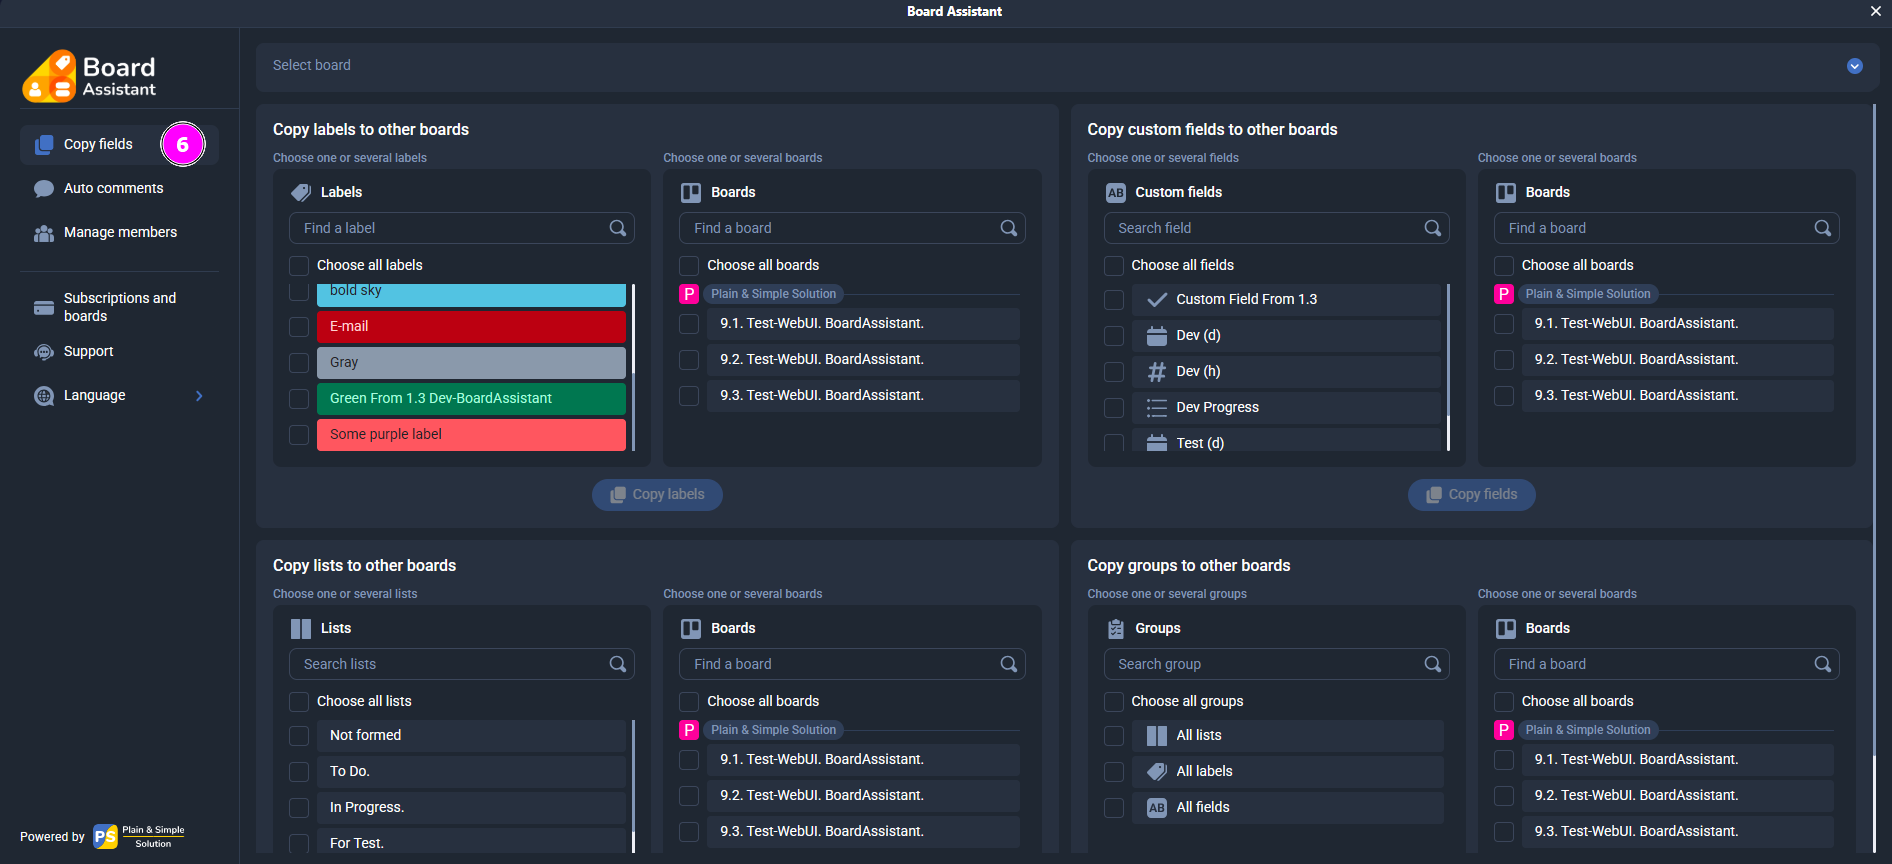
- Αντιγραφή πεδίων
Στην ενότητα Copy fields μπορείτε να μεταφέρετε γρήγορα δομές μεταξύ πινάκων:- Ετικέτες (Labels)
- Προσαρμοσμένα πεδία (Custom fields)
- Λίστες (Lists)
- Ομάδες στοιχείων (όλα τα παραπάνω μαζί)
Πώς να αντιγράψετε δεδομένα:
- Επιλέξτε τον πίνακα προέλευσης (από το αναπτυσσόμενο μενού πάνω).
- Τσεκάρετε τα στοιχεία που θέλετε να αντιγράψετε.
- Επιλέξτε τους πίνακες προορισμού.
- Κάντε κλικ στο κουμπί Copy.
⚠️ Αν τα επιλεγμένα στοιχεία υπάρχουν ήδη στους πίνακες προορισμού, δεν θα δημιουργηθούν διπλότυπα — μόνο τα νέα στοιχεία θα προστεθούν.
- Αυτόματα σχόλια
Στην ενότητα Auto comments μπορείτε να ενεργοποιήσετε την αυτόματη καταγραφή αλλαγών στις κάρτες για τον επιλεγμένο πίνακα Trello. Αυτό είναι ιδιαίτερα χρήσιμο για ομάδες που θέλουν να παρακολουθούν ποιος άλλαξε τι.
Αφού ενεργοποιηθεί, το Board Assistant θα προσθέτει αυτόματα σχόλια στις κάρτες όταν εντοπίζει:- Αλλαγές σε ετικέτες
- Αλλαγές σε λίστες ελέγχου
- Αλλαγές σε ημερομηνίες
- Αλλαγές σε προσαρμοσμένα πεδία
Τα σχόλια δημιουργούνται εξ ονόματος του χρήστη που έκανε την αλλαγή.
Η μορφή είναι κατανοητή και εμφανίζει την προηγούμενη και τη νέα τιμή. Παράδειγμα:
The value of the custom field "Test (d)" was changed from 06/17/2025 09:00 to 06/18/2025 09:00
Έτσι, βλέπετε εύκολα όλες τις αλλαγές χωρίς να ψάχνετε το ιστορικό της κάρτας.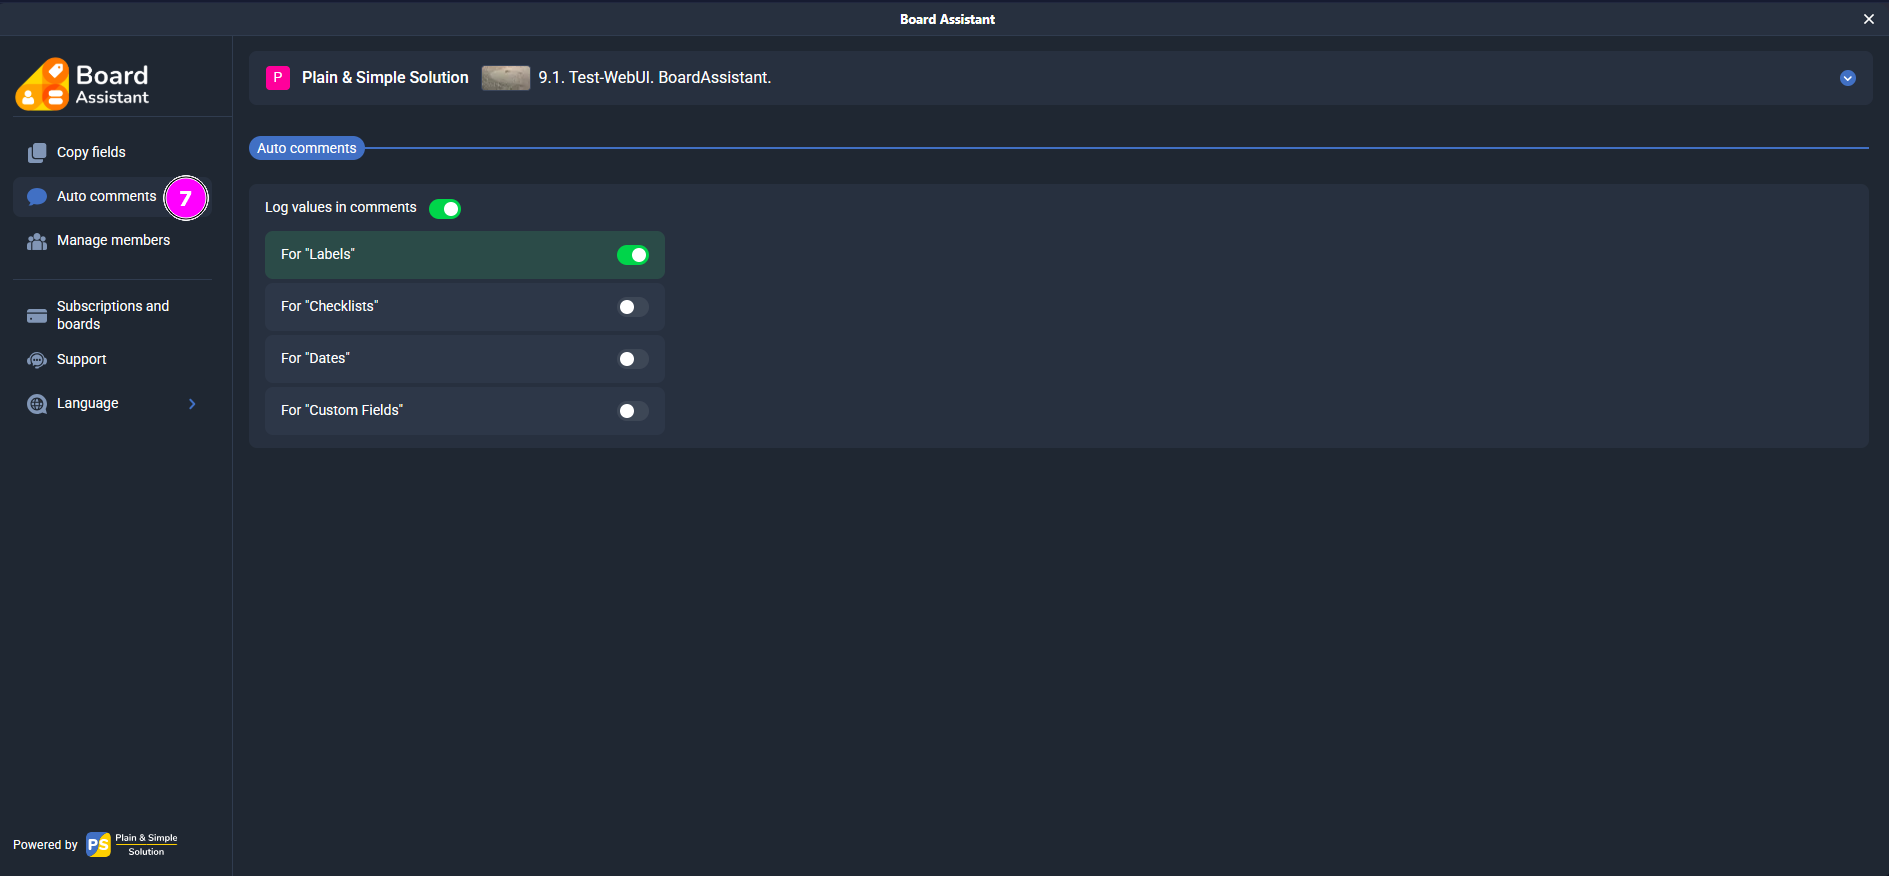
- Αυτόματη διαχείριση μελών
Στην ενότητα Manage members μπορείτε να ρυθμίσετε την αυτόματη ανάθεση ή αλλαγή μελών όταν μια κάρτα μετακινείται σε συγκεκριμένη λίστα.
Τι μπορείτε να ρυθμίσετε:- Τύπος ενέργειας — επιλέγεται από το αναπτυσσόμενο μενού:
- Without Change — χωρίς αλλαγή μελών
- Remove All Members — αφαίρεση όλων των μελών
- Replace Members — αντικατάσταση των υπαρχόντων με νέα μέλη
- Add Members — προσθήκη μελών χωρίς διαγραφή των υπαρχόντων
- Remove Members — επιλεκτική αφαίρεση συγκεκριμένων μελών
- Μέλη — μπορείτε να επιλέξετε ένα ή περισσότερα άτομα για κάθε λίστα.
- Show in the card — επιτρέπει την προβολή και επεξεργασία ρυθμίσεων μέσα από την κάρτα. Αν είναι απενεργοποιημένο, το σενάριο συνεχίζει να λειτουργεί, αλλά δεν μπορεί να αλλάξει από την κάρτα.
- Απόκρυψη μέλους από τη λίστα — αποκρύπτει κάποιον χρήστη από την επιλογή στην κάρτα, χωρίς να τον αφαιρεί από το σενάριο.
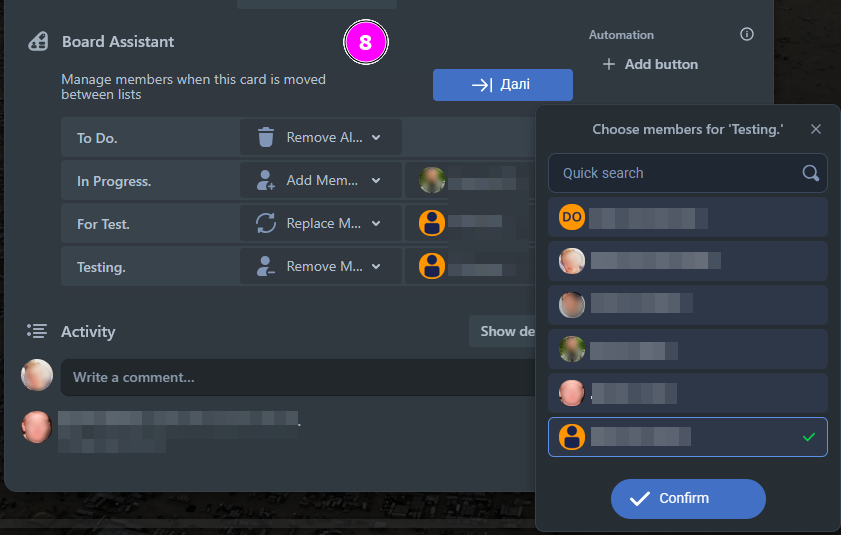
Τοπικές ρυθμίσεις στην κάρτα
Σε κάθε κάρτα, μπορείτε να τροποποιήσετε το αυτόματο σενάριο διαχείρισης μελών που έχει οριστεί σε επίπεδο λίστας. Αυτό είναι χρήσιμο όταν μια συγκεκριμένη κάρτα χρειάζεται διαφορετική ενέργεια από την προεπιλεγμένη για ολόκληρη τη λίστα.Πώς να το κάνετε:
- Ανοίξτε την κάρτα.
- Βρείτε την ενότητα Board Assistant (εμφανίζεται κάτω από την περιγραφή ή πάνω από τη δραστηριότητα).
- Θα δείτε τις τρέχουσες ρυθμίσεις — τον επιλεγμένο τύπο ενέργειας και τα μέλη.
- Ενημερώστε τις ρυθμίσεις σύμφωνα με τις ανάγκες αυτής της κάρτας.
- Οι αλλαγές αποθηκεύονται αυτόματα και ισχύουν μόνο για αυτήν την κάρτα, ανεξάρτητα από τους κανόνες της λίστας.
⬆️ Προτεραιότητα: Οι τοπικές ρυθμίσεις κάρτας έχουν υψηλότερη προτεραιότητα από τους καθολικούς κανόνες λίστας. Αυτό σημαίνει ότι ακόμη και αν η κάρτα μετακινηθεί σε λίστα με ενεργό σενάριο, θα εφαρμοστεί το τοπικό σενάριο εάν έχει οριστεί.
Παράδειγμα 1: Παράκαμψη προεπιλεγμένου κανόνα
Ο προεπιλεγμένος κανόνας στη λίστα “To Do” είναι:
Ενέργεια: Replace Members, Μέλη: Mark, Mary
Ωστόσο, για την κάρτα “Επείγουσα εργασία”, θέλετε να ανατεθεί μόνο ο John.
Ανοίγετε την κάρτα, μεταβαίνετε στο Board Assistant και αλλάζετε την ενέργεια σε:
Replace Members, Μέλος: John
➡️ Έτσι, όταν αυτή η κάρτα εισέλθει στη λίστα “To Do”, θα ανατεθεί μόνο στον John — όχι στον Mark και τη Mary.Παράδειγμα 2: Απενεργοποίηση κανόνα λίστας
Ο καθολικός κανόνας για τη λίστα “Pending” είναι:
Remove All Members
Αλλά η κάρτα “Νομική έγκριση” πρέπει να διατηρήσει τα τρέχοντα μέλη της.
Στην ενότητα Board Assistant της κάρτας, αλλάζετε την ενέργεια σε:
Without Change
➡️ Έτσι, όταν η κάρτα μετακινηθεί σε αυτήν τη λίστα, δεν θα χάσει τα μέλη της.Χάρη στους κανόνες σε επίπεδο κάρτας, μπορείτε να δημιουργείτε ευέλικτες εξαιρέσεις που σας επιτρέπουν να προσαρμόζετε τις ροές εργασίας όχι μόνο ανά λίστα αλλά και για κάθε μεμονωμένη κάρτα.
Κουμπί “Next list”
Προσθέστε το κουμπί “Next list” στην κάρτα για να τη μετακινείτε στην επόμενη λίστα με ένα κλικ. Μπορείτε να κρατήσετε το προεπιλεγμένο όνομα ή να βάλετε δικό σας (έως 16 χαρακτήρες).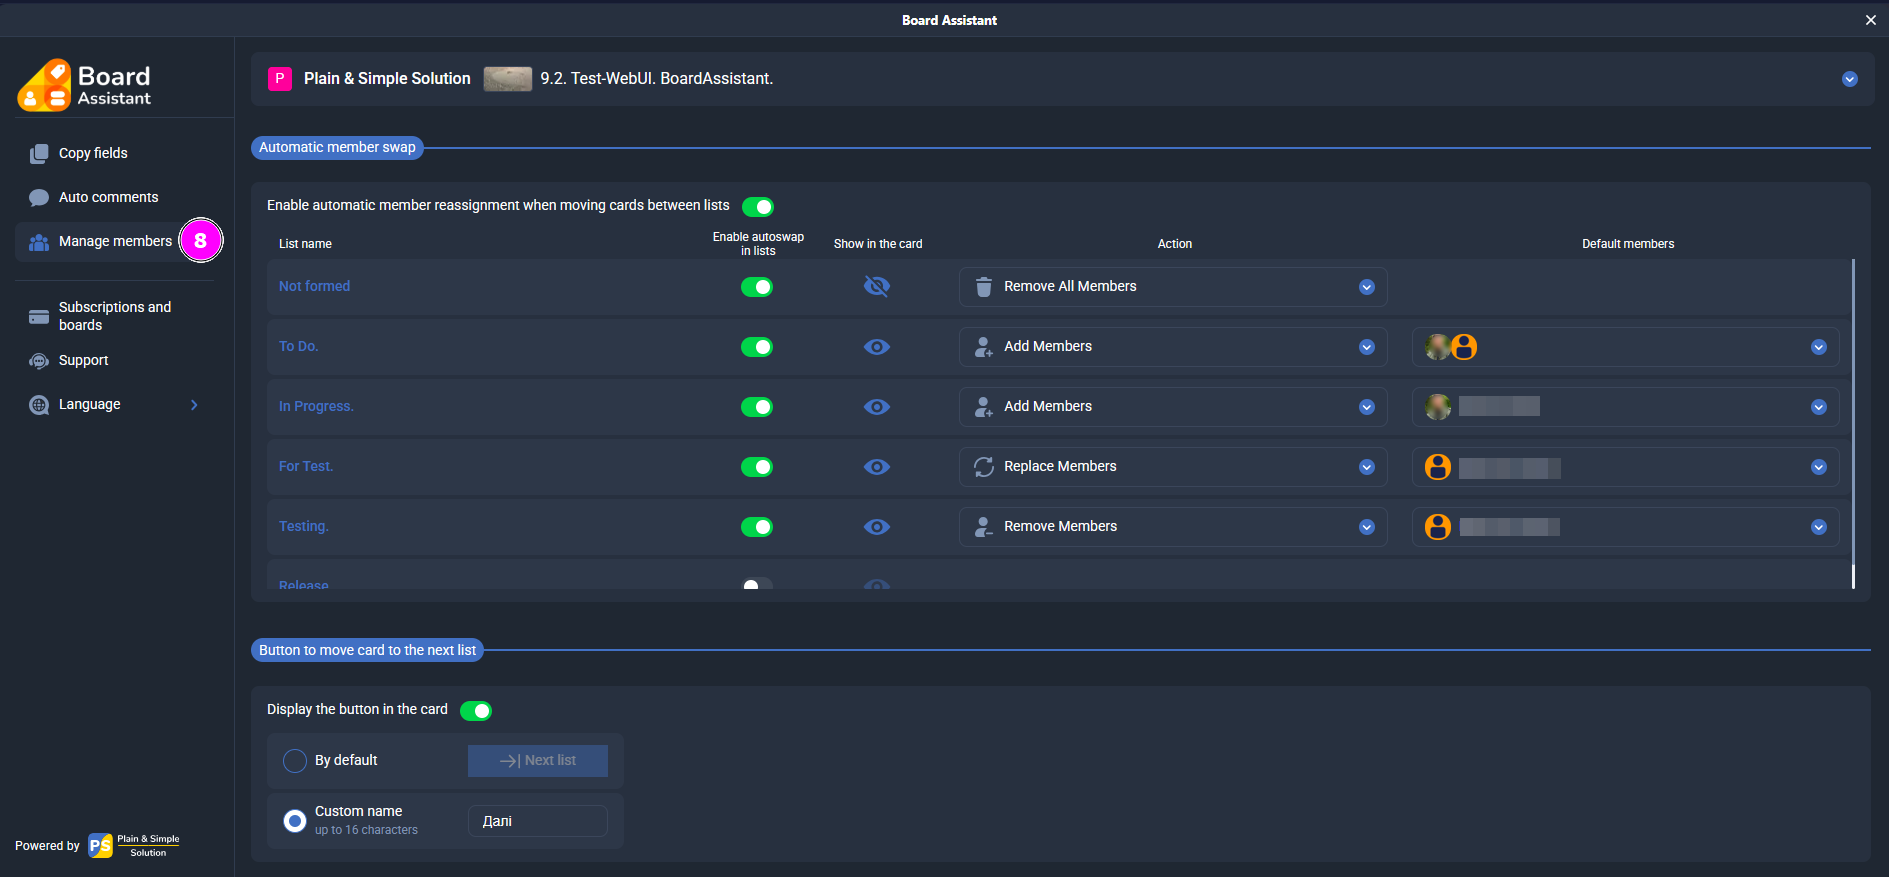
- Τύπος ενέργειας — επιλέγεται από το αναπτυσσόμενο μενού:
- Activation Check
After installing the Power-Up, open the Power-Ups menu on your Trello board. Make sure that Cross-Boards Dashboards appears in the list of enabled Power-Ups and has a green toggle (enabled state).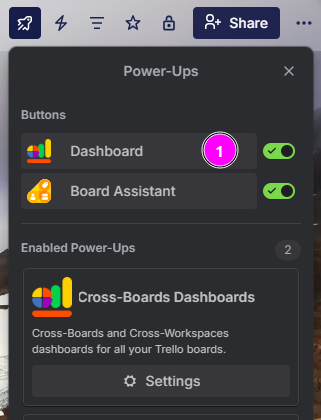
- Authorization
Locate the Cross-Boards Dashboards button in the top Trello panel and click it to launch the app. In the window that opens, review the Terms of Use and Privacy Policy, check the agreement box, and click Sign in to proceed with authorization.
- Granting Access
In the Trello authorization window, click Allow to grant Cross-Boards Dashboards access to your boards and workspaces. This access is required for proper functionality.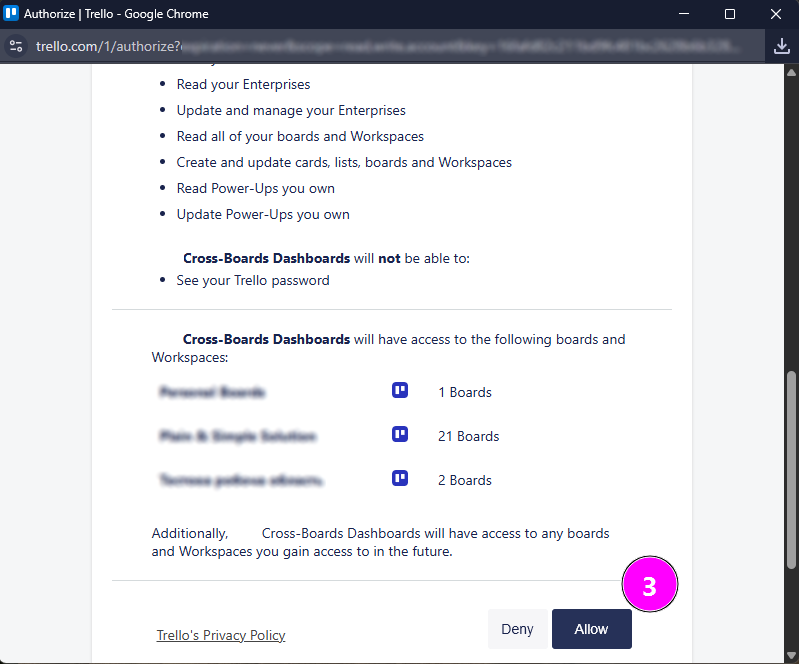
- Choose a subscription plan
After you authorize, the pricing plans page will open and a 14-day free trial will be activated for you automatically.
Click “Select boards” to go to the Trello boards selection, or activate the subscription plan you need right away.
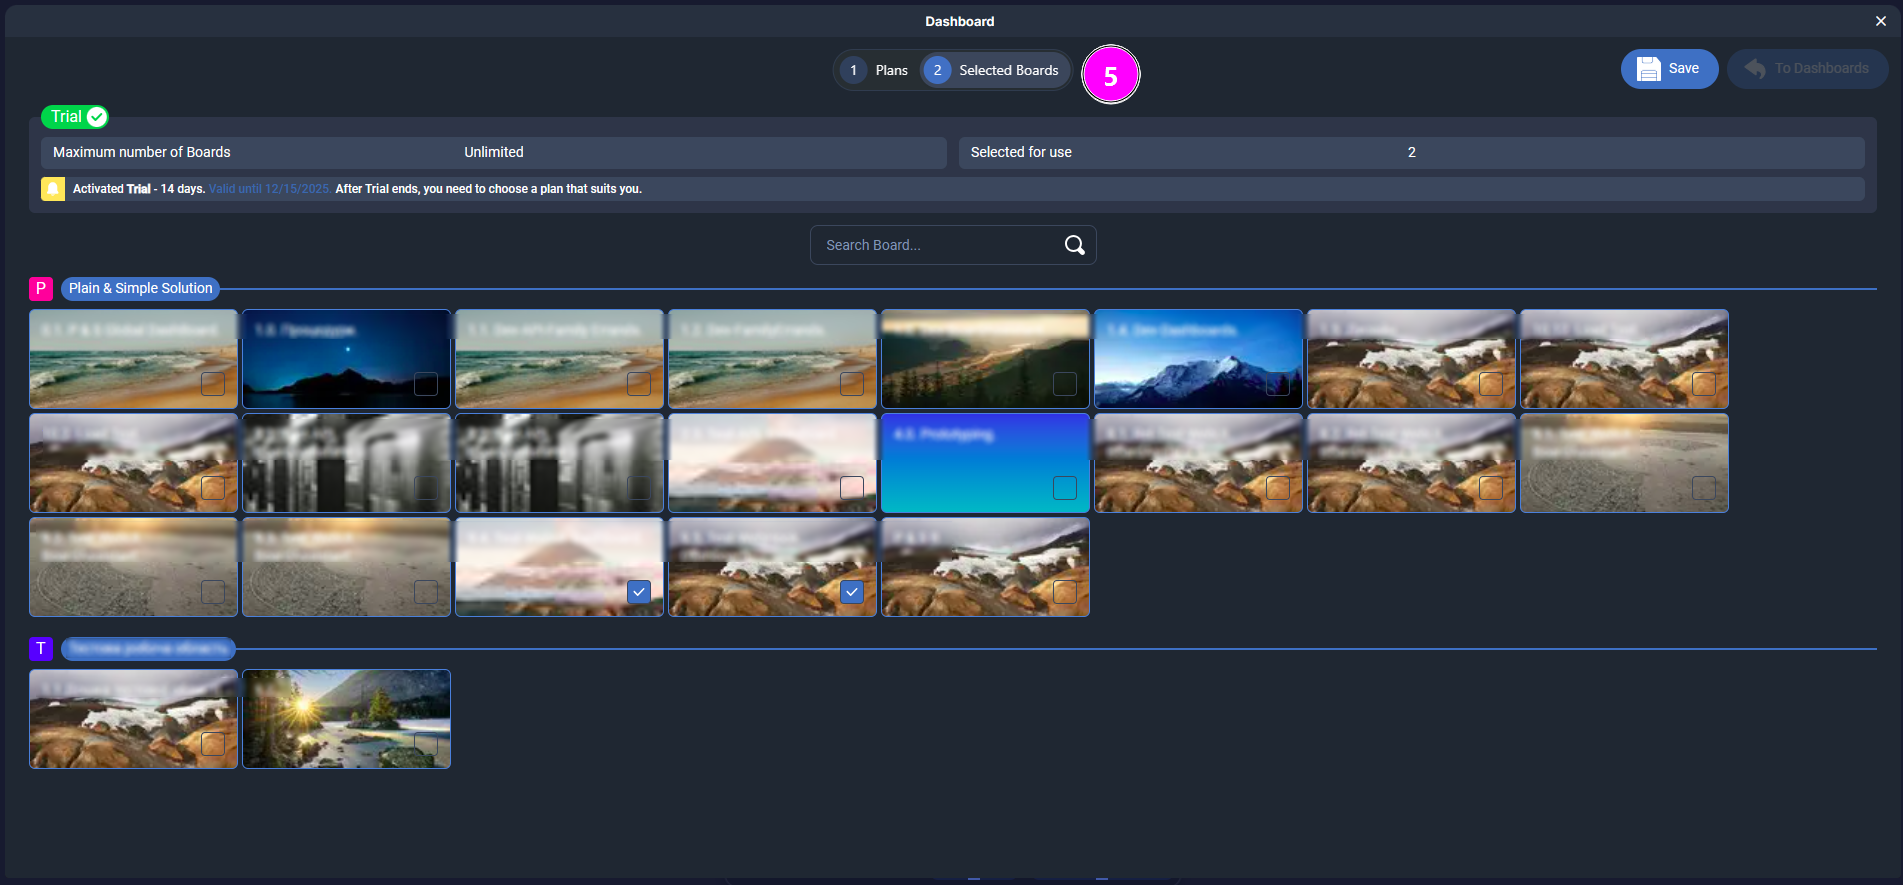
- Selecting Boards
Open the “Selected boards” tab, choose the boards you want to use with Cross-Boards Dashboards, and click “Save”.
You can change your board selection once every certain number of days, depending on your subscription, counted from the moment you select the first board. You don’t have to connect all available boards right away — add them later whenever you need.
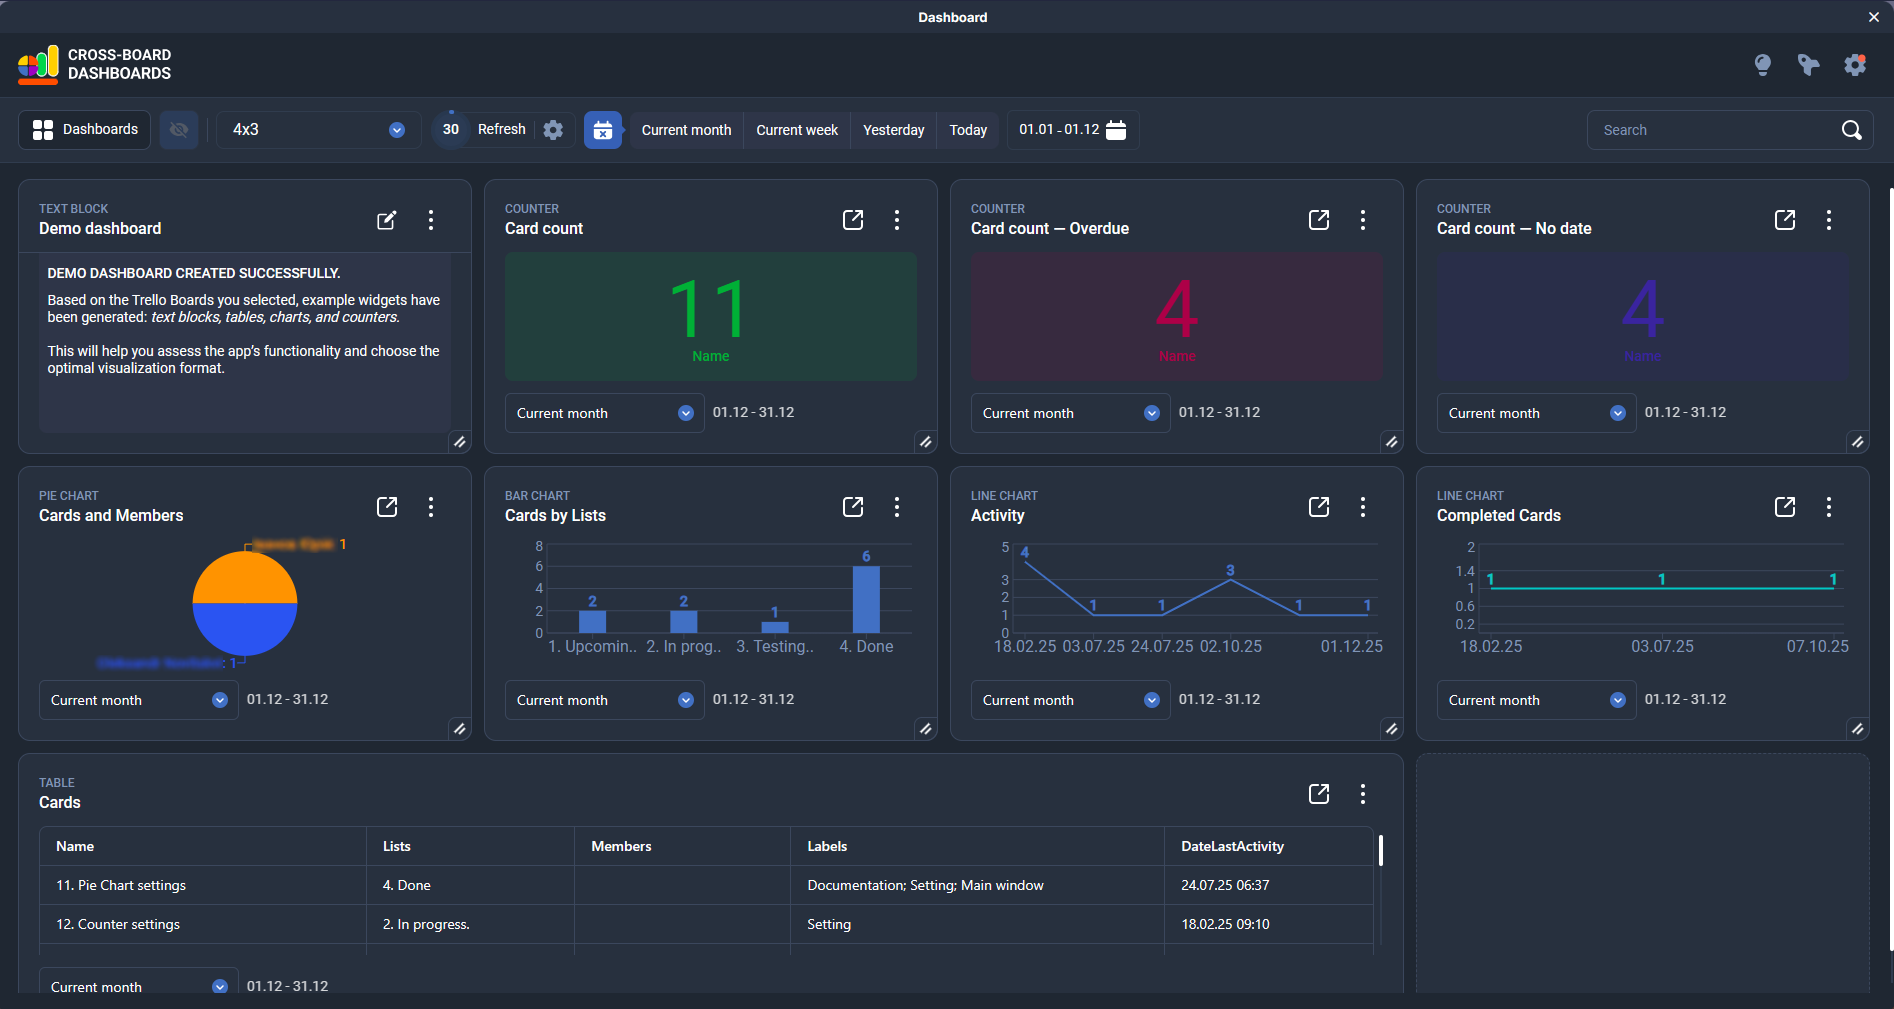
- Automatic demo dashboard
After you save your board selection and click “Go to dashboards”, the system will automatically create a demo dashboard. It will include data from the selected Trello boards for the current month and show the last activity date on cards.
The demo dashboard uses all widget types available in Cross-Boards Dashboards:
Text block — a short description of the dashboard and usage tips;
Counters — the total number of cards, overdue cards, cards without a date, etc.;
Pie chart — distribution of cards by members;
Bar chart — number of cards by lists;
Line chart — activity by dates of the last change on a card;
Table — a detailed list of cards with key fields (name, list, members, labels, dates).
This demo dashboard helps you quickly assess the app’s capabilities and choose the visualization format that works best for you.
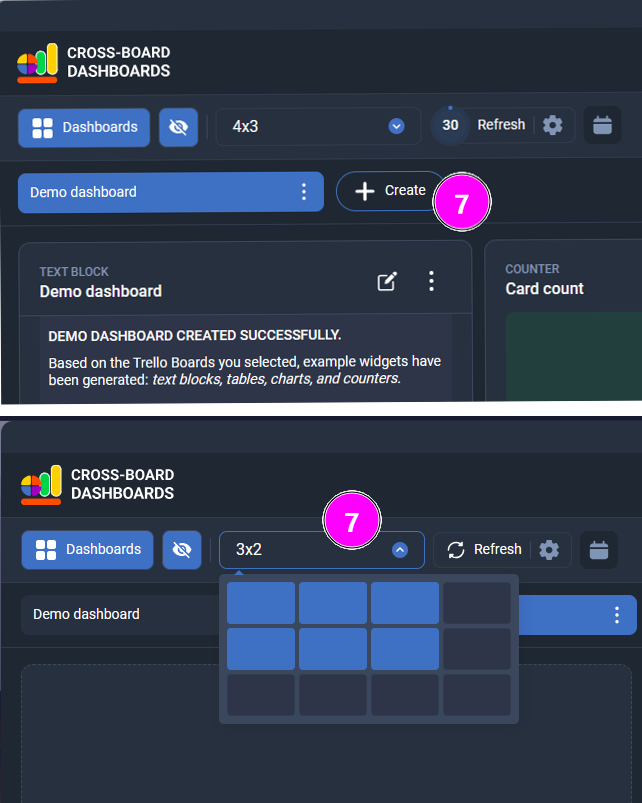
- Creating your own dashboardI
To create a new dashboard, click the “+ Create” button on the top bar. Enter a name for the dashboard and click the green button to save it.
By default, the dashboard grid is set to 3×2, but you can change it at any time by clicking the corresponding button on the top bar.
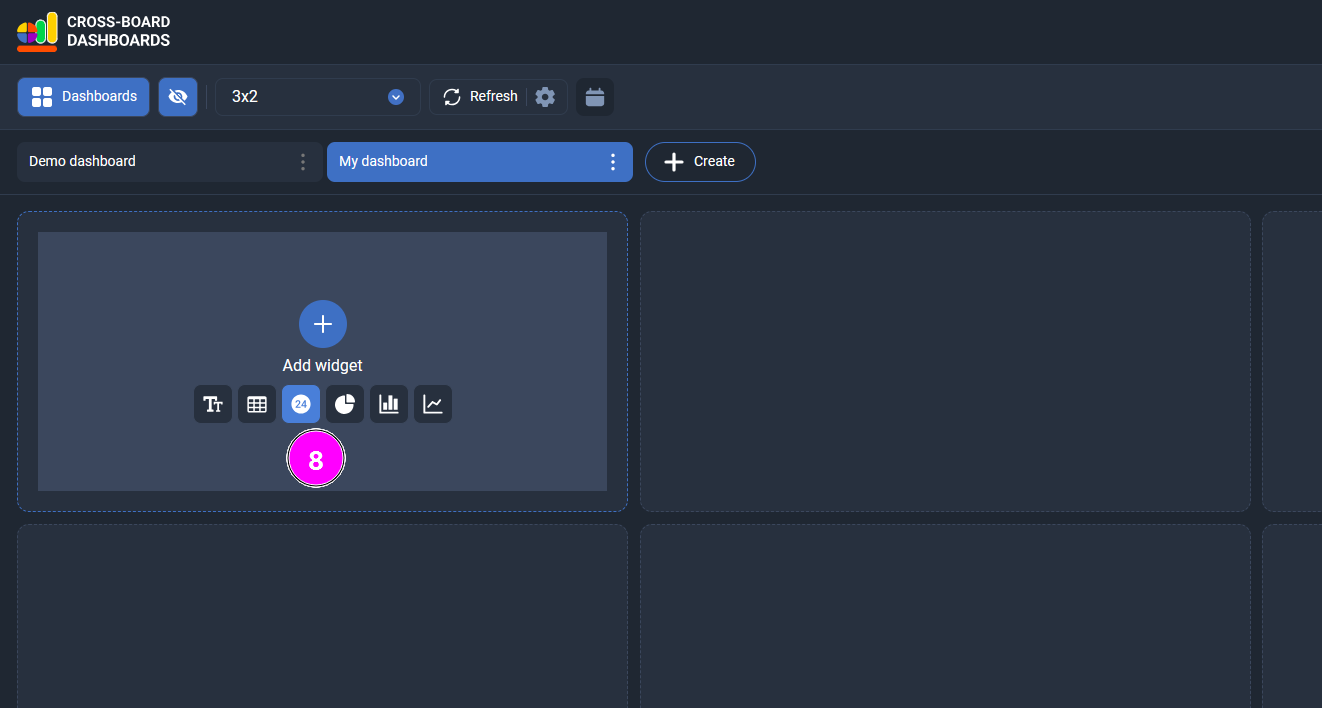
- Adding a widget
To add a new widget, hover over any empty tile on the dashboard. A panel with widget types will appear — click the icon of the widget you want to add (text block, counter, table, chart, etc.).
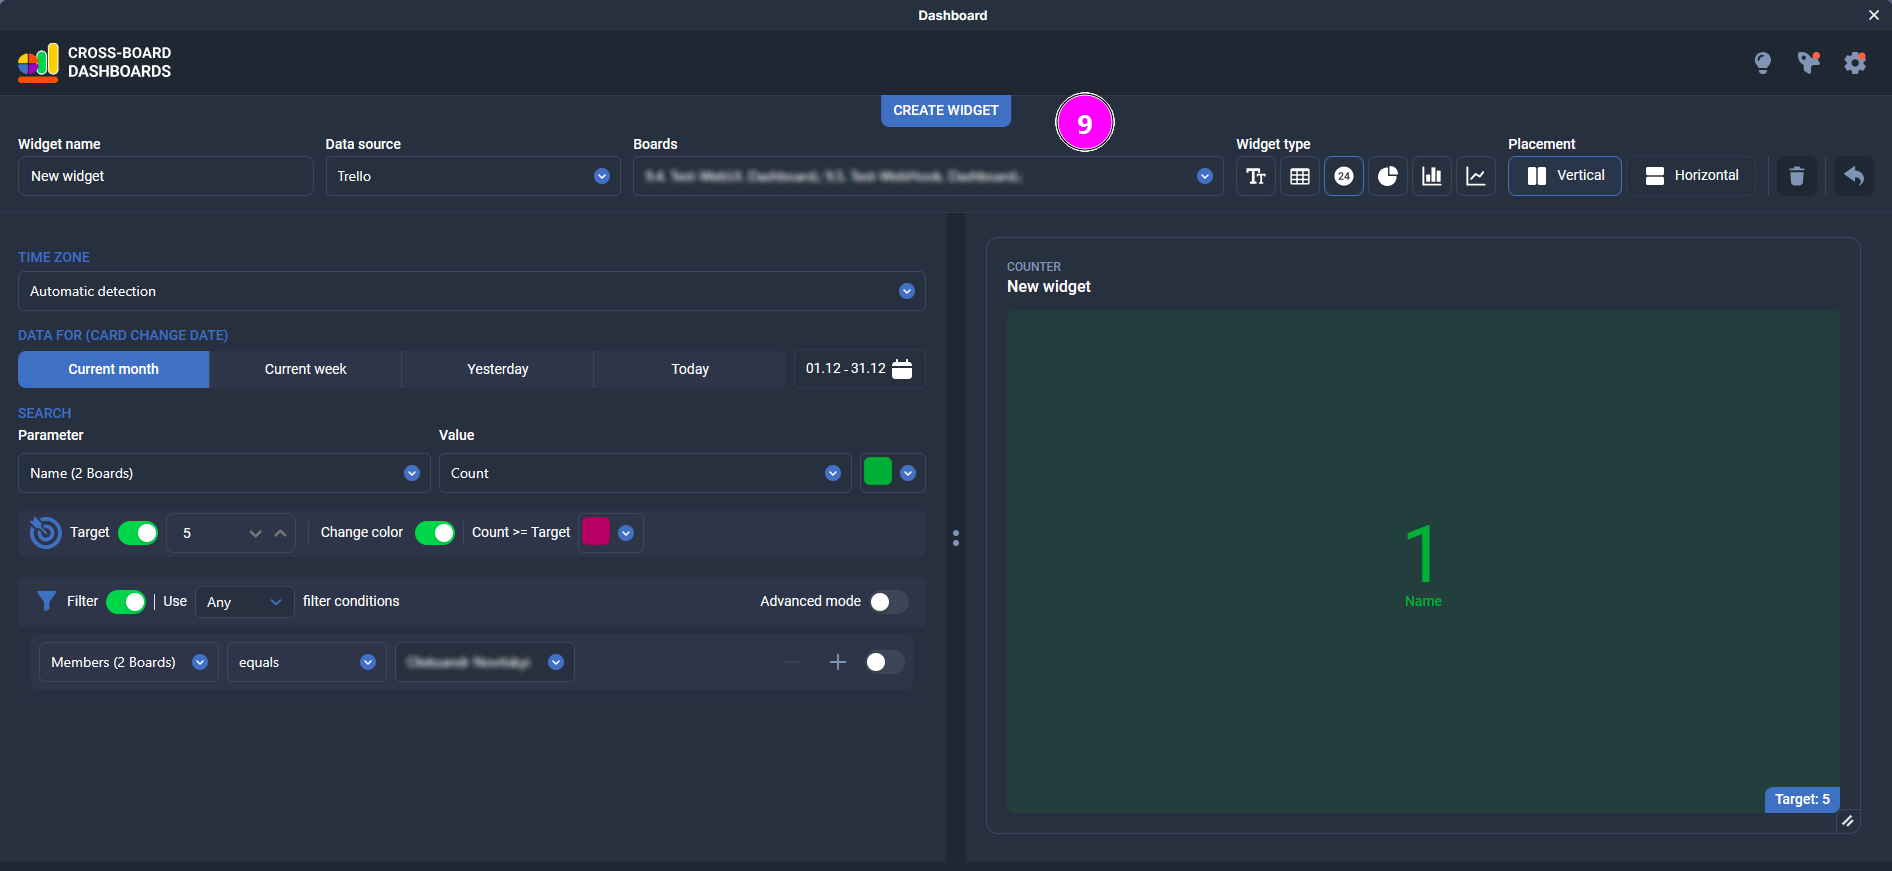
- Widget settings
In the widget settings window you define what data the widget shows and how it’s visualized. The left side contains all configuration options, the right side shows a live preview. The Placement toggle (Vertical / Horizontal) changes how these areas are arranged — one above the other or side by side, as on the screenshot.
Here you can:
set the widget name, data source and select the Trello boards to pull data from;
choose the widget type (text block, table, counter, charts) and the preview layout (Vertical / Horizontal);
configure the time zone and the period used for card changes (current month, current week, yesterday, today or a custom date range).
The Power-Up automatically detects your browser’s time zone and calculates “today/yesterday/week” and due dates accordingly. If your team spans multiple time zones, you can manually set a specific time zone for each widget so everyone sees correct local views;choose the metric (for example, number of cards) and set a Target value, with automatic color change when the target is reached;
add filters to decide which cards are included (by members, lists, labels, custom fields, etc.), in simple or advanced mode.
If the widget uses several boards, the app shows in brackets how many boards have a given field, for example: Members (2 boards). This is especially useful for custom fields with the same name on multiple boards.
There’s no separate Save button — changes are applied immediately as you adjust the settings. When you’re done, click the button in the top-right corner to return to the dashboards view.
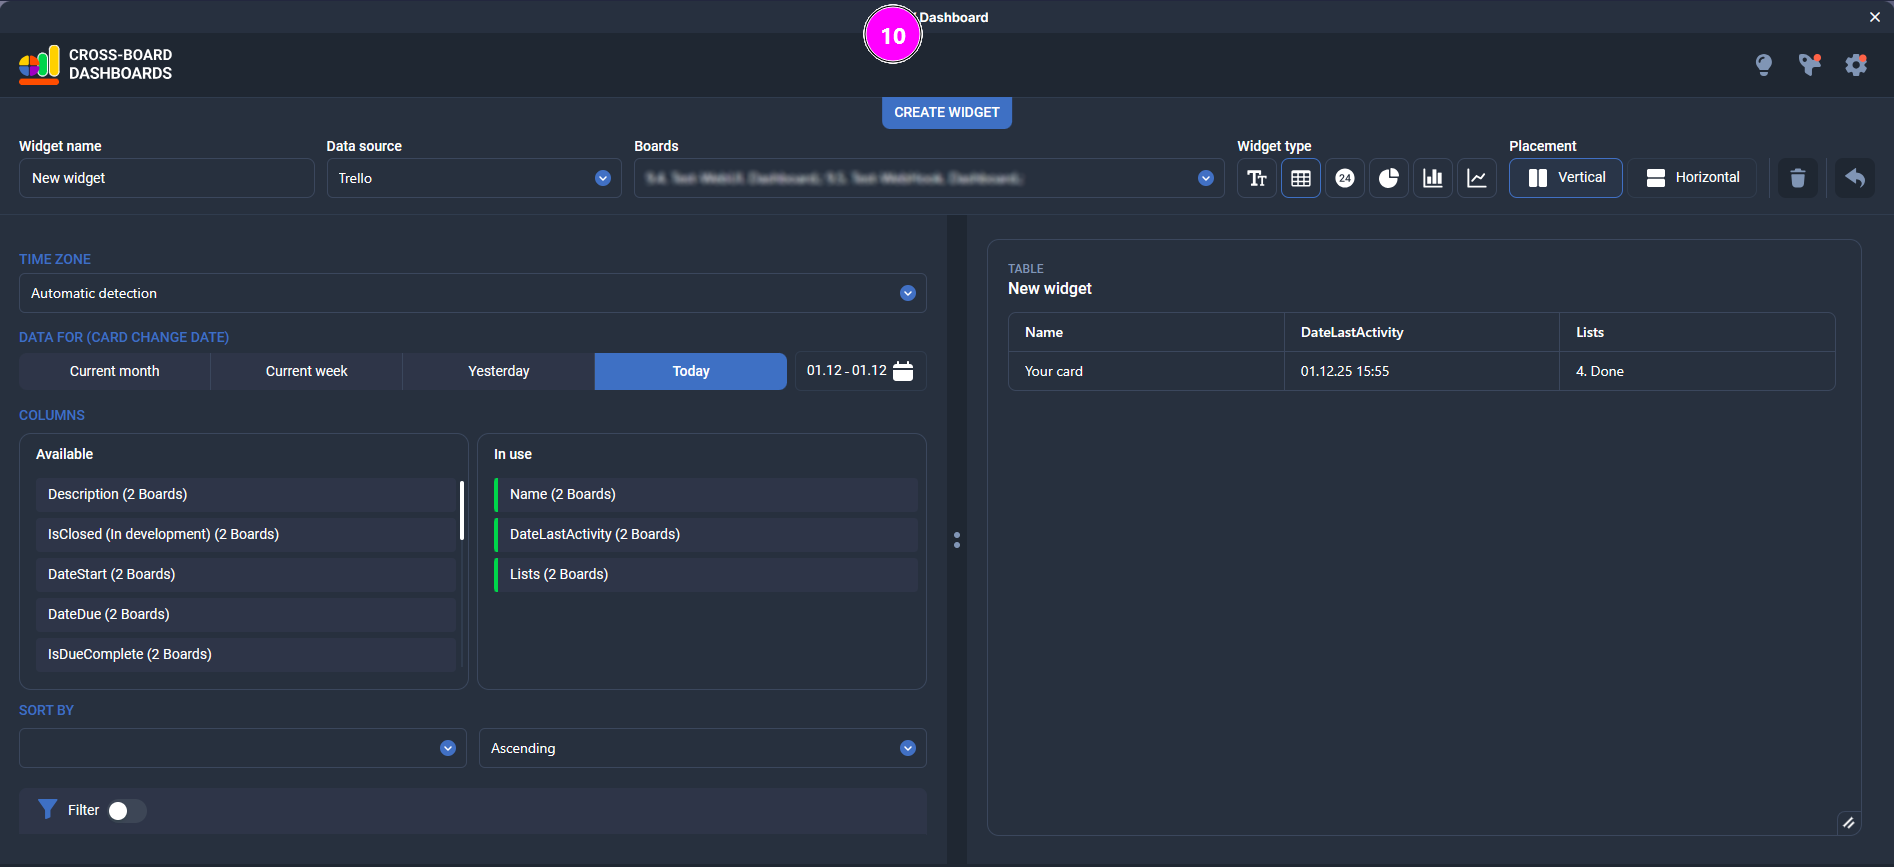
- Table widget settings
In the table mode you choose which Trello card fields will be shown in the table and in what order.
The Available block on the left shows all standard and custom fields (Name, Lists, Labels, DateStart, DateDue, DateLastActivity, etc.).
The In use block on the right shows the columns that are already used in the table.
To add a column to the table, drag it from Available to In use.
To change the column order, simply drag the items within the In use list.At the top of the window you can also:
set the period for the card change date (today, yesterday, current week, current month or a custom date range);
choose a field to sort by in the Sort by section and set the sort direction (Ascending / Descending);
enable Filter if needed to limit which cards are included in the table.
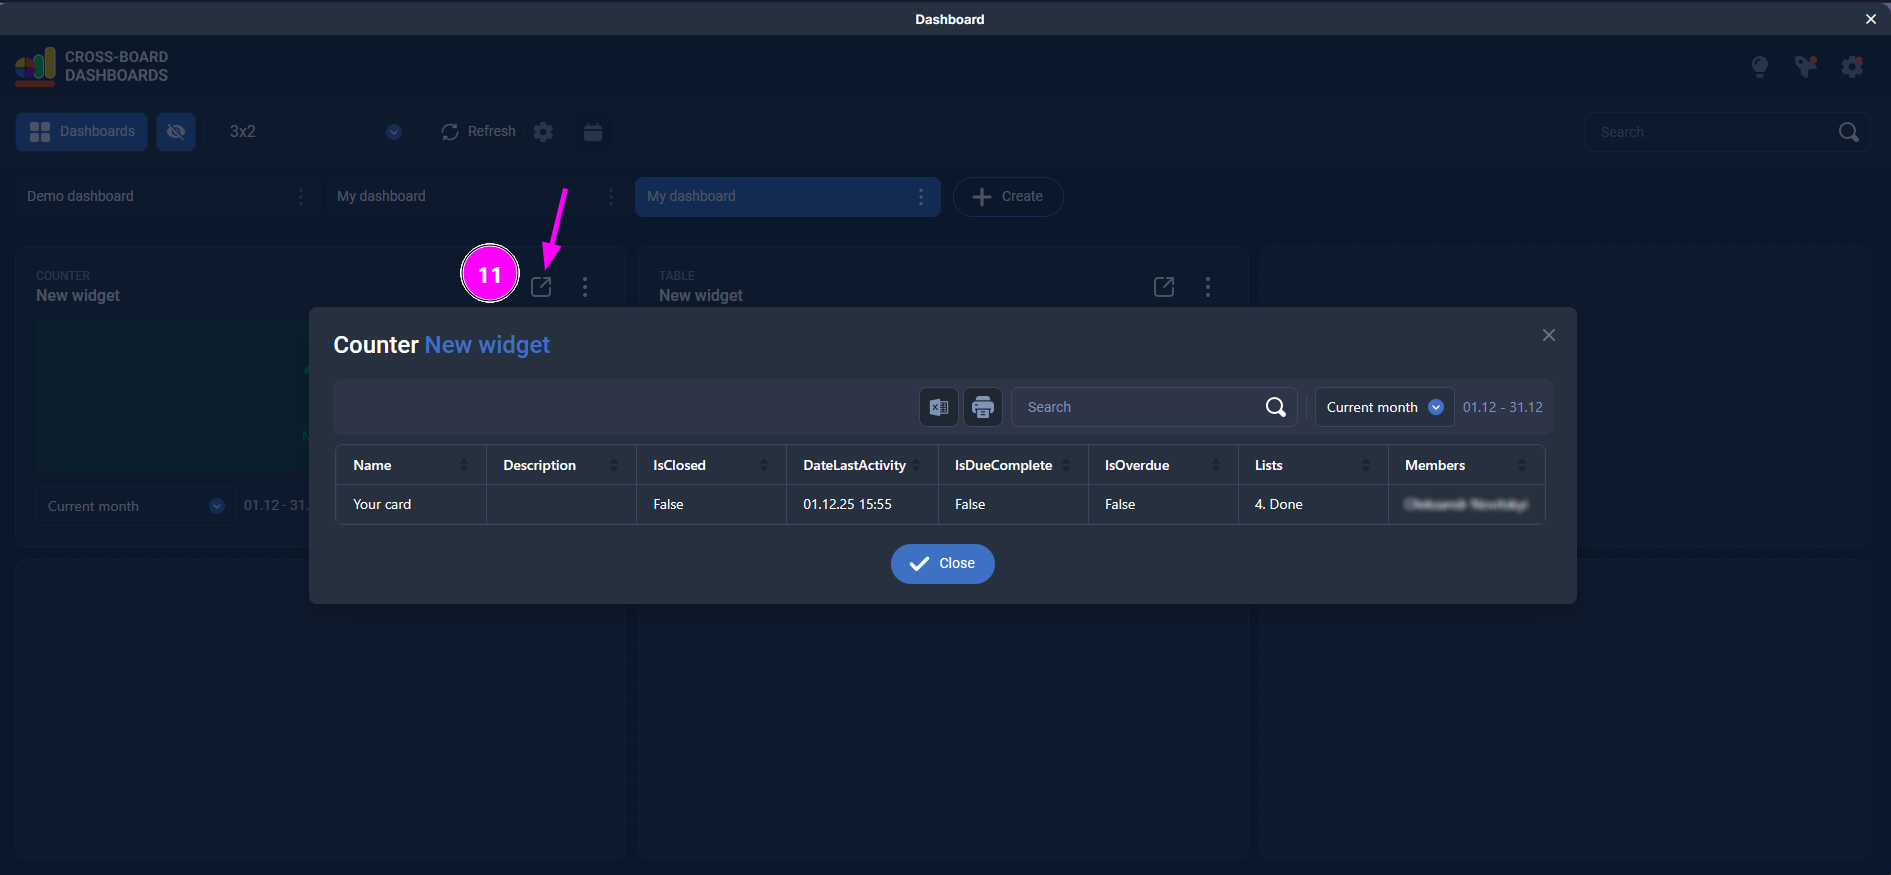
- Managing a widget on the dashboard
To resize a widget, drag it using the handle in the bottom-right corner.
To move a widget, grab its top area and drag it to any free cells in the grid.
By clicking the expand icon, you open a table with all the cards used to build this widget. There you can review, sort, and filter the data in more detail.
By clicking the three-dot menu, you can perform additional actions: rename the widget, open its settings, create a copy, move it, or delete it.

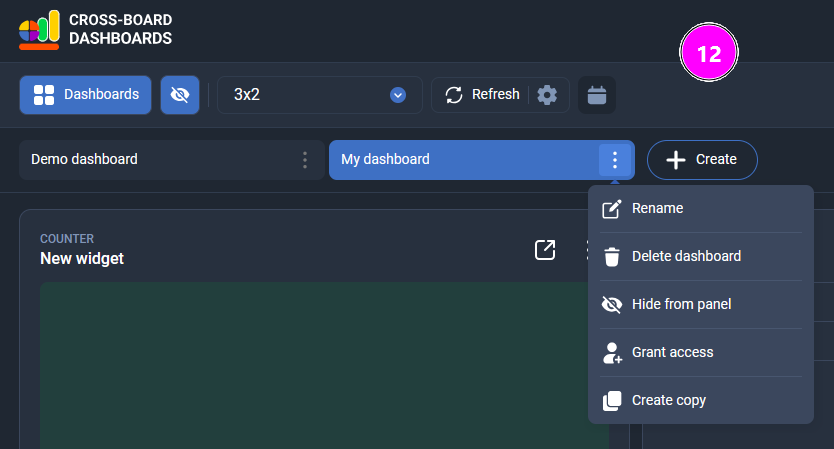
- Managing a dashboard
From the menu next to the dashboard name (three-dot icon) you can:
Rename – change the dashboard name.
Delete dashboard – permanently remove the dashboard.
Hide from panel – hide the dashboard from the top tab bar (the dashboard is not deleted and can be shown again later).
Grant access – share the dashboard with other users.
Create copy – duplicate the dashboard with all its widgets and settings.
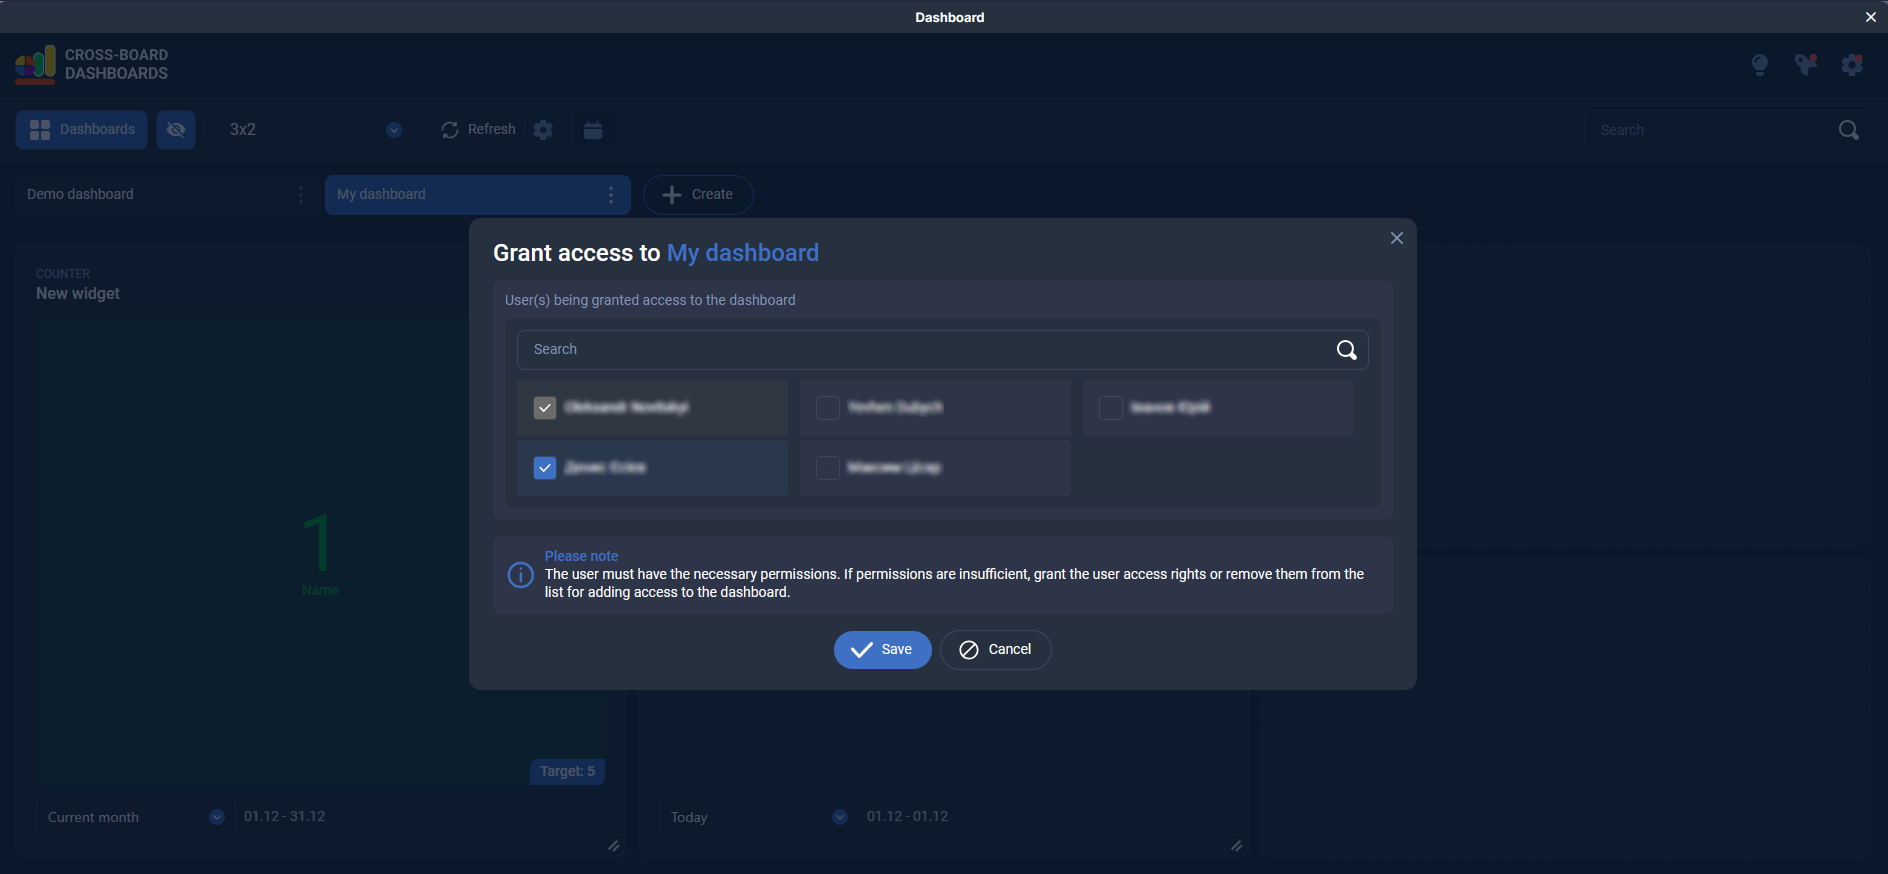
Sharing a dashboard
On some subscription plans you can share a dashboard with other members of your Trello boards.
To share a dashboard, open the three-dot menu for that dashboard and select Grant access.
In the dialog, search for and select the users you want to give access to.
A user must have the required permissions for the related Trello boards; otherwise they won’t appear in the list or won’t see all data.
The user you share the dashboard with does not need to buy a subscription. They can view the dashboards shared with them as long as the subscription of the owner who granted access remains active.
Έχετε ερωτήσεις; Ρωτήστε μας
Θα σας συμβουλέψουμε για τα προϊόντα της Plain&Simple Solution και θα σας βοηθήσουμε να επιλέξετε το σωστό 😉