


Як це працює?
Це швидкий путівник за нашими продуктами. Тут лише найважливіше: перші кроки, відповіді на часті запитання та корисні поради, щоб за кілька хвилин перейти від ідеї до результату.
![]() Board Assistant
Board Assistant
 Cross-Boards Dashboards
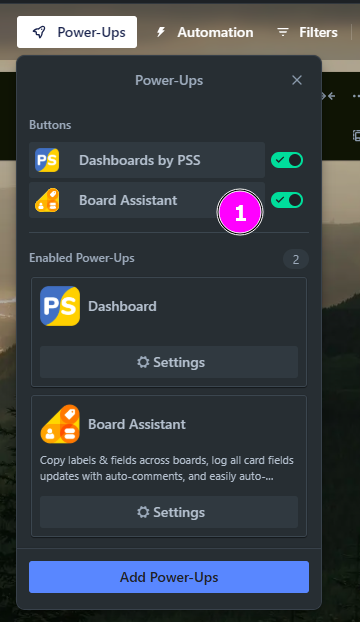
- Перевірка активації
Після встановлення Power-Up відкрийте меню Power-Ups на панелі вашої дошки Trello. Переконайтесь, що Board Assistant відображається в списку активних розширень і має зелений перемикач (увімкнений стан).
- Авторизація
Знайдіть кнопку Board Assistant на верхній панелі Trello та натисніть на неї, щоб запустити додаток. У вікні, що з’явиться, ознайомтеся з Умовами використання та Політикою конфіденційності, поставте галочку та натисніть Sign in для авторизації.
- Надання доступу
У вікні авторизації Trello натисніть кнопку Allow, щоб надати Board Assistant доступ до ваших дошок і робочих просторів. Це необхідно для коректної роботи автоматизацій та функцій додатку.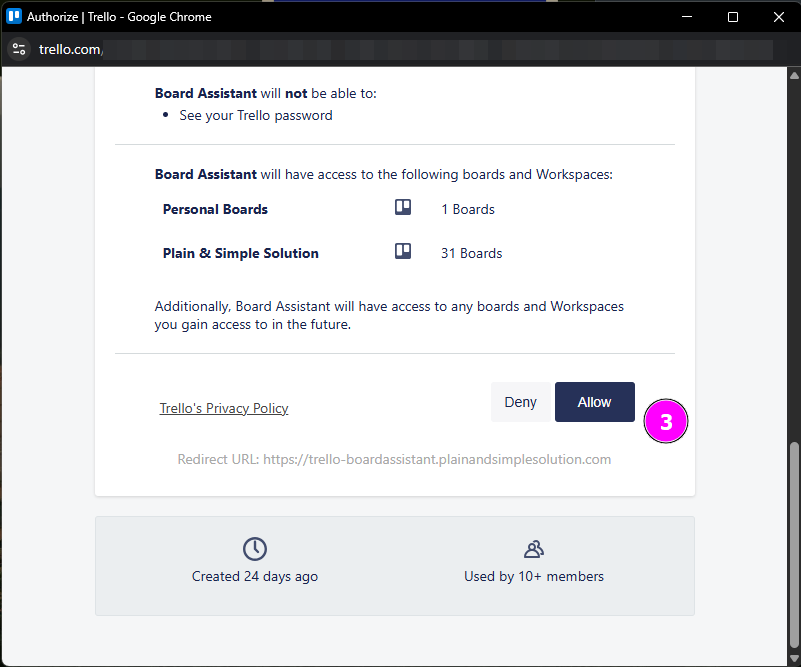
- Вибір тарифного плану
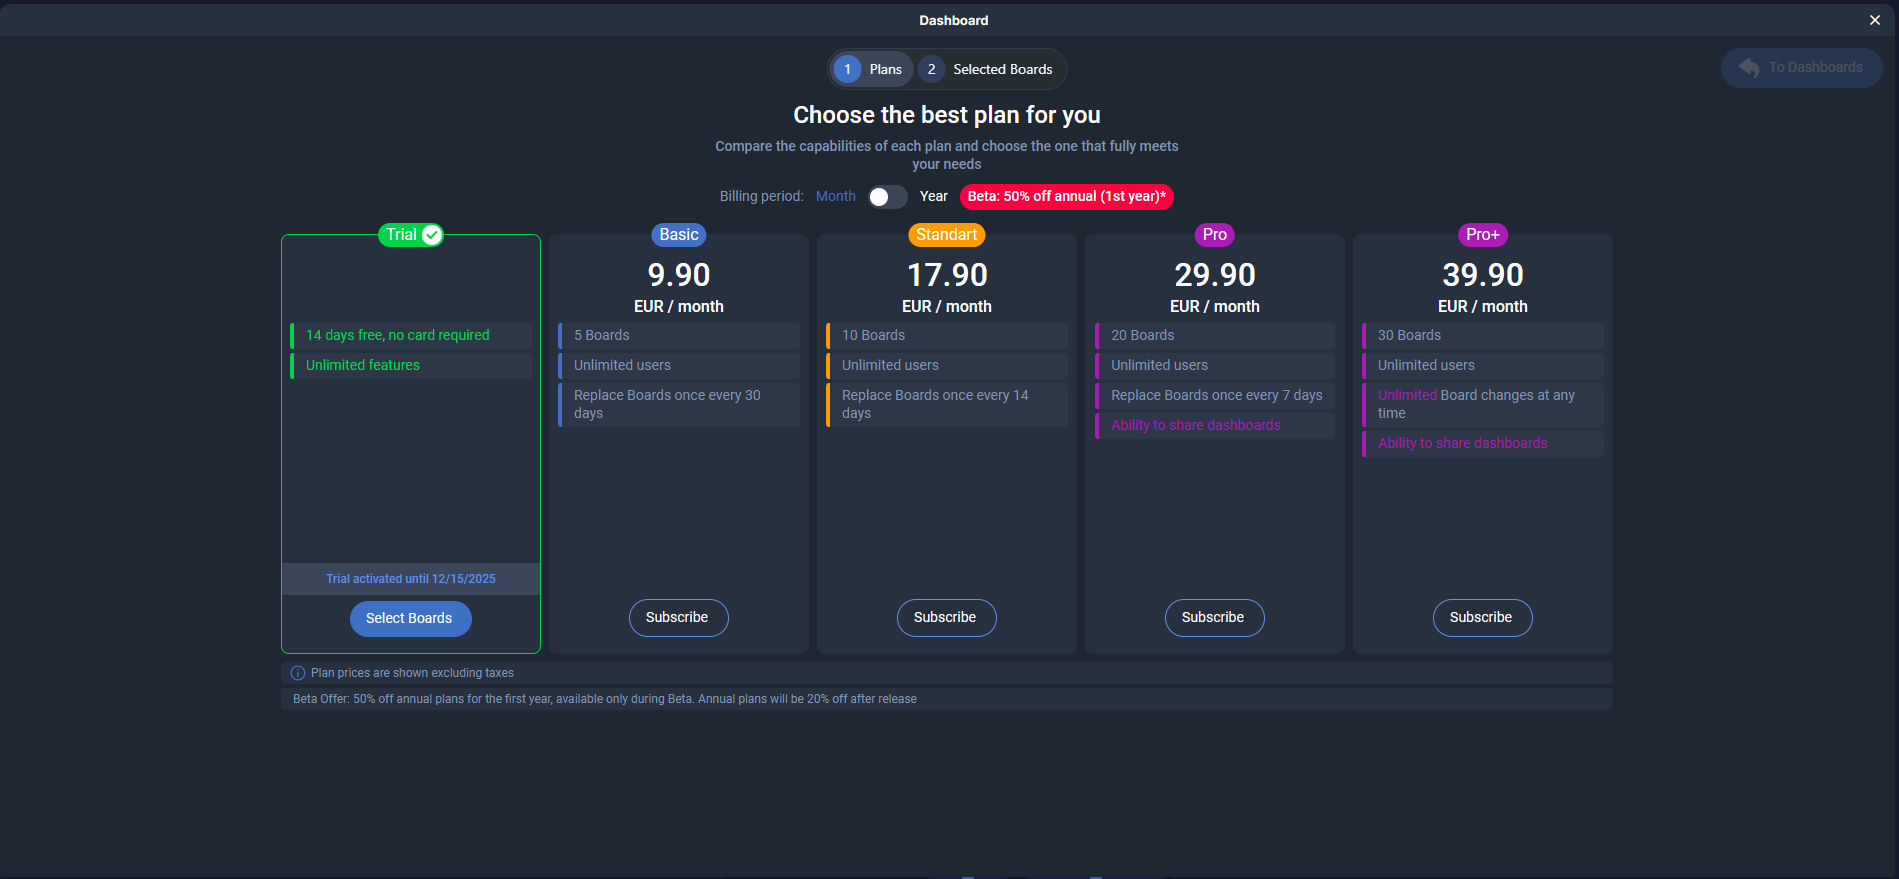
Після авторизації відкриється сторінка з тарифами.
Оберіть безкоштовну підписку (до 2-х дошок) або інший тариф, що найкраще відповідає вашим потребам.
Натисніть Subscribe, щоб активувати обраний план.
🔔 Важливо: Безкоштовна підписка буде недоступна, якщо хтось інший у вашому робочому просторі вже використовує її або має платну підписку.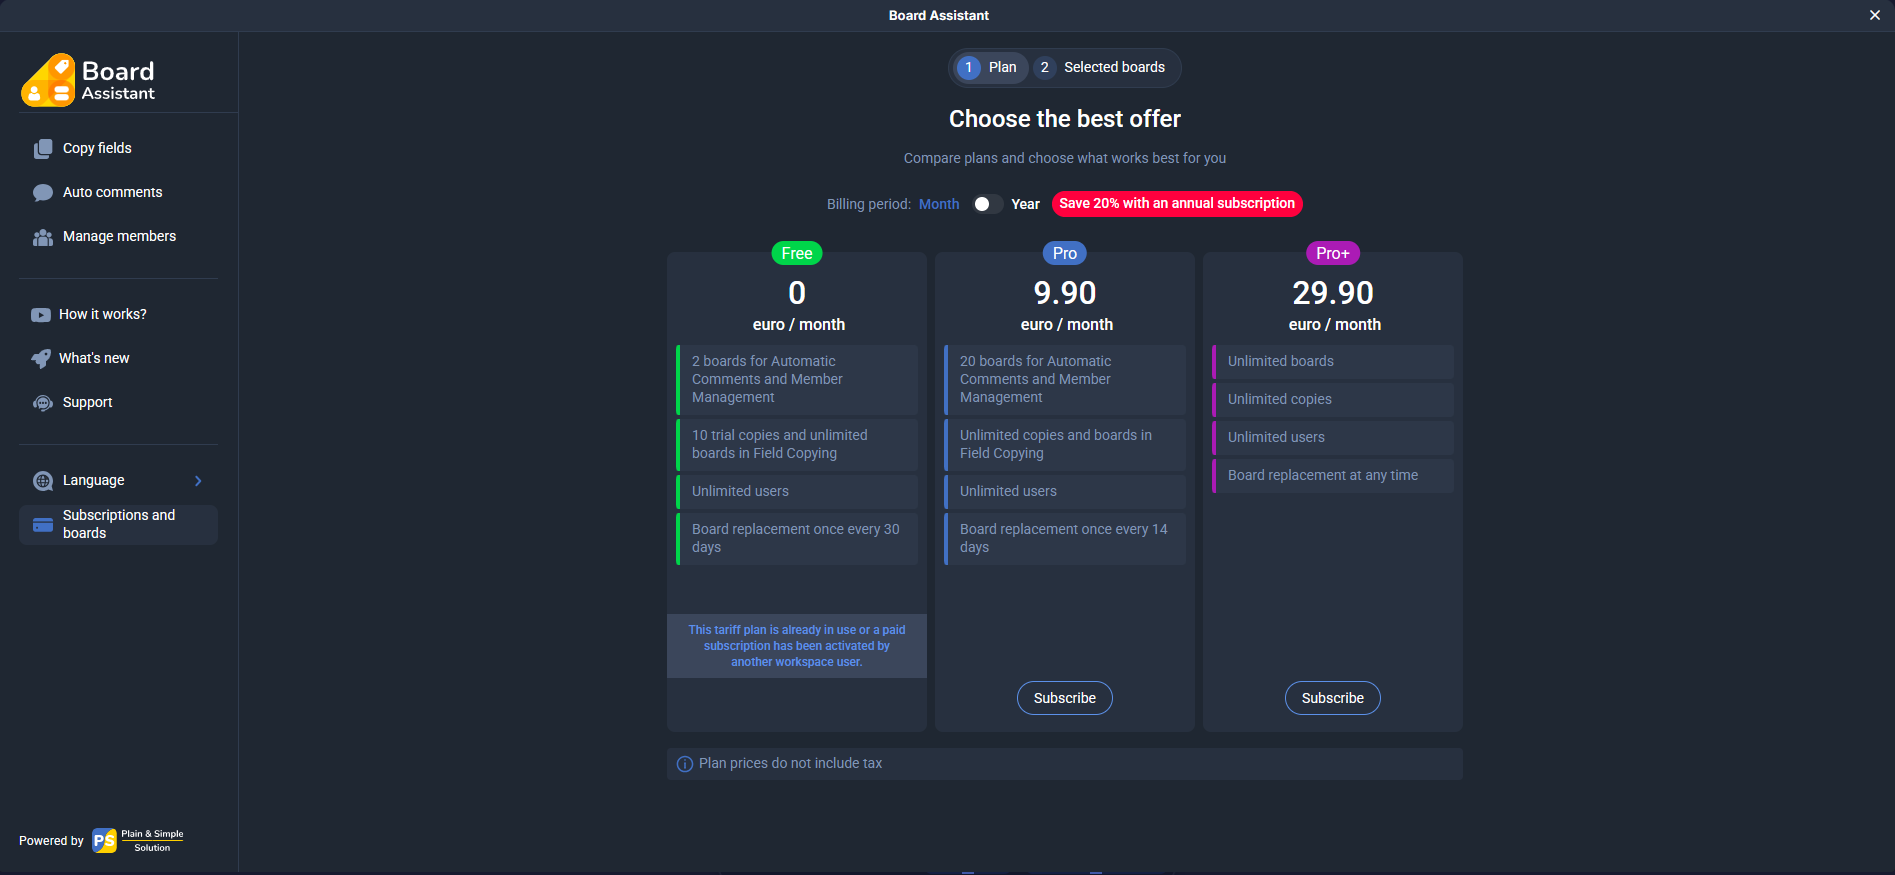
- Вибір дошок
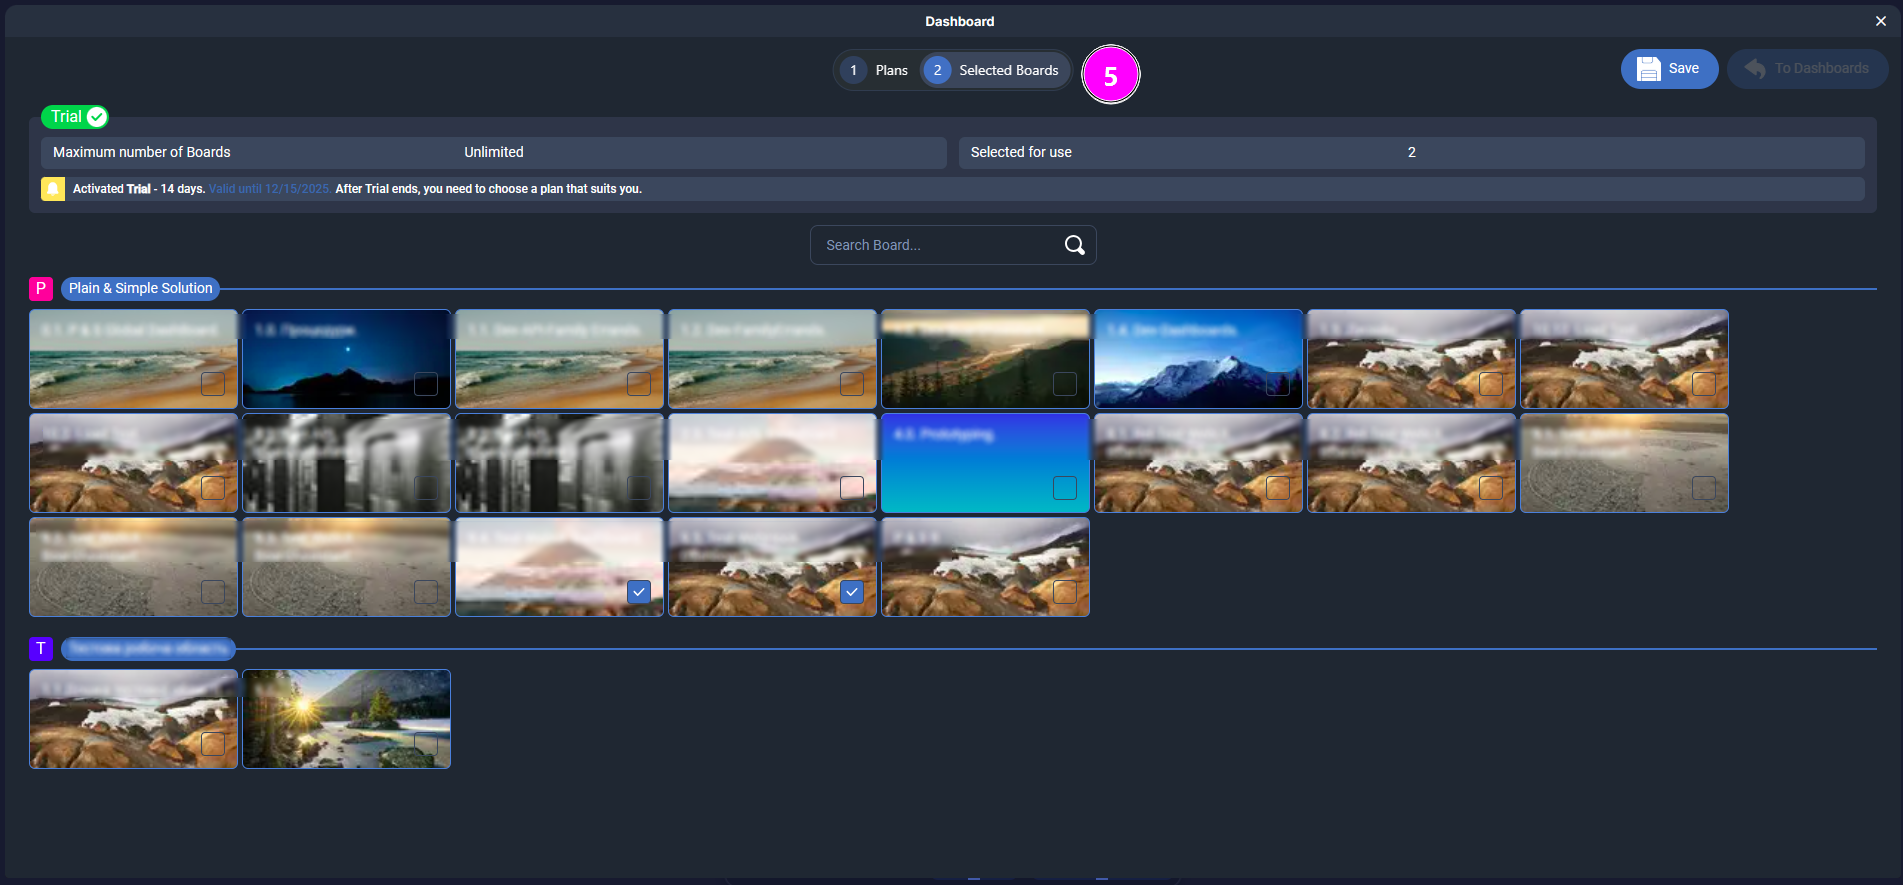
Після активації підписки відкрийте вкладку Selected boards, оберіть дошки, з якими працюватиме Board Assistant, і натисніть Save.
Зміна дошок доступна раз на 30 днів, починаючи з дати вибору першої дошки.Ви не зобов’язані одразу обирати всі дошки, доступні за підпискою — додавайте їх за потреби в будь-який момент.Дошки, обрані іншими учасниками вашого робочого простору, відображаються з іконками їхніх профілів. Ви можете безкоштовно користуватись ними.Якщо учасник, який обрав таку дошку, видалить її зі своєї підписки — ви втратите доступ, тож за потреби варто додати її у власний список.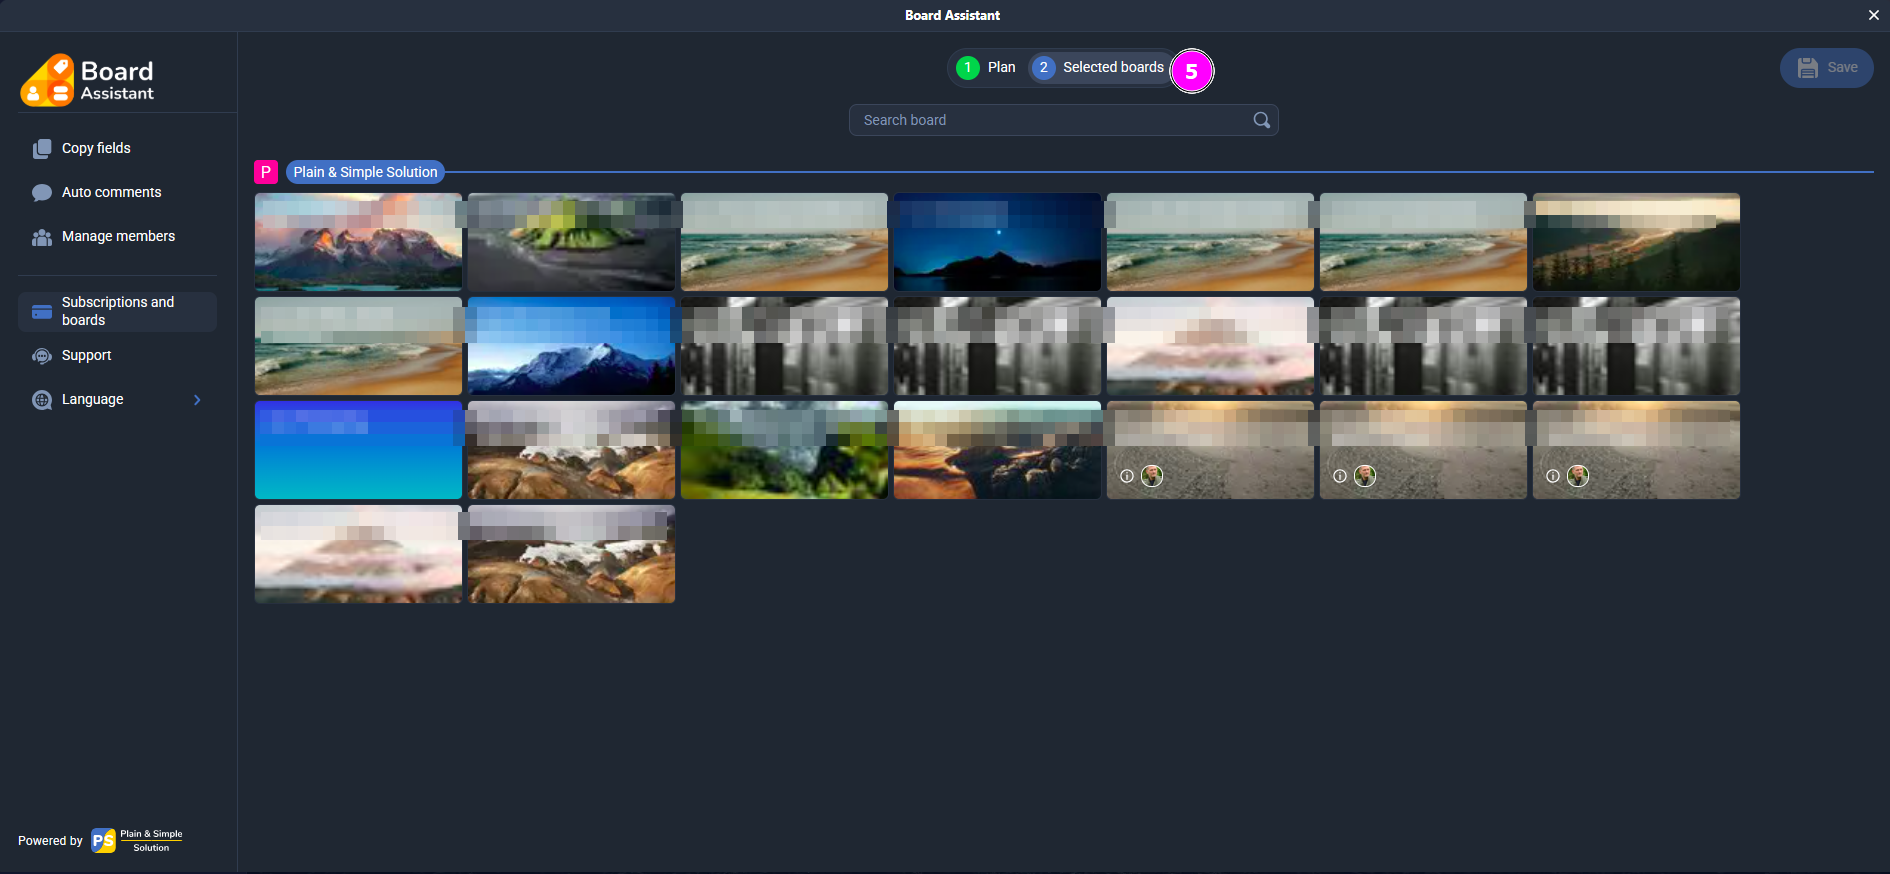
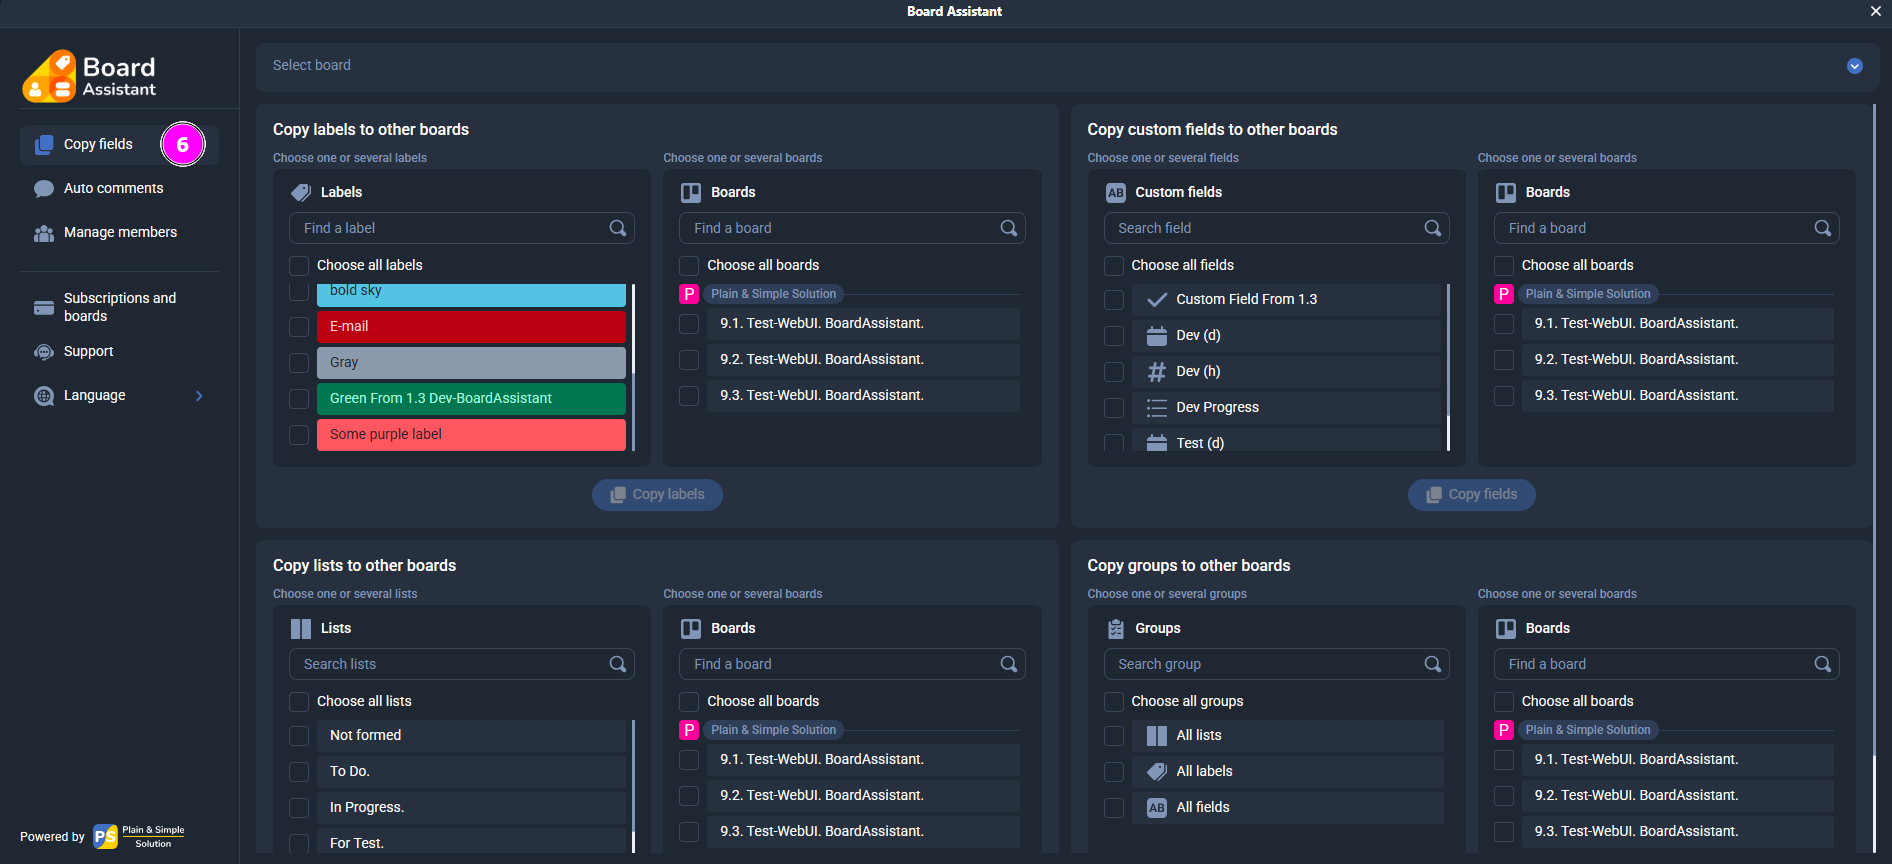
- Копіювання полів
У розділі Copy fields ви можете швидко переносити структуру між дошками:- Мітки (Labels)
- Користувацькі поля (Custom fields)
- Списки (Lists)
- Групи елементів (включно з усіма мітками, полями та списками одночасно)
Щоб скопіювати дані:
- Виберіть вихідну дошку (з випадаючого списку зверху).
- У потрібному блоці позначте елементи, які бажаєте скопіювати.
- Оберіть дошки, на які потрібно скопіювати.
- Натисніть кнопку Copy.
⚠️ Якщо на обраних дошках вже існують такі ж елементи, вони не будуть дублюватися — копіюються лише нові.
- Автоматичні коментарі
У розділі Auto comments ви можете активувати автоматичне логування змін у картках Trello для обраної дошки. Це особливо корисно для команд, де важливо відслідковувати, хто і що змінив.
Після активації, Board Assistant автоматично додає коментарі до карток у таких випадках:- Зміни у мітках
- Зміни у чеклістах
- Зміни у датах
- Зміни у користувацьких полях
Коментарі створюються від імені того користувача, який вніс зміни.
Формат коментаря зрозумілий і прозорий — вказується попереднє значення і нове. Наприклад:
The value of the custom field "Test (d)" was changed from 06/17/2025 09:00 to 06/18/2025 09:00
Це дозволяє бачити всі зміни без необхідності вручну відкривати поля чи історію активності.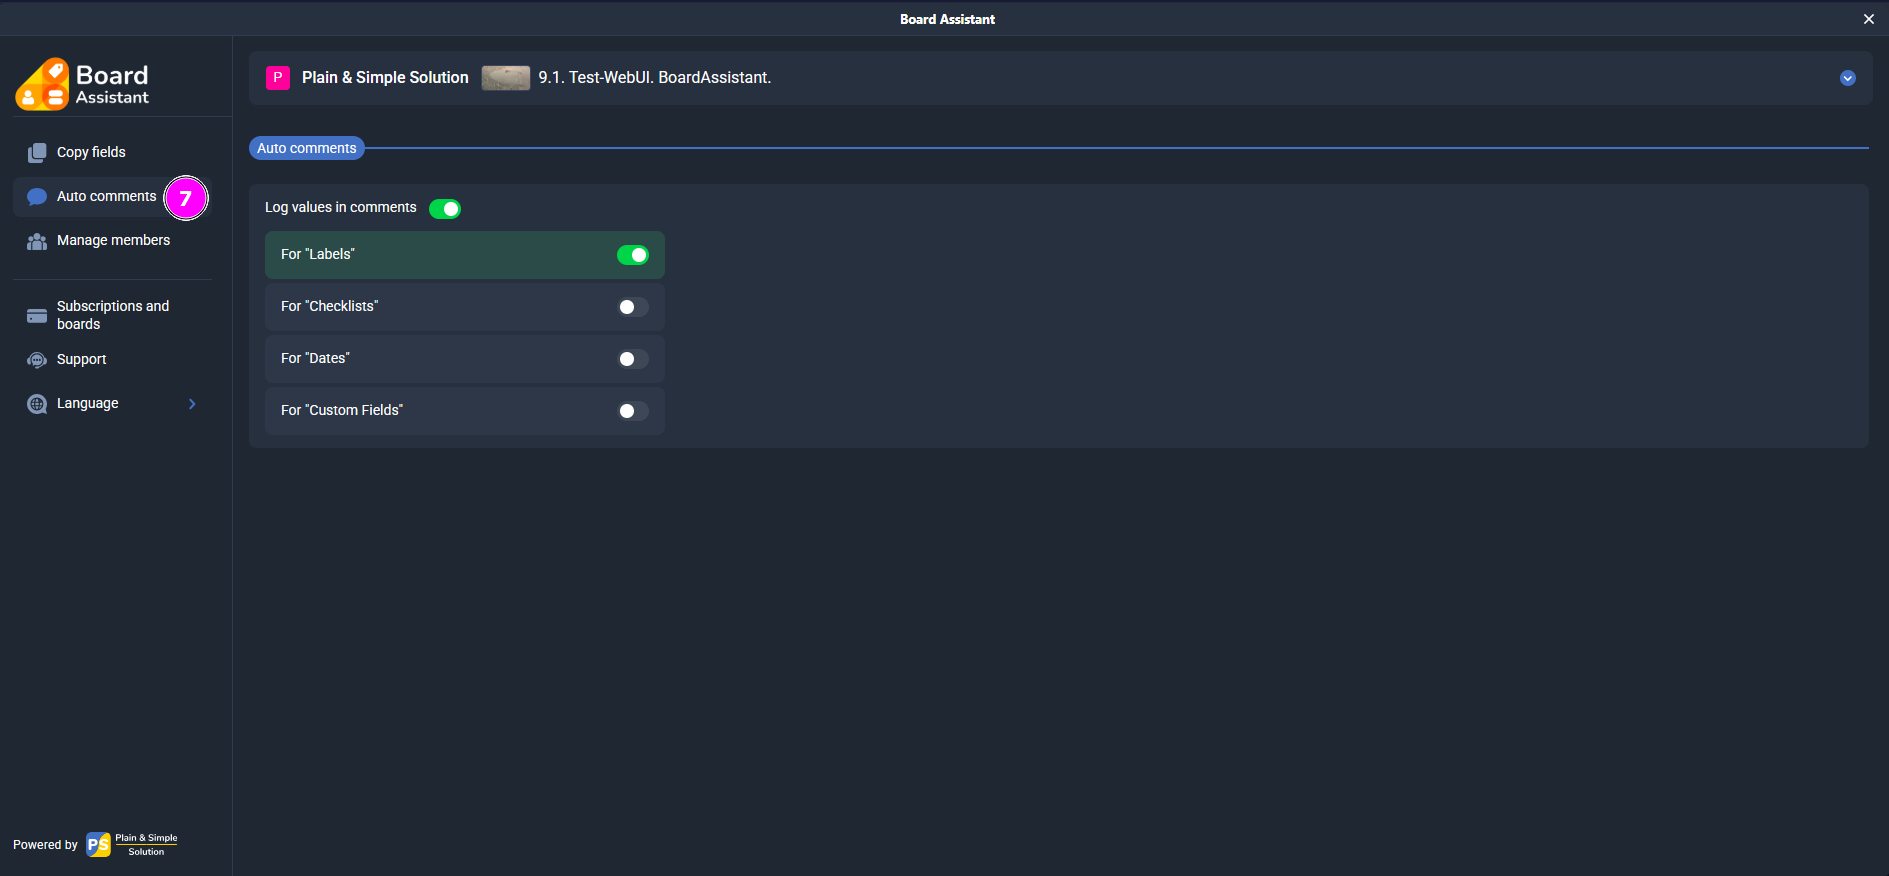
- Автоматичне керування учасниками
У розділі Manage members ви можете налаштувати автоматичне призначення або зміну учасників, коли картка потрапляє до певного списку.
Що можна налаштувати:- Тип дії — обирається з випадаючого списку:
- Without Change — не змінювати учасників
- Remove All Members — прибрати всіх учасників
- Replace Members — замінити поточних учасників на нових
- Add Members — додати нових до поточних
- Remove Members — вибірково видалити зазначених
- Учасники — можна обрати одного або кількох учасників для кожного списку.
- Показувати в картці (Show in the card) — дозволяє редагувати налаштування прямо з картки.
- Сховати учасника зі списку в картці — приховує користувача зі списку вибору, але не вимикає сценарій.
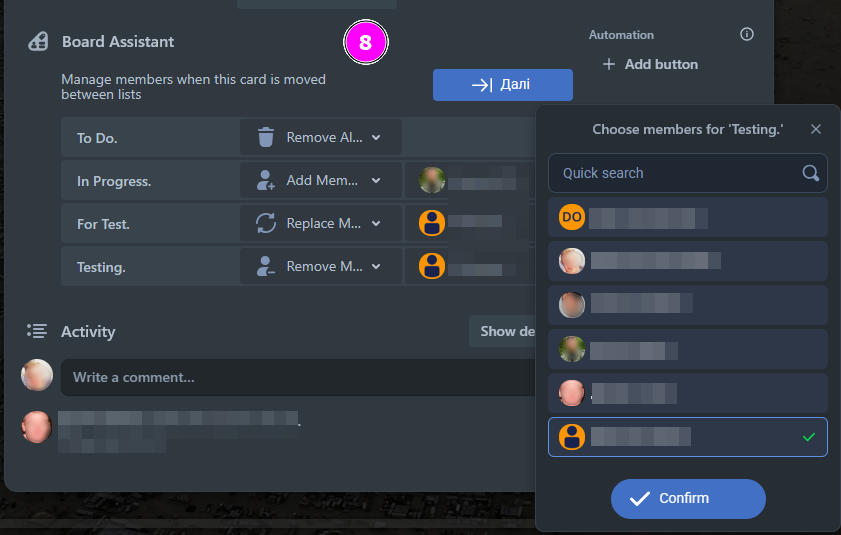
Локальні налаштування в картці
У кожній картці ви можете індивідуально змінити автоматичний сценарій керування учасниками, який було задано на рівні списку. Це зручно у випадках, коли для окремої картки потрібен інший порядок дій, ніж для інших у цьому ж списку.
Як це зробити:- Відкрийте картку.
- Знайдіть секцію Board Assistant (відображається під описом або над активністю).
- Ви побачите поточні налаштування — дію (тип зміни учасників) та список учасників.
- Змініть їх відповідно до потреб саме цієї картки.
- Зміни зберігаються автоматично та будуть діяти лише для цієї картки — незалежно від того, що задано для всього списку.
⬆️ Пріоритет: Локальні налаштування мають вищий пріоритет, ніж глобальні. Тобто, навіть якщо картка переміститься до списку з активним сценарієм, буде виконано локальний сценарій, якщо він заданий.
Приклад 1: Виключення з правила
У списку “To Do” за замовчуванням діє правило:
Дія: Replace Members, Учасники: Марк, Марія
Проте для картки “Термінове завдання” ви хочете, щоб працював лише Джон.
Ви відкриваєте картку, переходите в Board Assistant, змінюєте дію на:
Replace Members, Учасник: Джон
➡️ У результаті, коли ця картка потрапляє у список “To Do”, вона отримає тільки Джона — а не Марка і Марію.Приклад 2: Відключення сценарію
У списку “В очікуванні” стоїть глобальна дія:
Remove All Members
Але картка “Узгодження з юристом” має залишатися з поточними учасниками.
У Board Assistant в картці ви змінюєте дію на:
Without Change
➡️ Таким чином, при переміщенні в цей список, картка не втратить учасників.Завдяки локальним сценаріям ви можете будувати гнучкі винятки, які дозволяють налаштовувати роботу не тільки за списками, а й на рівні кожної окремої картки.
Кнопка “Next list”
Додайте зручну кнопку “Next list” у картку. Вона дозволяє перемістити картку до наступного списку в один клік. Ви можете задати власну назву (до 16 символів).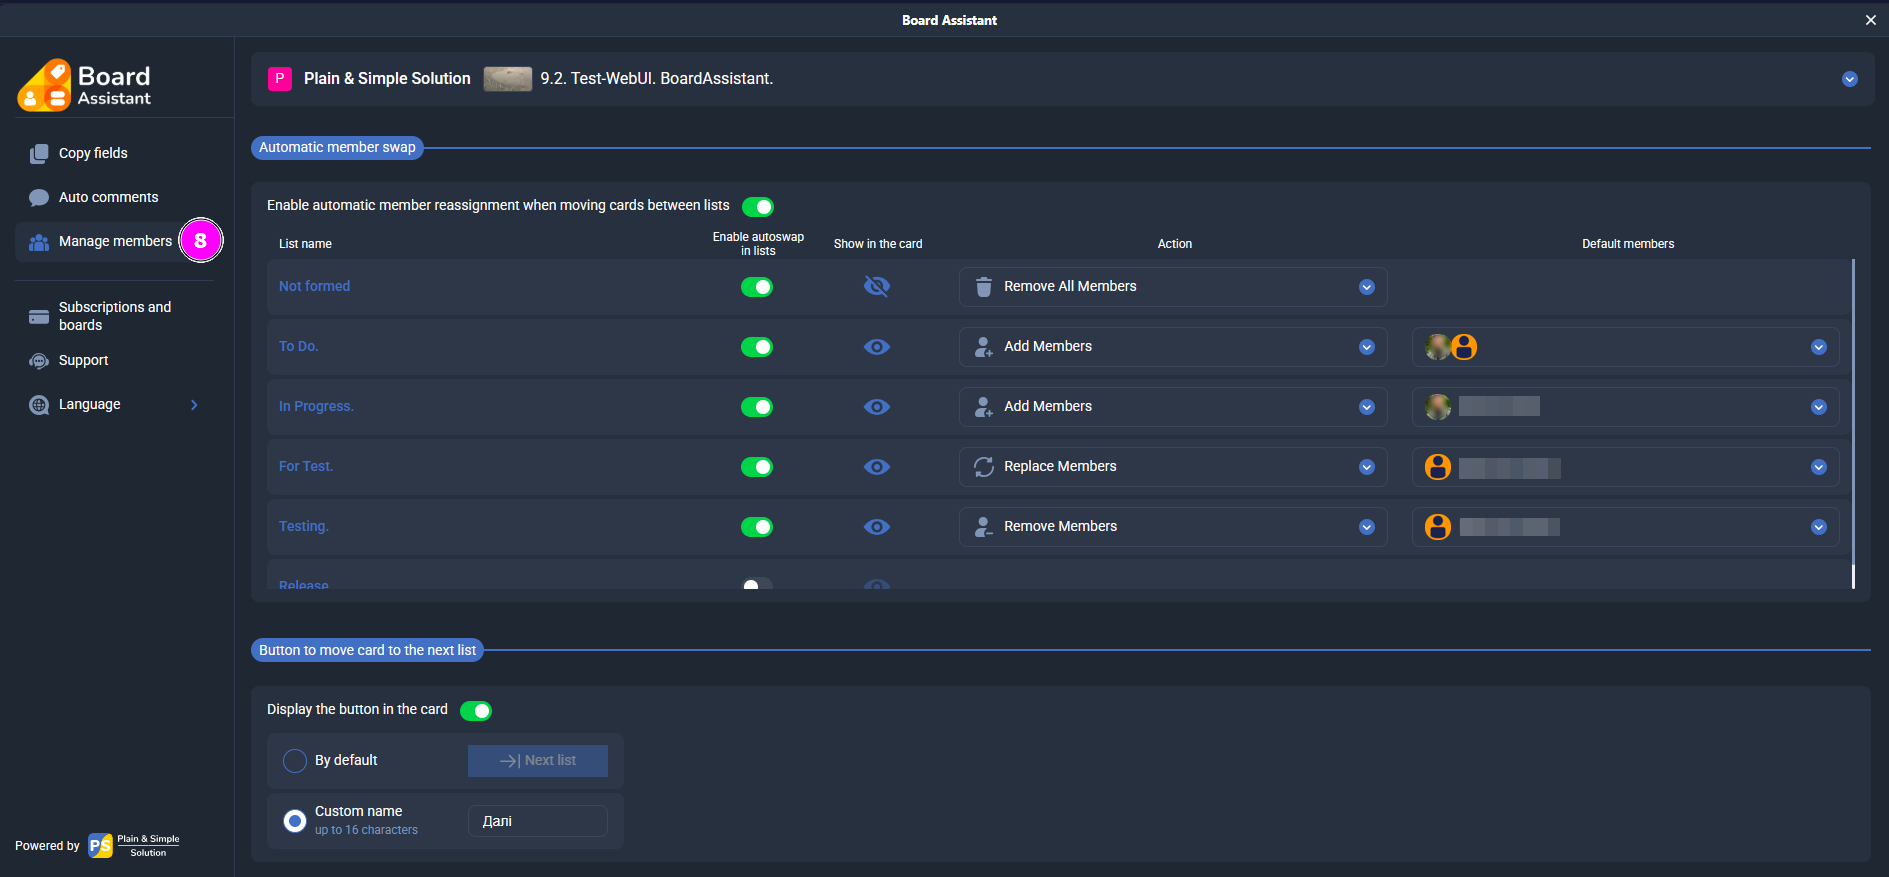
- Тип дії — обирається з випадаючого списку:
- Activation Check
After installing the Power-Up, open the Power-Ups menu on your Trello board. Make sure that Cross-Boards Dashboards appears in the list of enabled Power-Ups and has a green toggle (enabled state).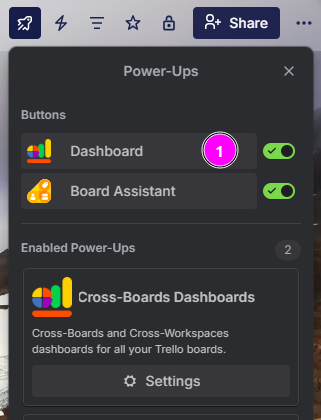
- Authorization
Locate the Cross-Boards Dashboards button in the top Trello panel and click it to launch the app. In the window that opens, review the Terms of Use and Privacy Policy, check the agreement box, and click Sign in to proceed with authorization.
- Granting Access
In the Trello authorization window, click Allow to grant Cross-Boards Dashboards access to your boards and workspaces. This access is required for proper functionality.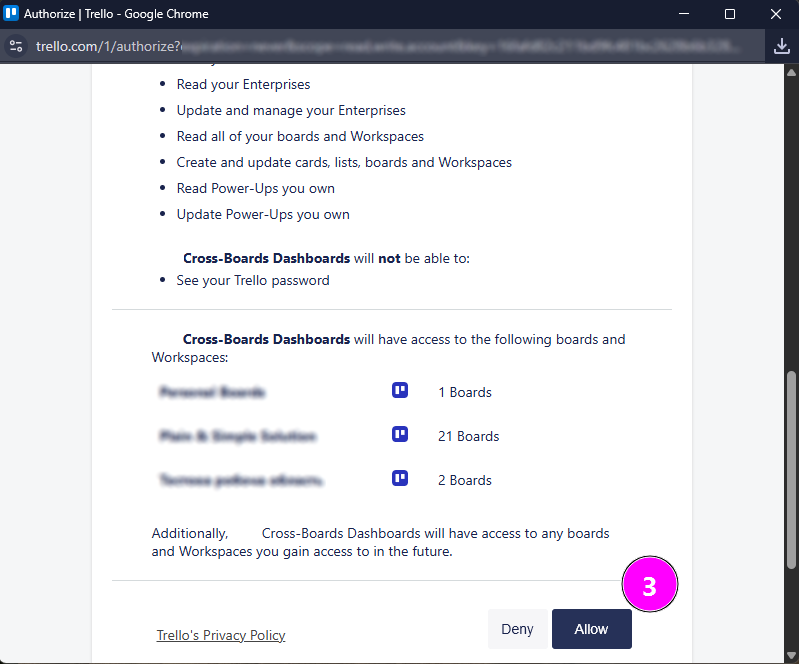
- Choose a subscription plan
After you authorize, the pricing plans page will open and a 14-day free trial will be activated for you automatically.
Click “Select boards” to go to the Trello boards selection, or activate the subscription plan you need right away.
- Selecting Boards
Open the “Selected boards” tab, choose the boards you want to use with Cross-Boards Dashboards, and click “Save”.
You can change your board selection once every certain number of days, depending on your subscription, counted from the moment you select the first board. You don’t have to connect all available boards right away — add them later whenever you need.
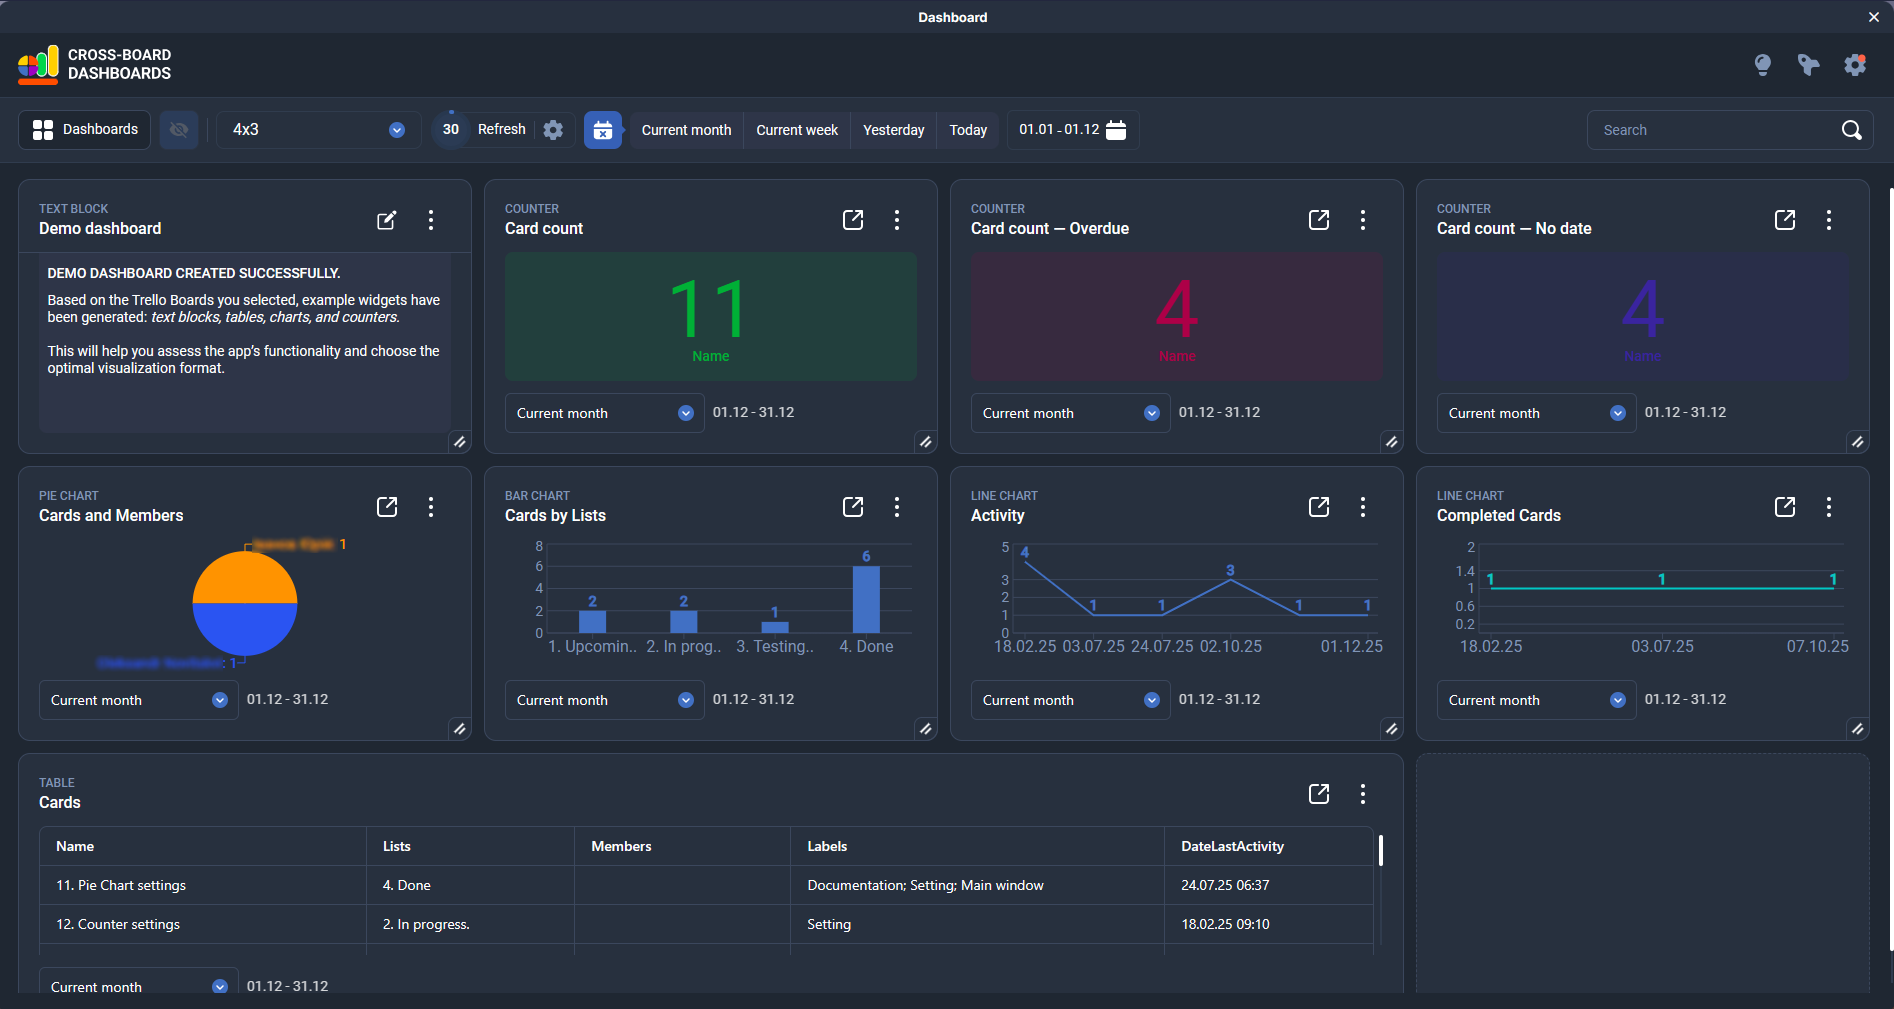
- Automatic demo dashboard
After you save your board selection and click “Go to dashboards”, the system will automatically create a demo dashboard. It will include data from the selected Trello boards for the current month and show the last activity date on cards.
The demo dashboard uses all widget types available in Cross-Boards Dashboards:
Text block — a short description of the dashboard and usage tips;
Counters — the total number of cards, overdue cards, cards without a date, etc.;
Pie chart — distribution of cards by members;
Bar chart — number of cards by lists;
Line chart — activity by dates of the last change on a card;
Table — a detailed list of cards with key fields (name, list, members, labels, dates).
This demo dashboard helps you quickly assess the app’s capabilities and choose the visualization format that works best for you.
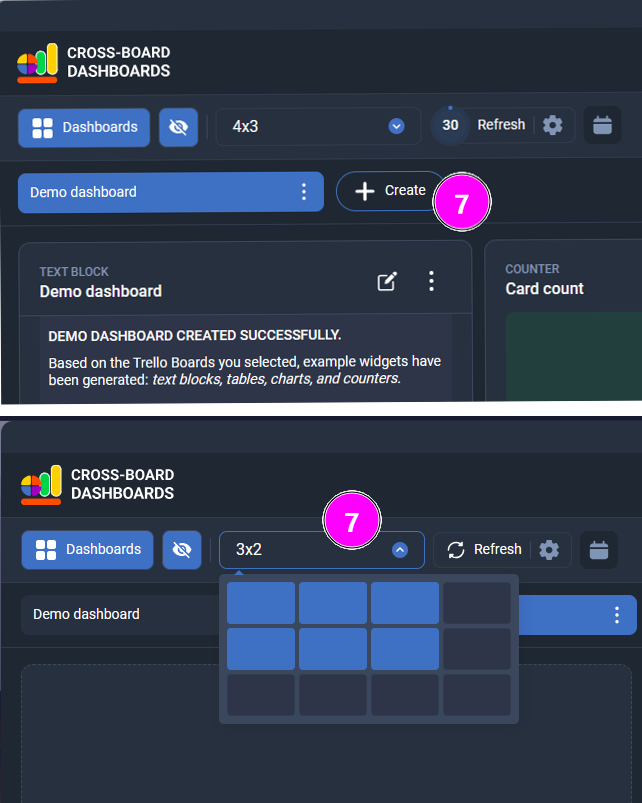
- Creating your own dashboardI
To create a new dashboard, click the “+ Create” button on the top bar. Enter a name for the dashboard and click the green button to save it.
By default, the dashboard grid is set to 3×2, but you can change it at any time by clicking the corresponding button on the top bar.
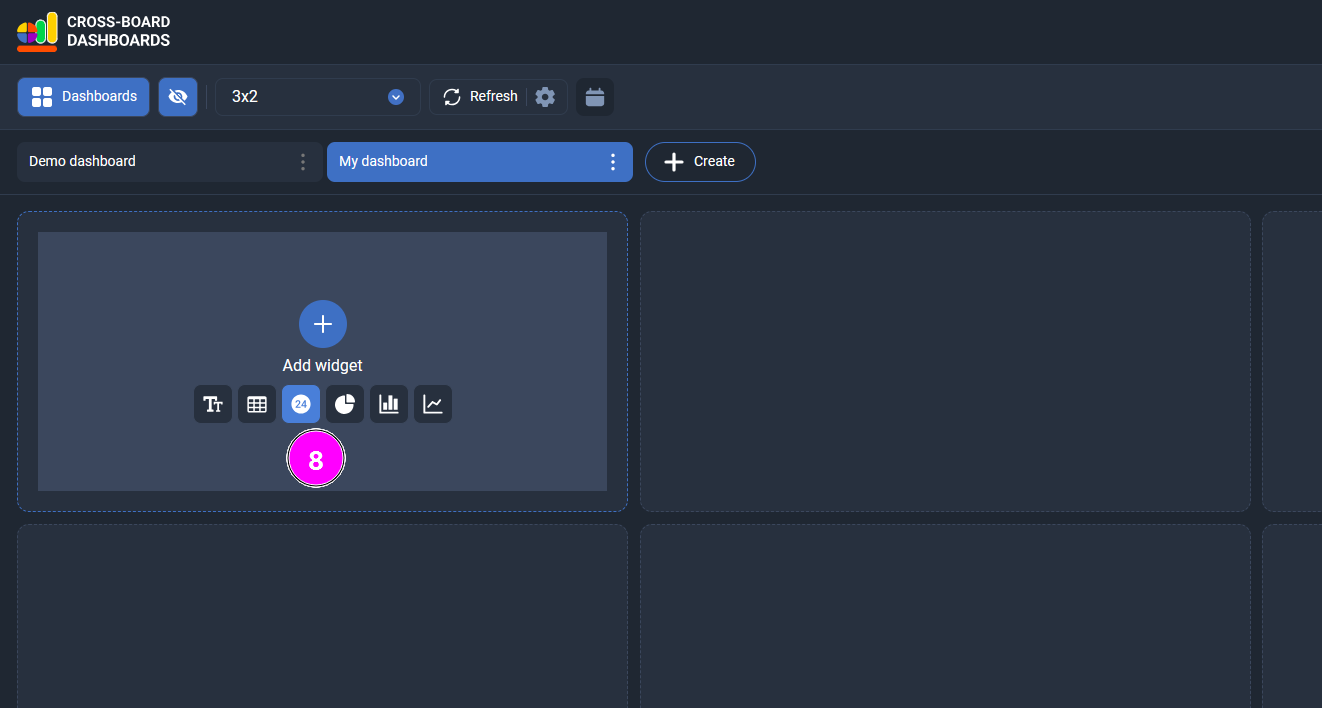
- Adding a widget
To add a new widget, hover over any empty tile on the dashboard. A panel with widget types will appear — click the icon of the widget you want to add (text block, counter, table, chart, etc.).
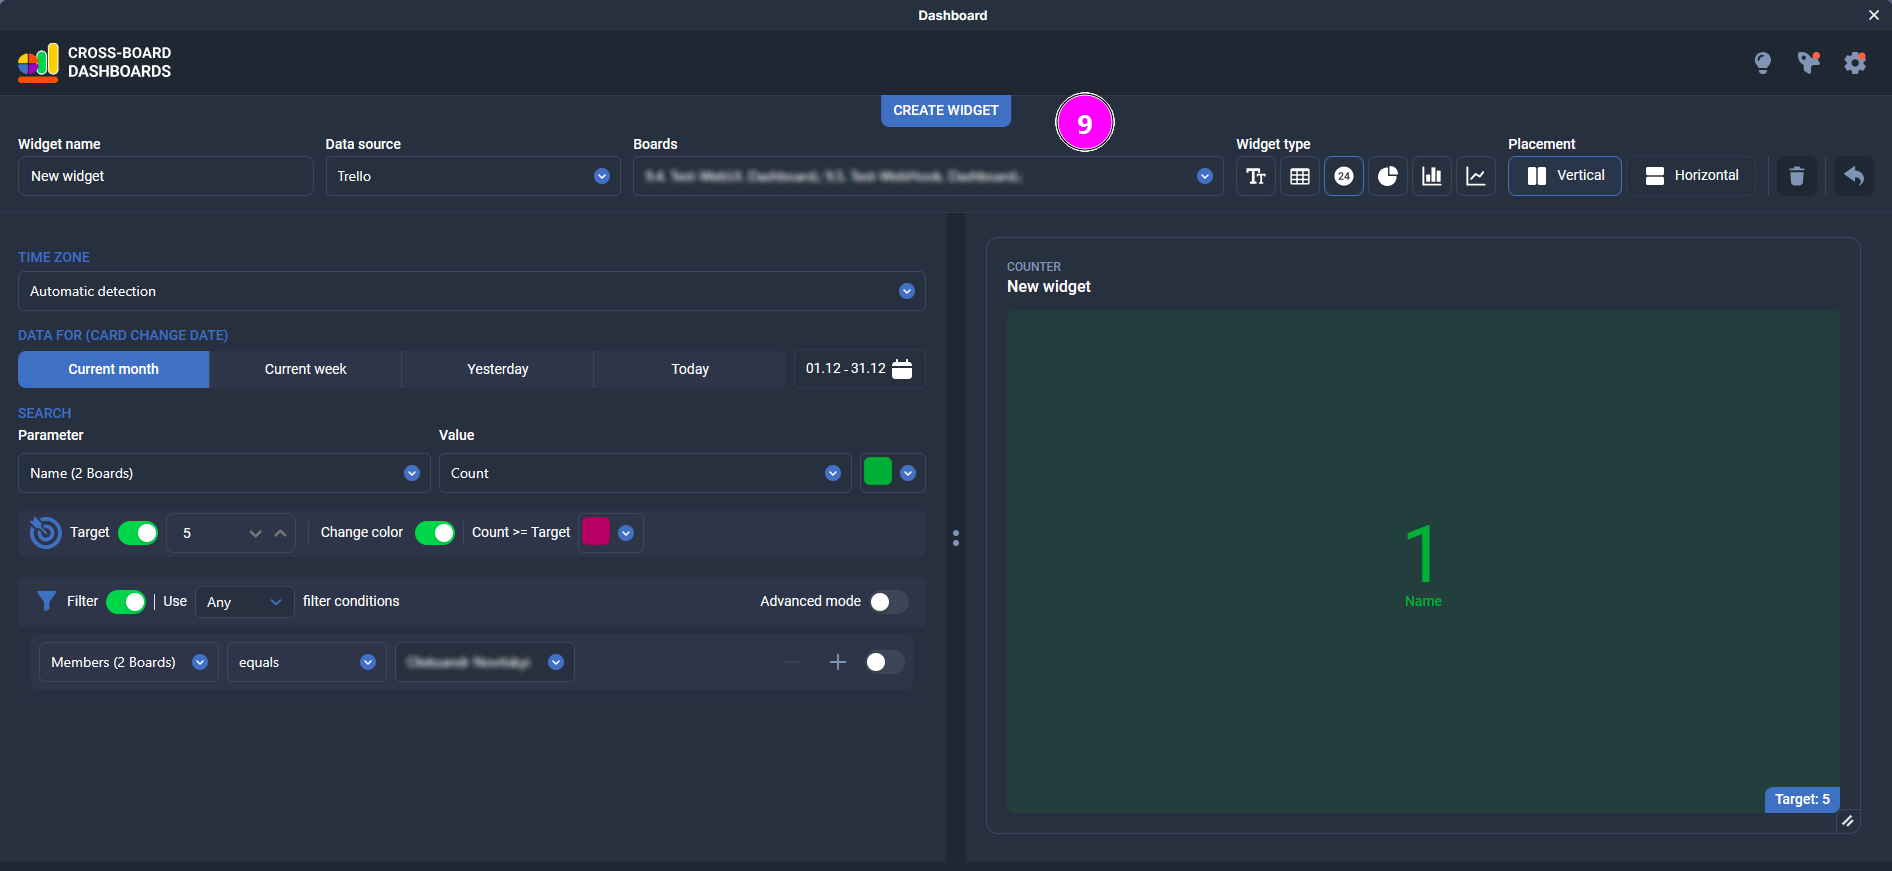
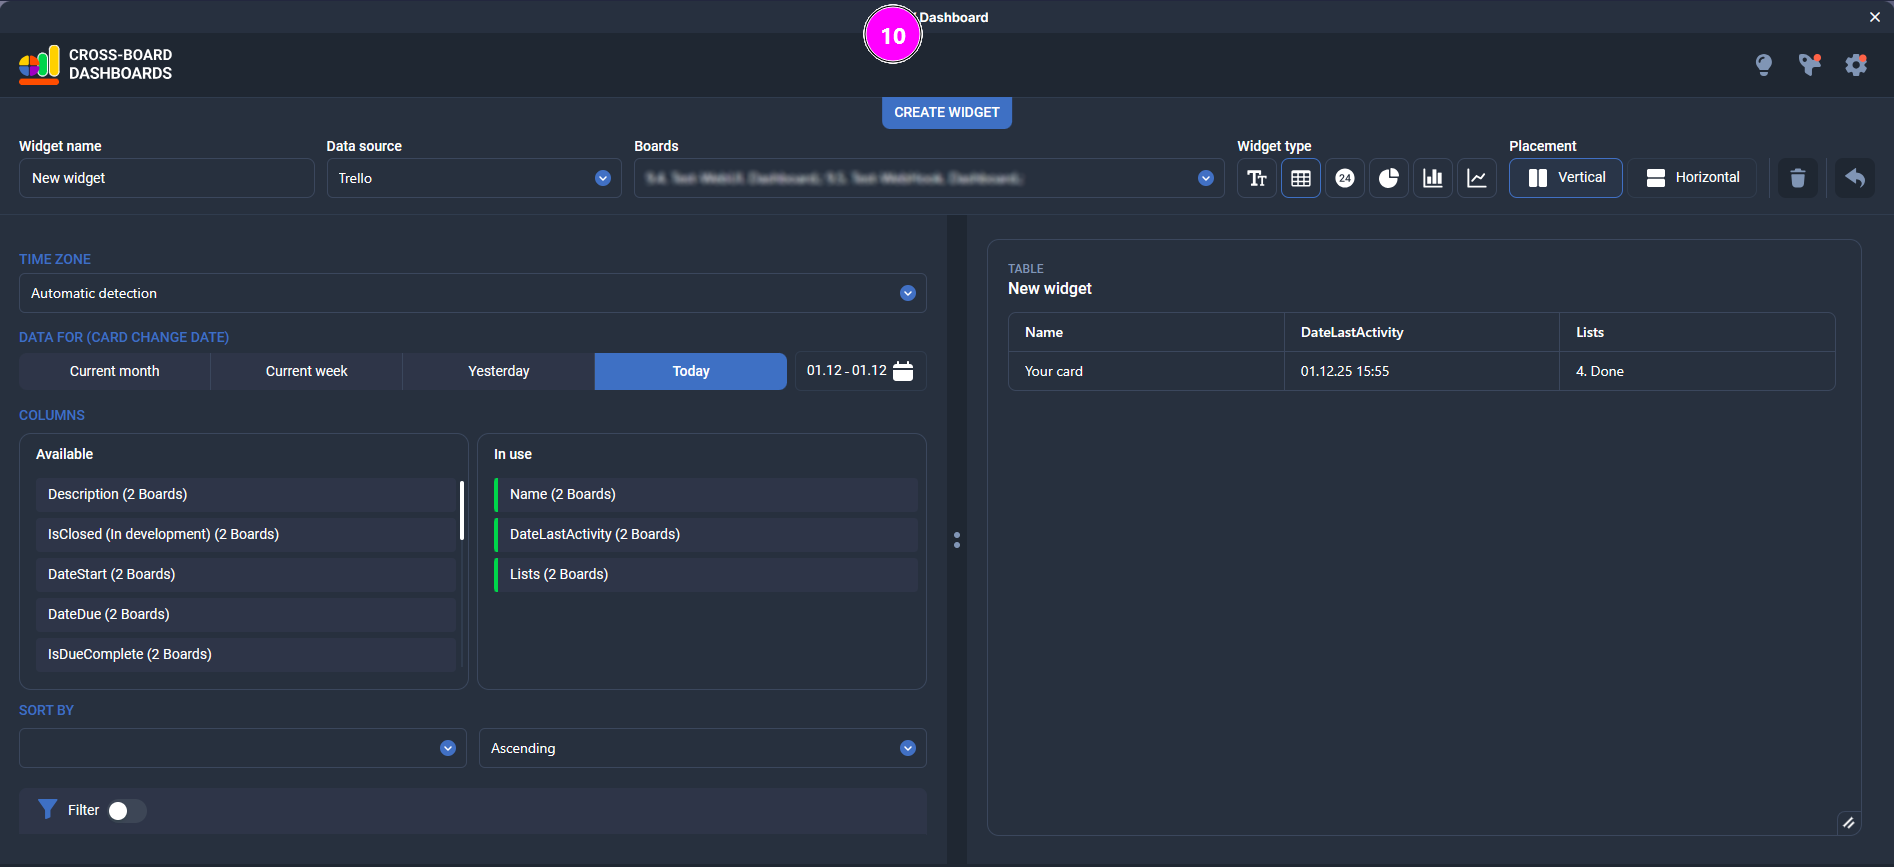
- Widget settings
In the widget settings window you define what data the widget shows and how it’s visualized. The left side contains all configuration options, the right side shows a live preview. The Placement toggle (Vertical / Horizontal) changes how these areas are arranged — one above the other or side by side, as on the screenshot.
Here you can:
set the widget name, data source and select the Trello boards to pull data from;
choose the widget type (text block, table, counter, charts) and the preview layout (Vertical / Horizontal);
configure the time zone and the period used for card changes (current month, current week, yesterday, today or a custom date range).
The Power-Up automatically detects your browser’s time zone and calculates “today/yesterday/week” and due dates accordingly. If your team spans multiple time zones, you can manually set a specific time zone for each widget so everyone sees correct local views;choose the metric (for example, number of cards) and set a Target value, with automatic color change when the target is reached;
add filters to decide which cards are included (by members, lists, labels, custom fields, etc.), in simple or advanced mode.
If the widget uses several boards, the app shows in brackets how many boards have a given field, for example: Members (2 boards). This is especially useful for custom fields with the same name on multiple boards.
There’s no separate Save button — changes are applied immediately as you adjust the settings. When you’re done, click the button in the top-right corner to return to the dashboards view.
- Table widget settings
In the table mode you choose which Trello card fields will be shown in the table and in what order.
The Available block on the left shows all standard and custom fields (Name, Lists, Labels, DateStart, DateDue, DateLastActivity, etc.).
The In use block on the right shows the columns that are already used in the table.
To add a column to the table, drag it from Available to In use.
To change the column order, simply drag the items within the In use list.At the top of the window you can also:
set the period for the card change date (today, yesterday, current week, current month or a custom date range);
choose a field to sort by in the Sort by section and set the sort direction (Ascending / Descending);
enable Filter if needed to limit which cards are included in the table.
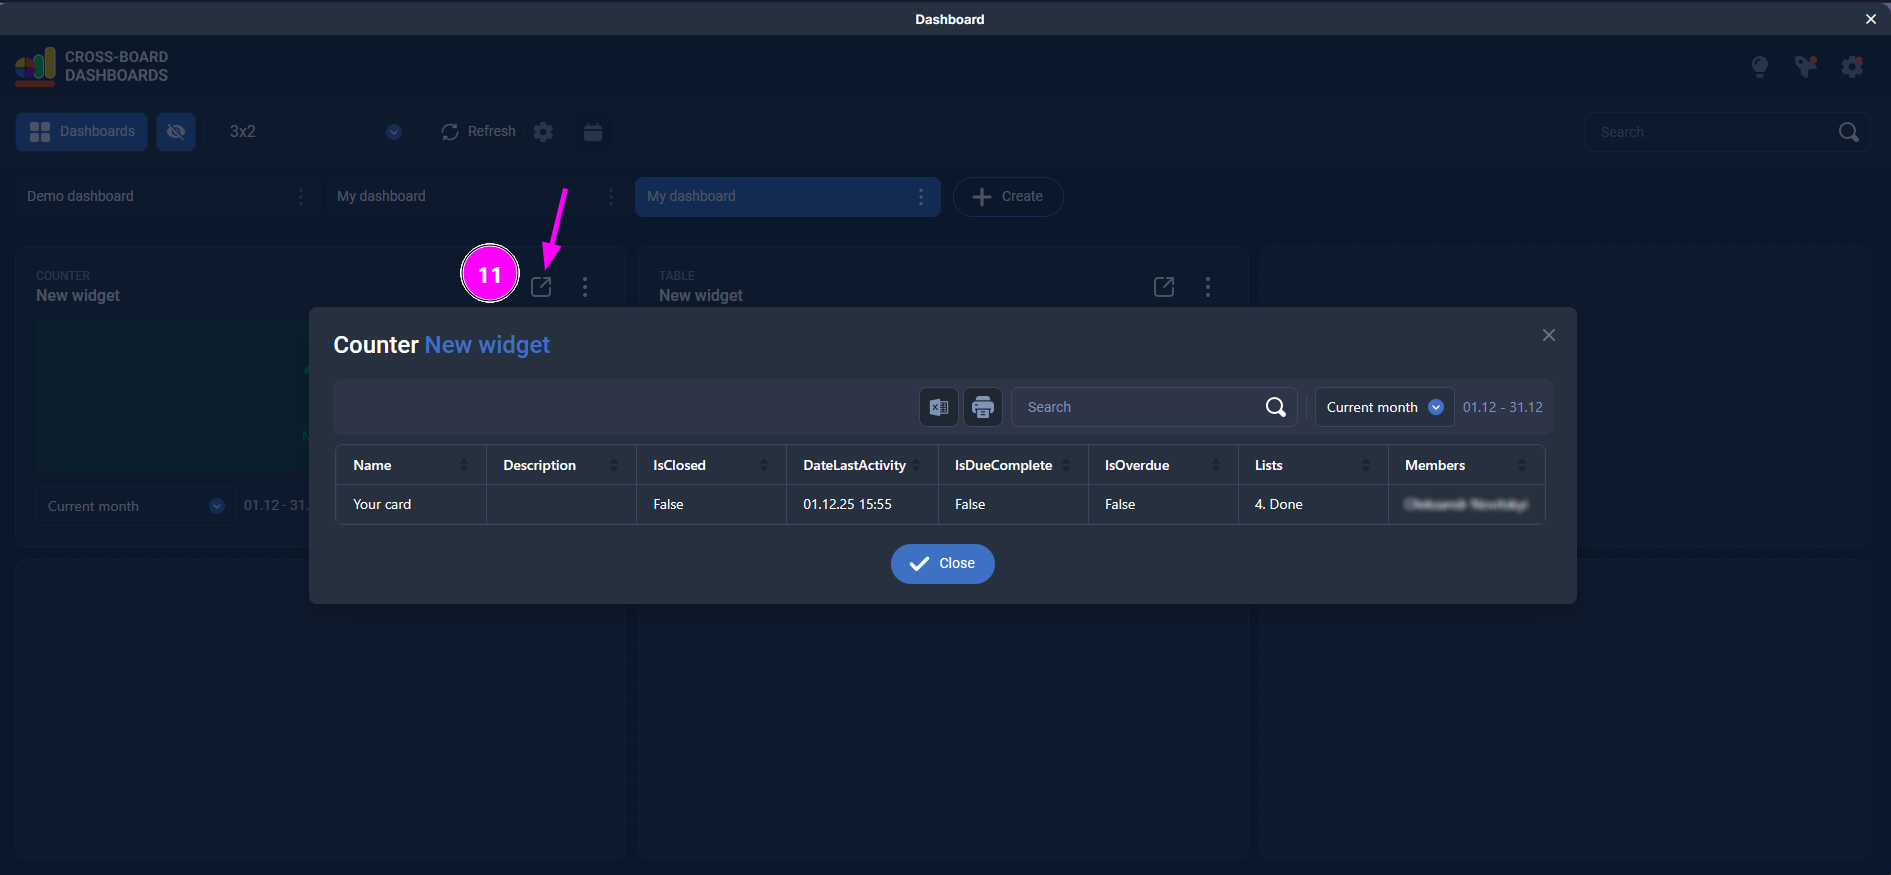
- Managing a widget on the dashboard
To resize a widget, drag it using the handle in the bottom-right corner.
To move a widget, grab its top area and drag it to any free cells in the grid.
By clicking the expand icon, you open a table with all the cards used to build this widget. There you can review, sort, and filter the data in more detail.
By clicking the three-dot menu, you can perform additional actions: rename the widget, open its settings, create a copy, move it, or delete it.

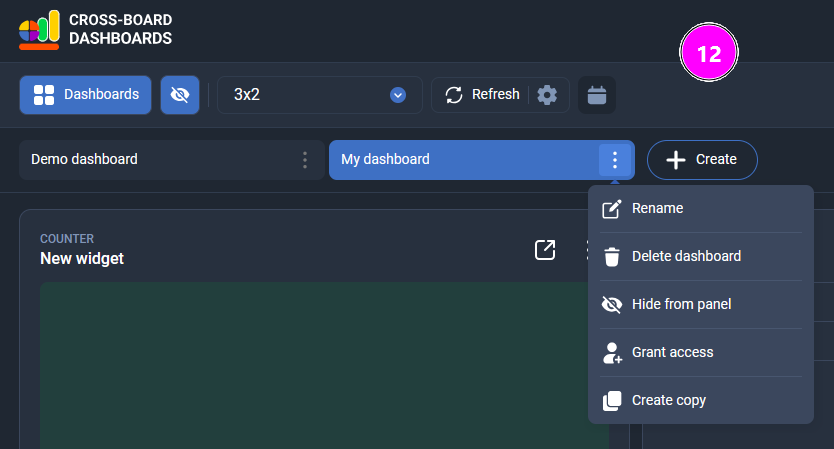
- Managing a dashboard
From the menu next to the dashboard name (three-dot icon) you can:
Rename – change the dashboard name.
Delete dashboard – permanently remove the dashboard.
Hide from panel – hide the dashboard from the top tab bar (the dashboard is not deleted and can be shown again later).
Grant access – share the dashboard with other users.
Create copy – duplicate the dashboard with all its widgets and settings.
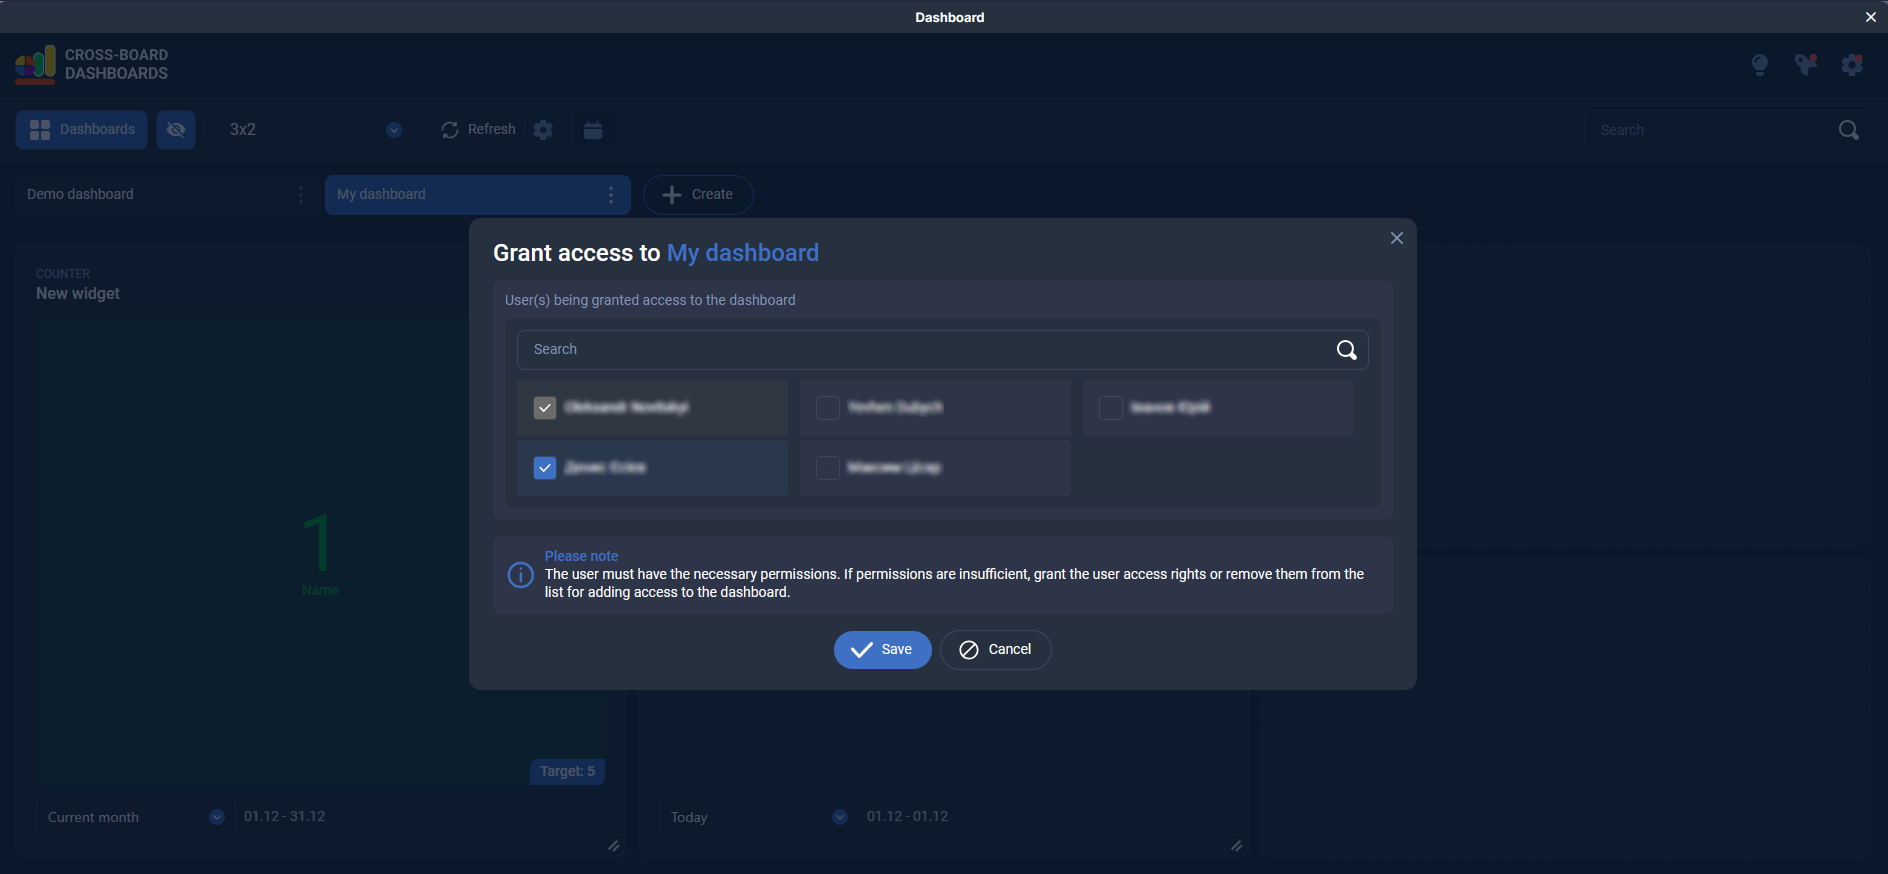
Sharing a dashboard
On some subscription plans you can share a dashboard with other members of your Trello boards.
To share a dashboard, open the three-dot menu for that dashboard and select Grant access.
In the dialog, search for and select the users you want to give access to.
A user must have the required permissions for the related Trello boards; otherwise they won’t appear in the list or won’t see all data.
The user you share the dashboard with does not need to buy a subscription. They can view the dashboards shared with them as long as the subscription of the owner who granted access remains active.
Є питання?
Задайте його нам
Проконсультуємо вас з приводу продуктів Plain&Simple Solution